Installing and Initializing Inventory
Prerequisites
The following files are required for installation:
- archive with
saf-inventorymodule files for OpenSearch - archive with
safInventorymodule files for OpenSearch Dashboards
Installation Process
Install the module on OpenSearch servers with the following command:
sudo -u opensearch $OS_HOME/bin/opensearch-plugin install file://<path to module archive>
Install the module on OpenSearch Dashboards servers with the following command:
sudo -u opensearch $OSD_HOME/bin/opensearch-dashboards-plugin install file://<path to module archive>
After installing or updating the plugin, increment build.number in $OPENSEARCH_DASHBOARDS_HOME/package.json. This clears the browser cache. Then restart the OpenSearch Dashboards service.
For details, see Installing Plugins.
Inventory Initialization
To initialize the module, go to Main menu - System Settings - Module Configuration - Inventory - Initialization:
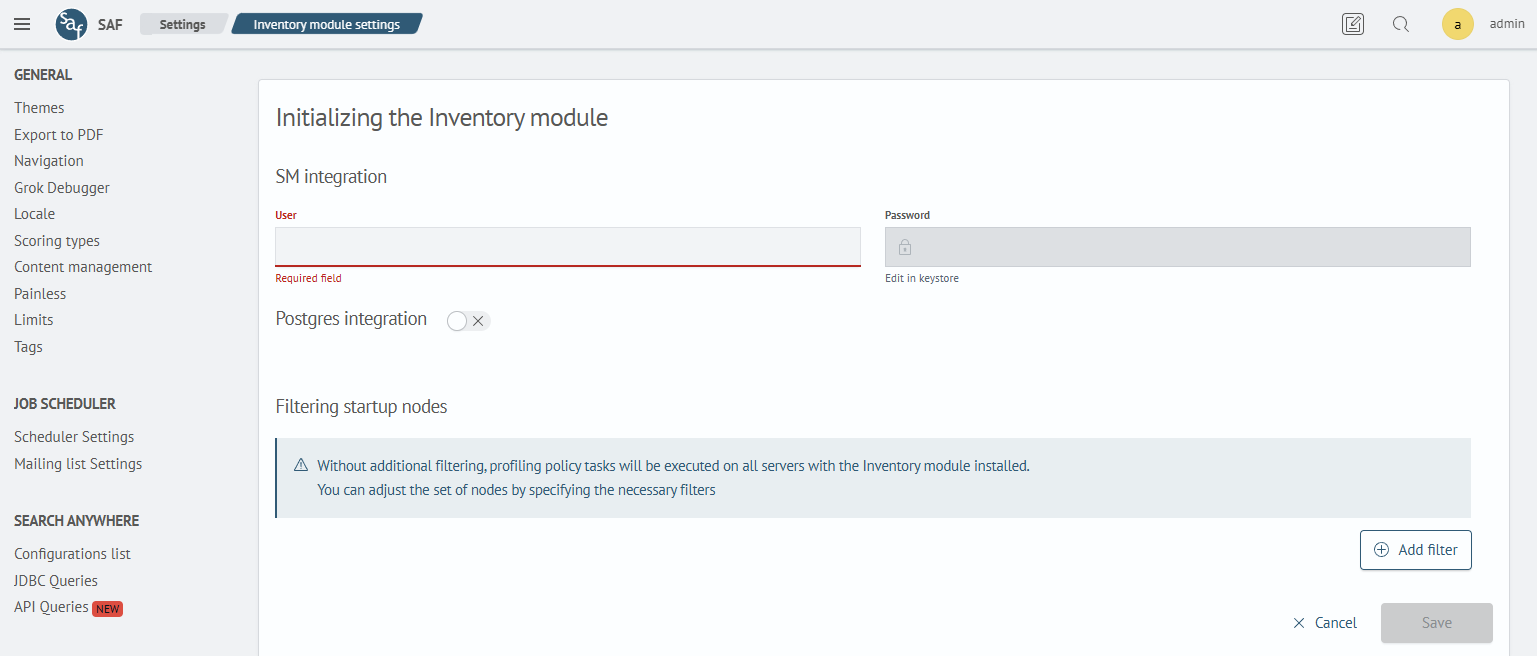
Integration with SAF
In the User field, enter the OpenSearch account name.
The Password field is non-editable and is managed via the OpenSearch keystore.
To integrate the Inventory module with SAF, add the inv.os.pass key to the keystore only on nodes where the Inventory plugin is installed.
Adding a Password to the Keystore via API Request
Open Main menu - System Settings - Dev Tools. To identify the nodes where the Inventory plugin is installed, run:
GET _cat/plugins?v&h=name,component,version
In the response, find the rows with sa-inventory in the component column and note the node names from the name column.
To view the keystore contents on the cluster nodes, run:
GET _core/keystore
The API allows modifying the keystore only for specific cluster nodes (e.g., filtered by node name mask). For details on keystore management API, refer to the dedicated article.
Add the key to the nodes with the Inventory plugin by specifying a node name or a common wildcard in the nodeid parameter:
POST _core/keystore/inv.os.pass?nodeid=<INVENTORY_NODE_NAME_OR_MASK>
{
  "value" : "<ADMIN_PASSWORD>"
}
Specify the admin user password in the value field. If the nodes cannot be selected with a single wildcard, repeat the request for each node where the Inventory plugin is installed.
Adding a Password to the Keystore Manually
Add the inv.os.pass key to the keystore on OpenSearch nodes where the Inventory plugin is installed with the following command:
sudo -u opensearch $OPENSEARCH_HOME/bin/opensearch-keystore add inv.os.pass
When prompted for the key value, enter the admin user password. Restart the OpenSearch node after running the command.
Integration with Postgres
Integration with PostgreSQL is required for the proper operation of the Inventory module in accordance with the updated calculation algorithm.
By default, the parameter is disabled—in this case, the fields are not mandatory. When the parameter is enabled, all fields become required for input
The Password parameter is non-editable and managed via the OpenSearch keystore.
To integrate the Inventory module with PostgreSQL, add the inv.pg.pass key to the keystore only on nodes where the Inventory plugin is installed. Use one of the methods described for the inv.os.pass key: via an API request or manually.
Instead of the admin user password, specify the PostgreSQL user password: in the value field when using an API request or at the command prompt when adding the key manually.
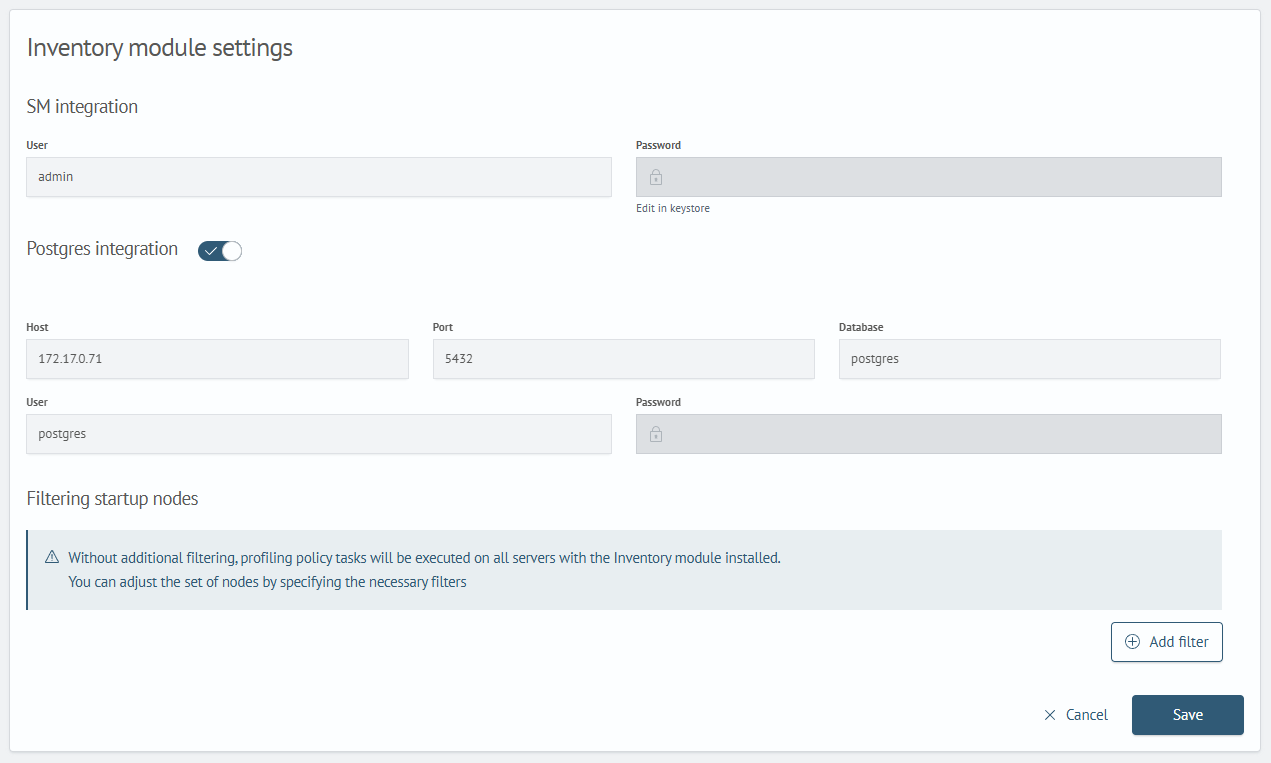
To configure the connection, fill in the following fields:
Host— database server IP addressPort— PostgreSQL connection portDatabase— database nameUser— username for the connection
Node Execution Filtering
By default, tasks run on all servers where the Inventory module is installed. Filters define the set of nodes used to run tasks. This setting is optional.
The following filter types are available:
Include— at least one condition must be metExclude— none of the conditions can be metRequire— all conditions must be met
The following attribute types are available:
Node NameHost IP AddressPublic Host IP AddressIP AddressHost NameNode IdentifierCustom Attribute
In the Value field, enter the node attribute value.
When you use Custom Attribute, a field appears for its name:

Editing Inventory Settings
After initializing the module, you can edit its parameters and add additional settings on the same tab.
Example of a completed form:
Adding a Section to the Main Menu
To add the module component to the menu, navigate to Main Menu - System Settings - Management - Navigation - JSON. Add the JSON dictionary below to the data list.
Inventory Menu
{
  "itemType": "module",
  "name": "inventory",
  "show": false,
  "id": "39afa001-b528-4488-bd55-58b09c0bded9",
  "title": "Inventory",
  "sections": [
    {
      "itemType": "page",
      "name": "inventory-configs",
      "show": true,
      "id": "f8518eba-cdf9-4341-bd14-51644f09c620",
      "title": "Assets",
      "enabled": true
    }
  ],
  "enabled": true
}
Manual moduleInventory Startup
If necessary, you can start moduleInventory manually, for example, to verify the settings or update the asset database outside the schedule. Run only one module instance on one of the nodes where the Inventory plugin is installed.
Startup Parameters
-v— display the version-log— duplicate log output to the console-with-index— use fast candidate search with partial similarity-bulk-changes— send asset changes using bulk requests
Go to the directory containing the executable and run the command as the opensearch user:
cd $OS_HOME/utils/inventory
sudo -u opensearch ./moduleInventory -log -with-index -bulk-changes
To display the version, run:
sudo -u opensearch $OS_HOME/utils/inventory/moduleInventory -v