Asset Configuration Setup
All asset configurations created before version 5.0 will use the old calculation algorithm.
More information about updating is described in the section Asset Configuration Migration
For the updated calculation algorithm to work correctly, you need to configure interaction with Postgres, described in detail here.
Description of Asset Configuration Settings
Configuration Management
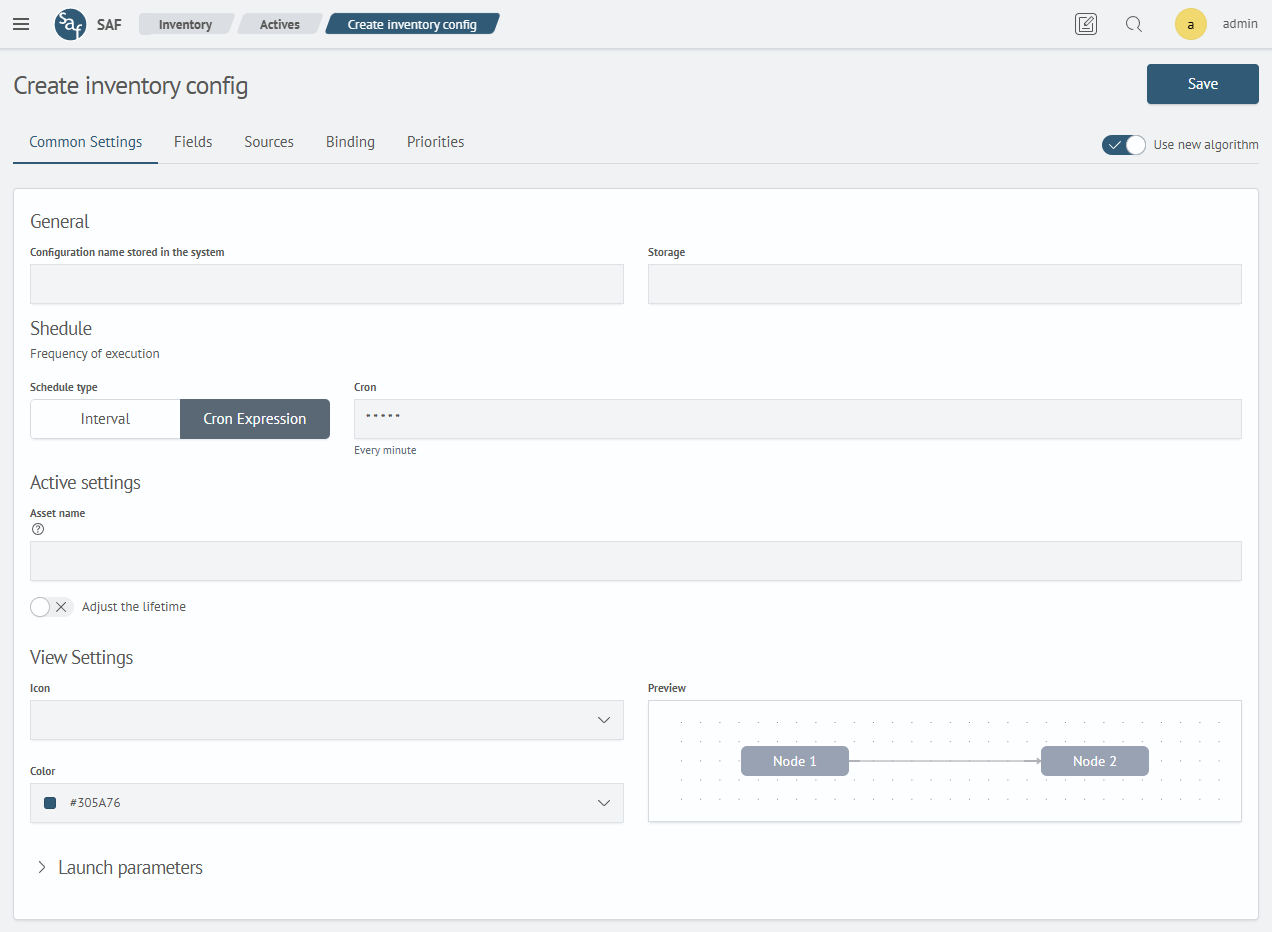
To create a new or edit an existing configuration, you need to click the Create button or in the Actions section click the Edit item. After this, a form for creating (or editing) a configuration will open:
List of settings that make up the created configuration:
General Settings- general information about the assetFields— fields that constitute the main information about the asset, divided into basic and additional fieldsSources— list of sources used to create the asset database, as well as includes creating a rule for matching source fields and basic/additional fieldsBinding— source fields where their relationship is configuredPriorities— rule that determines the priority of extracting basic/additional fields from sources
When creating a configuration, by default, the updated calculation algorithm will be used.
To select the old calculation algorithm, the Use new algorithm switch is available, which needs to be switched to inactive position.
General Settings
The general settings tab consists of the following sections:
Basic- contains settings for configuration name and storage nameSchedule- contains setting for the frequency of running background tasks to collect assets.noteThe following schedule types are available for selection:
IntervalorCron-expression.noteBasicandScheduleare mandatory fields to fill.Asset settings- contains setting for asset name and asset lifetimeDisplay Settings- contains settings for visualizing asset configuration or the assets themselves in various interface parts (image and color)Launch Parameters- contains settings used when forming the asset database (batch changes, index usage, replication usage, etc.)
The Asset name parameter supports tokens based on basic and additional fields. Usage example: $hostname$ - $os$.
In the Asset Lifetime field, you can enter an integer from 1 with a time unit specification (s - seconds, m - minutes, h - hours, d - days). The value cannot be composite. Examples: 20h, 2d, 30s.
The View Settings section and the Enable data replication to index option are available only for configurations with the updated calculation algorithm!
The launch parameter options Batch Changes, Using Index, Merge with Empty, and Fast Search Only are available only for configurations with the old calculation algorithm!
When enabling the data replication to index parameter, the asset database formed by the calculation module's background task will be copied to an index according to the structure of the old calculation algorithm.
If the index did not previously exist, it will be created automatically.
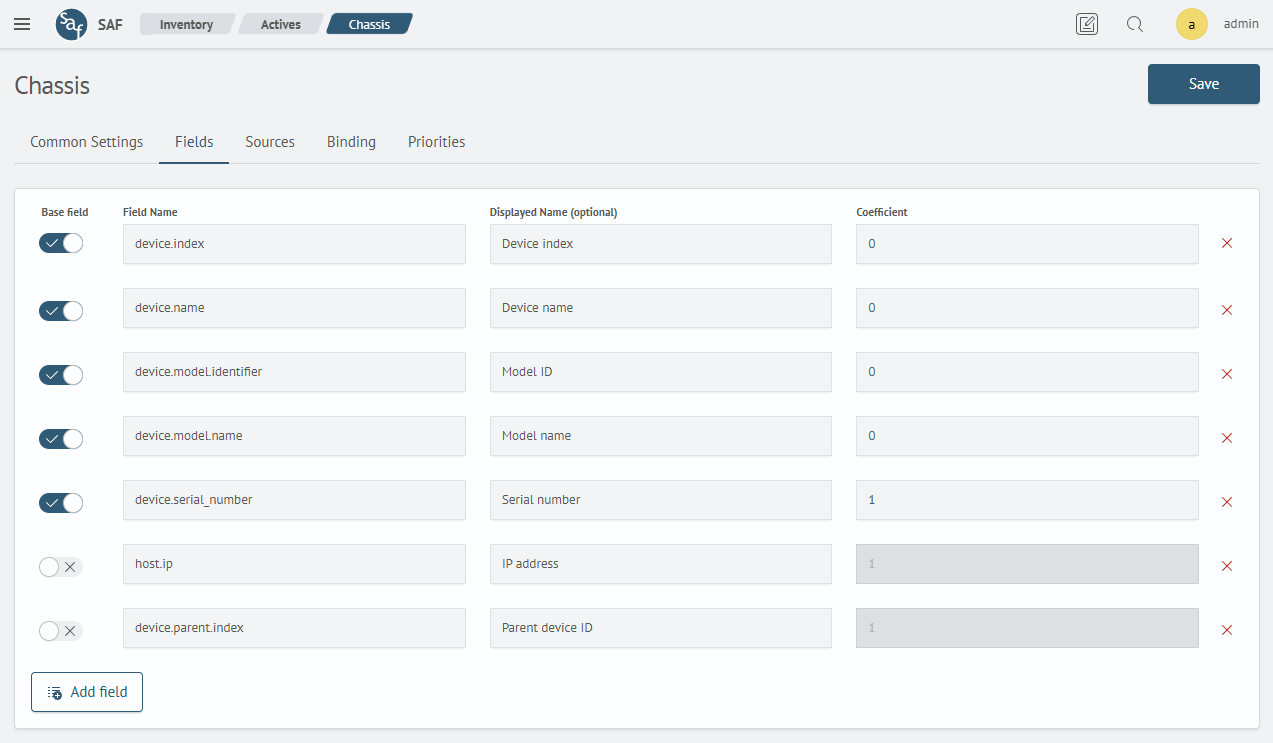
Fields
The fields tab consists of asset field settings. Each field has the following set of attributes:
-
Basic Field- flag determining whether the field is basic or additional -
Field Name- technical name of the asset field that will participate in calculations (cannot be duplicated) -
Display Name (optional)- field name displayed in interfaces -
CoefficientnoteThe basic field coefficient determines the degree of influence of the field on the similarity of two assets. It is used when an asset is obtained from source events and a decision needs to be made whether to create a new asset in the database or update an existing one. The decision is made by calculating the similarity coefficient of two assets.
Similarity is determined through similarity coefficient k calculated by the formula k = c/(a+b-c), where:
-
c - number of matching basic fields of existing and new asset
-
a - number of basic fields of existing asset
-
b - number of basic fields of new asset.
Assets are considered similar if k >= 0.5 when b <= 5 or if k >= 0.554 when b > 5. The basic field coefficient multiplies the presence of the field in sums a, b and c. If the coefficient is 0, the field is not counted in the sums. If the coefficient is 1, the field is counted in the sums once. If the coefficient is specified as n, the field will be counted in the sums n times.
-
To add a new field, use the Add Field button.
Example of added fields in the Fields tab:
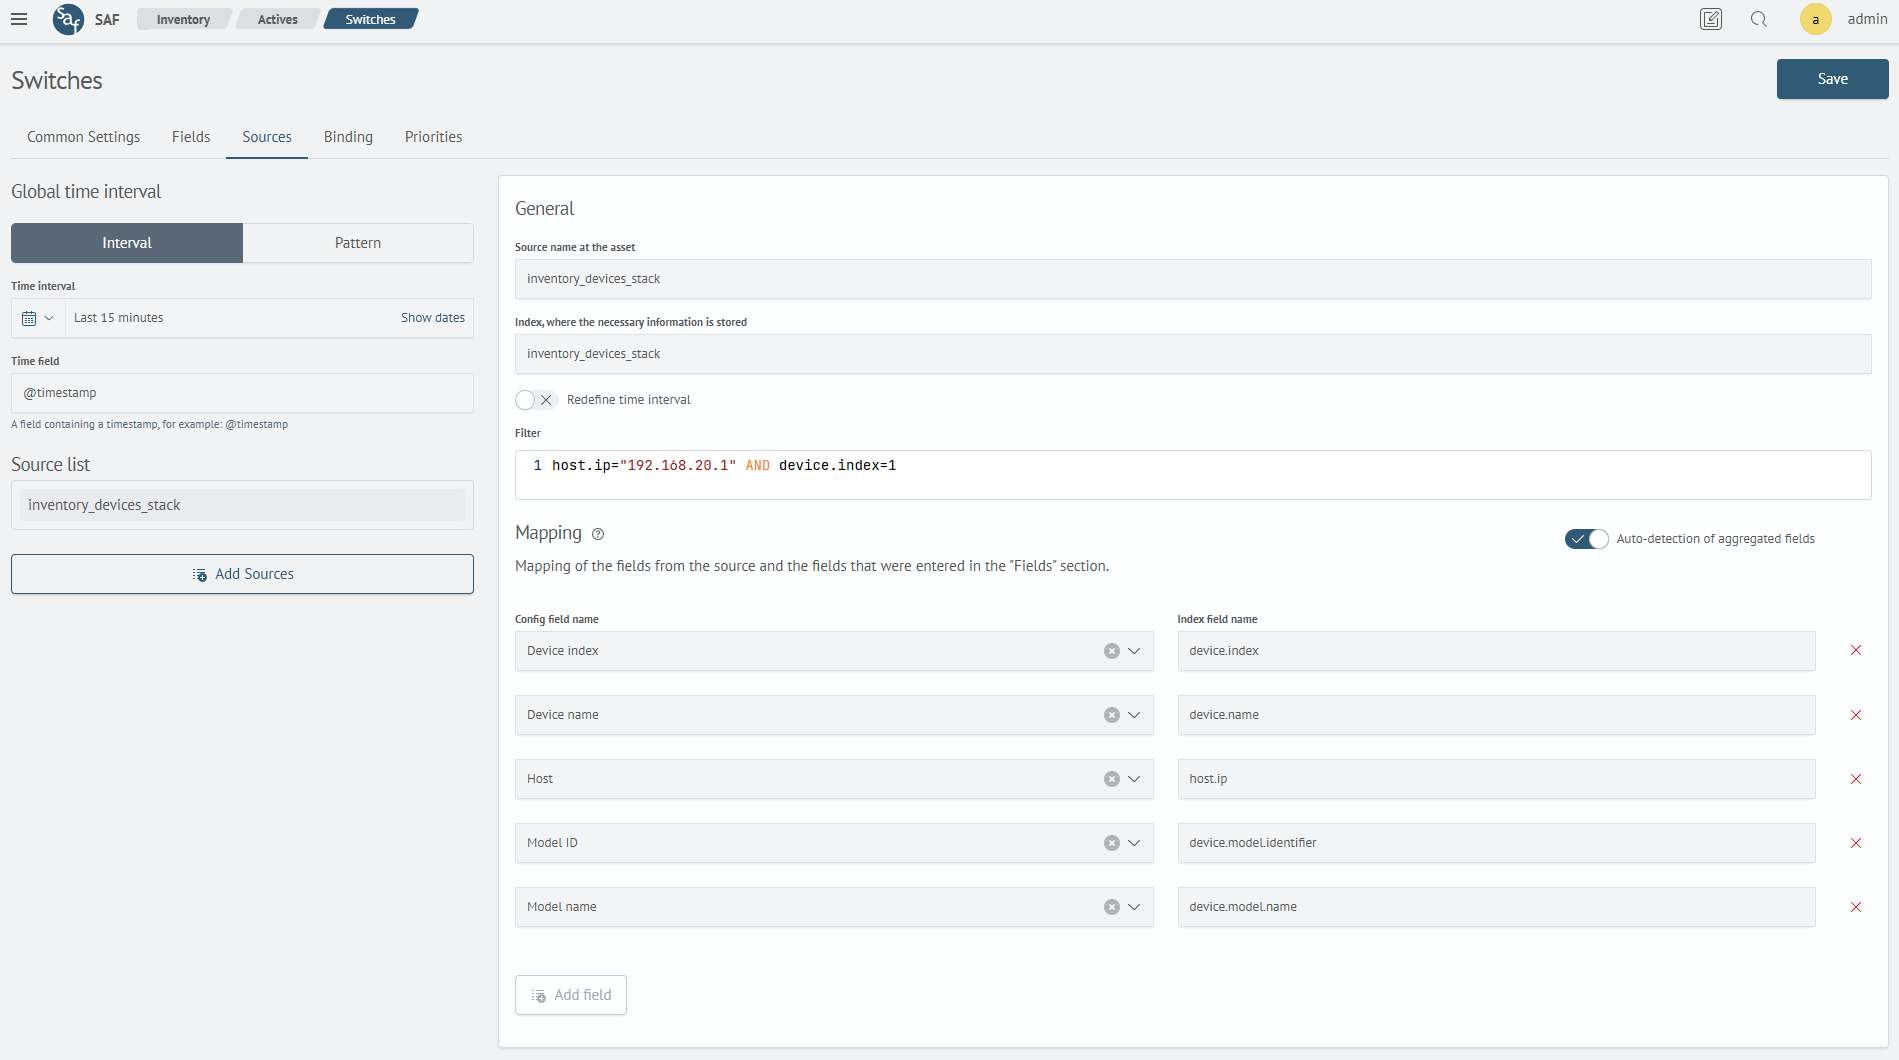
Sources
To add a source, you need to click the Add Source button, after which a submenu will appear that needs to be expanded for its setup.
Source setup consists of the following items:
-
Source name at the assets— source name -
Index— where necessary information is storedAttention!The number of configuration fields may exceed the limit of calculated fields for the index. If the number of calculated fields of the index is less than the number of asset configuration fields, you need to increase the
max_script_fieldsparameter for the index.This can be done with the following command:
PUT <index>/_settings
{
  "index" : {
    "max_script_fields" : <value>
  }
} -
Filter— expression by which filtering will be performed (in the format:<field>="value" AND/OR another expression) -
Time Interval— time interval for which data is selected from the source to limit their volumenoteThe
Time intervalfield specifies the filter interval magnitude in the form ofintervalorpatternby the@timestampfield (by default). The interval can be set globally for all sources in the configuration or individually for each source.The interval magnitude is specified as a positive number of time units, such as 90d (90 days), 24h (24 hours), 15m (15 minutes). The following time units are supported:
m- minute,h- hour,d- day,w- week,M- month,y- year. More information about time units can be found inOpenSearch documentation.If the time interval is specified in minutes, the right boundary of the filter corresponds to the current moment (
now), otherwise the right boundary equals the beginning of the previous hour (now-1h/h). The left boundary is calculated as the difference between the right boundary and the time interval.All source documents whose
@timestampis greater than or equal to the left boundary and less than or equal to the right boundary of the filter are included. -
Auto-detection of aggregated fields- when enabled, aggregated type fields will be used (default: enabled) -
Mapping— mapping by which source fields and fields specified inBasic FieldsandAdditional Fieldsparameters are matched
To add mapping, use the Add Field button.
Example of a configured source in the Sources tab:
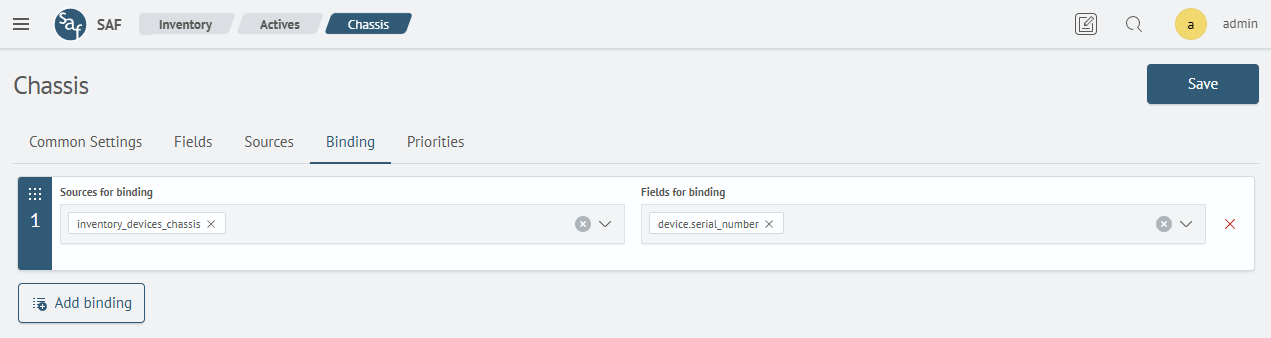
Binding
To fill in information about key fields, you need to click the Add button, after which a setup line will appear.
Key field setup consists of the following items:
Sources for Binding— which sources need to be bound, taken from theSourcestabBinding Fields— selection of fields specified inBasic FieldsandAdditional Fieldsparameters
Example of configuration binding setup:
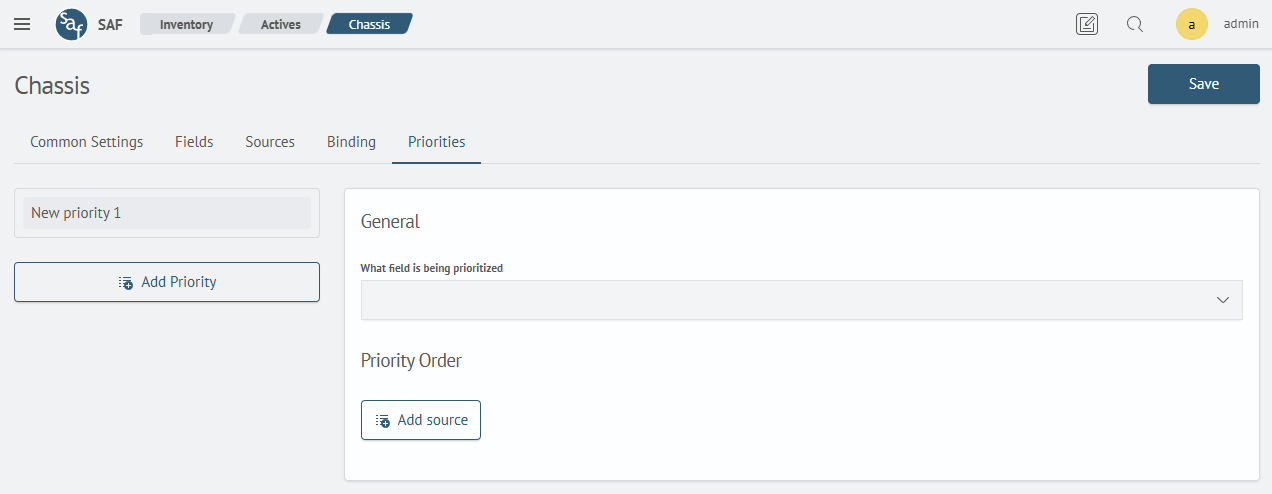
Prioritization
To fill in information about prioritization, you need to click the Add Priority button, after which a submenu will appear that needs to be expanded for its setup.
Priority setup consists of the following items:
Field— by which field priority is determinedField Extraction Order— extracting field from source according to given priority
To add a prioritization rule, click the Add Source button.
Priority Level indicates the sequential number of field extraction from the source.
The field value is primarily extracted from the source with the lowest numerical priority level value (highest priority).
When setting identical priorities, the field in the asset will be represented as an array.
Example of configured prioritization: