Updating SAF Beat Manager and SAF Beat
SAF Beat Manager must be updated first. After that, you can proceed to update SAF Beat agents. SAF Beat Manager maintains backward compatibility with previous agent versions.
Conventions:
SAF_INSTALLER- the directory where theSearch Anywhere Frameworkinstallation package is unpackedSBM_HOME- the installation directory ofSAF Beat ManagerSB_HOME- the installation directory ofSAF Beat
Updating SAF Beat Manager
Updating SAF Beat Manager and its configurations is only available manually.
- Back up the certificates and configuration of the current installation, for example, to the
/app/backupdirectory:
mkdir -p /app/backup/$(date +%Y%m%d)/sbm/
cp -r $SBM_HOME/etc/ssl /app/backup/$(date +%Y%m%d)/sbm/
cp $SBM_HOME/etc/*.yml /app/backup/$(date +%Y%m%d)/sbm/
- Stop the service and remove the existing version of
SAF Beat Manager:
systemctl stop SAFBeatManager
rm -f $SBM_HOME/SAFBeatManager*
- After unpacking the
Search Anywhere Frameworkinstaller, copy the installation file, make it executable, and remove the old configuration file:
cp $SAF_INSTALLER/utils/SAFBeatManager/SAFBeatManager-* $SBM_HOME/SAFBeatManager
chmod +x $SBM_HOME/SAFBeatManager
rm $SBM_HOME/etc/SAFBeatManager.yml
rm $SBM_HOME/etc/config.yml
- Install
SAF Beat Manager, restart the service, and then immediately stop it:
$SBM_HOME/SAFBeatManager remove
$SBM_HOME/SAFBeatManager install
systemctl restart SAFBeatManager
systemctl stop SAFBeatManager
Starting from version 4.2.0, the configuration file name has changed from SAFBeatManager.yml to config.yml. If config.yml exists, it will be used. If it doesn't exist, SAFBeatManager.yml might be used. The configuration syntax has changed; it is recommended to transfer the settings to the new configuration file.
- Compare the old configuration file
SAFBeatManager.ymland the newconfig.yml:
diff /app/backup/$(date +%Y%m%d)/sbm/SAFBeatManager.yml $SBM_HOME/etc/config.yml
- Transfer the necessary settings from the old file to the new one and restart the service:
systemctl restart SAFBeatManager
Updating SAF Beat for Linux
- Back up the certificates and configuration of the current installation, for example, to the
/app/backupdirectory:
mkdir -p /app/backup/$(date +%Y%m%d)/sb/
cp -r $SB_HOME/cert /app/backup/$(date +%Y%m%d)/sb/
cp $SB_HOME/config/*.yaml /app/backup/$(date +%Y%m%d)/sb/
- Stop the service and remove the existing version of
SAF Beat:
systemctl stop SAFBeat
rm -f $SB_HOME/SAFBeat*
- After unpacking the
Search Anywhere Frameworkinstaller, copy the installation file, make it executable, and remove the old configuration file:
cp $SAF_INSTALLER/utils/SAFBeat/SAFBeat-linux-x64-* $SB_HOME/SAFBeat
chmod +x $SB_HOME/SAFBeat
rm $SB_HOME/config/config.yaml
- Install
SAF Beat, restart the service, and then immediately stop it:
$SB_HOME/SAFBeat remove
$SB_HOME/SAFBeat install
systemctl restart SAFBeat
systemctl stop SAFBeat
- Compare the old configuration file
config.yamland the new one:
diff /app/backup/$(date +%Y%m%d)/sb/config.yaml $SB_HOME/config/config.yaml
- Transfer the necessary settings from the old file to the new one and restart the service:
systemctl restart SAFBeat
Updating SAF Beat for Windows
To update the agent on Windows, you must first uninstall it. However, uninstalling will affect the entire installation directory, so back up all necessary files beforehand. When installing from the command line or PowerShell, the installation command with the list of parameters can be left unchanged.
-
Back up the certificates (usually
C:\Program Files\SAFBeat\cert\) and the configuration of the current installation (usuallyC:\Program Files\SAFBeat\config\config.yaml) -
Uninstall the old agent through "Add/Remove Programs" in Windows
Control Panel -
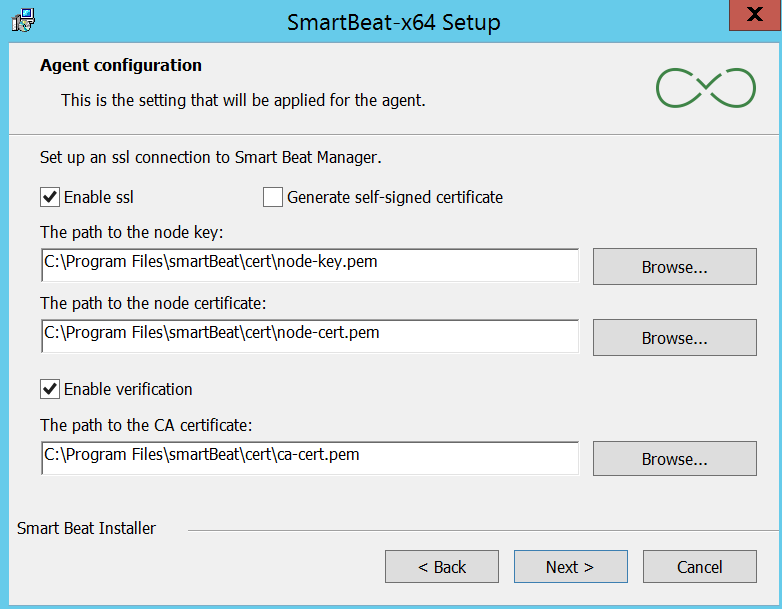
Install
SAF Beat. Pay attention to the SSL/TLS settings window; you can specify the certificates copied before the update. If you check theGenerate self-signed certificatebox, new self-signed certificates will be generated (if none exist)