Updating Search Anywhere Framework
This instruction describes the process of updating Search Anywhere Framework from version 5.0.* to 5.1.*.
For proper operation of notes and other features, you must:
- Create the
$OS_HOME/uploadsdirectory on SA Data Storage nodes - Set ownership to the user running SA Data Storage
- Mount a shared network folder to this directory
Refer to the configuration guide for setup instructions.
Information
Conventions:
SAF_INSTALLER- the directory where theSearch Anywhere Frameworkversion 5.1 installation package is unpackedUSER- a system user with administrator rights, usuallyadminOS_HOME- the OpenSearch home directory, usually/app/opensearch/OS_DATA- the directory where indexed data is stored, usually/app/data/opensearchOS_IP- IP address of one of the OpenSearch cluster serversOSD_HOME- the OpenSearch Dashboards home directory, usually/app/opensearch-dashboards/PATH_SSL- the location of the certificate, theadminprivate key, and theca-cert, usually/app/opensearch/config/
The first step in updating is to determine the currently installed version of Search Anywhere Framework. This can be done by viewing the module versions on the main page or by running the following command in the command line:
curl https://$OS_IP:9200/_cat/plugins -k -u $USER
After entering this command, you will need to enter the password for the $USER account. It is recommended to use the admin user.
A detailed list of new features can be found in the article What's New in SAF 5.1.
Let's consider the update procedure for each component. The 5.1 installer needs to be unpacked into a directory, for example, /app/distr/.
Before starting work, it is strongly recommended to back up the main configuration files and Security settings.
After completing the update, be sure to update SAF Beat Manager. The RestAPI has been updated without backward compatibility, so in the menu item Main Menu - System Settings - SAF Beat Management, the agent list will be empty. Use the SAF Beat Manager update instructions.
Recommended Actions
It is recommended to create a directory, for example, /app/backup, where you should save:
- The
configdirectory, usually$OS_HOME/configor$OSD_HOME/config - The
systemdfiles, usually/etc/systemd/system/opensearch.serviceand/etc/systemd/system/opensearch-dashboards.service,/etc/systemd/system/sme-re.service - The file
/etc/sysctl.d/00-opensearch.conf - A copy of the Security settings. This needs to be done once, and requires the certificate and private key of the admin user. (The command below will create a directory with the current date containing the OpenSearch security settings.)
  chmod +x $OS_HOME/plugins/opensearch-security/tools/securityadmin.sh
  JAVA_HOME=$OS_HOME/jdk/ $OS_HOME/plugins/opensearch-security/tools/securityadmin.sh -backup /app/backup/security_$(date +%Y%m%d) \
  -icl \
  -nhnv \
  -cacert $OS_HOME/config/ca-cert.pem \
  -cert $OS_HOME/config/admin-cert.pem \
  -key $OS_HOME/config/admin-key.pem
Actions before updating
Adding the settings menu
In Search Anywhere Framework 5.1.0, the ability to configure availability for menu items System Parameters was added. Before migration, you need to add a JSON object to the menu. To do this, open the menu settings (Main Menu - System Parameters - Management - Menu Settings), go to the JSON Structure tab and add at the very end with a comma before the closing square bracket the following object:
{
            "enabled": true,
            "id": "ie8fa5171-24a8-11f0-8733-23f302e3ac2f",
            "name": "system-params",
            "title": "Settings",
            "itemType": "group",
            "sections": [
              {
                "enabled": true,
                "id": "i06a36591-24a9-11f0-8733-23f302e3ac2f",
                "name": "smdevtools",
                "title": "Dev Console",
                "itemType": "page"
              },
              {
                "enabled": true,
                "id": "i282fce61-24a9-11f0-8733-23f302e3ac2f",
                "name": "smart-beats-management",
                "title": "SAF Beat Management",
                "itemType": "page"
              },
              {
                "enabled": true,
                "id": "i44404121-24a9-11f0-8733-23f302e3ac2f",
                "name": "opensearch_index_management_dashboards",
                "title": "Index Management",
                "itemType": "page"
              },
              {
                "enabled": true,
                "id": "i57d141d1-24a9-11f0-8733-23f302e3ac2f",
                "name": "smmanagement",
                "title": "Management",
                "itemType": "page"
              },
              {
                "enabled": true,
                "id": "i69291b61-24a9-11f0-8733-23f302e3ac2f",
                "name": "security",
                "title": "Security",
                "itemType": "page"
              }
            ]
          }
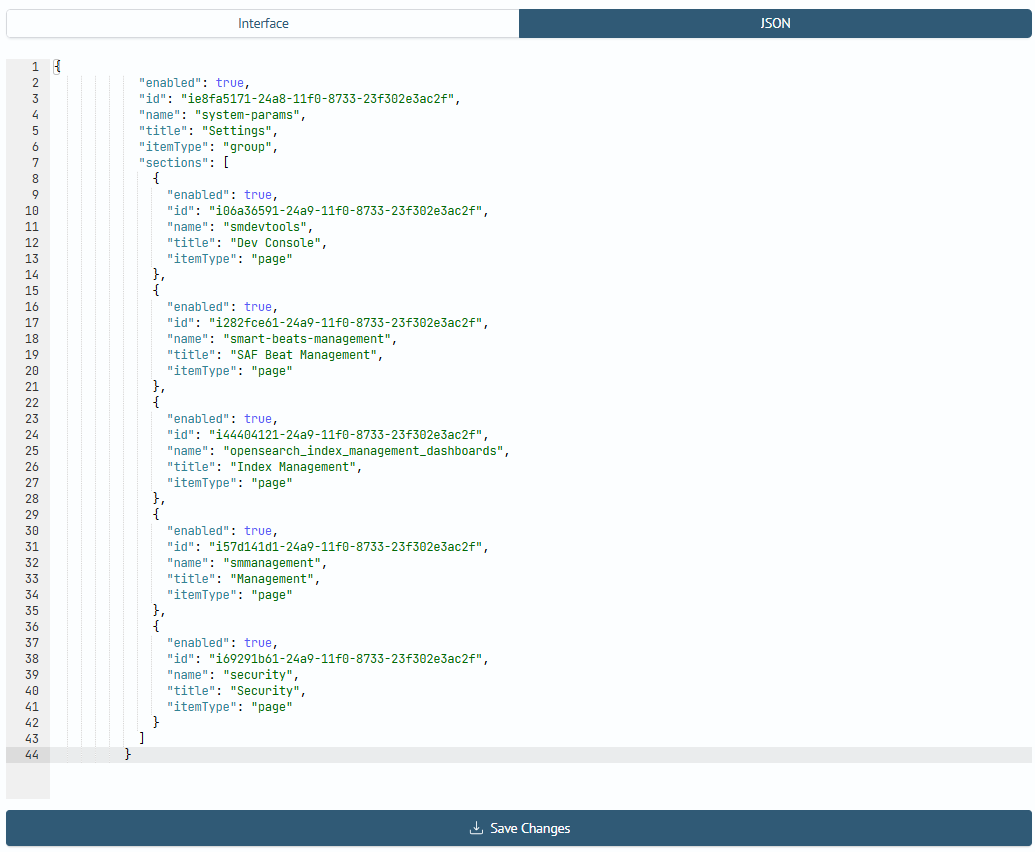
The menu structure can also be modified via the terminal. To do this, run the following command to retrieve the current menu (it is recommended to use the admin user):
curl -k -u admin -XGET https://$OS_IP:9200/_core/nav_settings -o menu.json
When adding a menu via the terminal, pay attention to the structure of the resulting menu.json.
A file named menu.json containing the current menu structure will appear in the current directory. Open the menu.json file and add the JSON object above with a trailing comma right before the closing square bracket. Save the modified file and run:
curl -XPUT "https://$OS_IP:9200/_core/nav_settings" \
     -k -u admin \
     -d "@menu.json" \
     -H "Content-Type: application/json"
Adding a Role and User
This step is recommended but optional for the update process.
We recommend creating a dedicated role and user for self-monitoring connections.
-
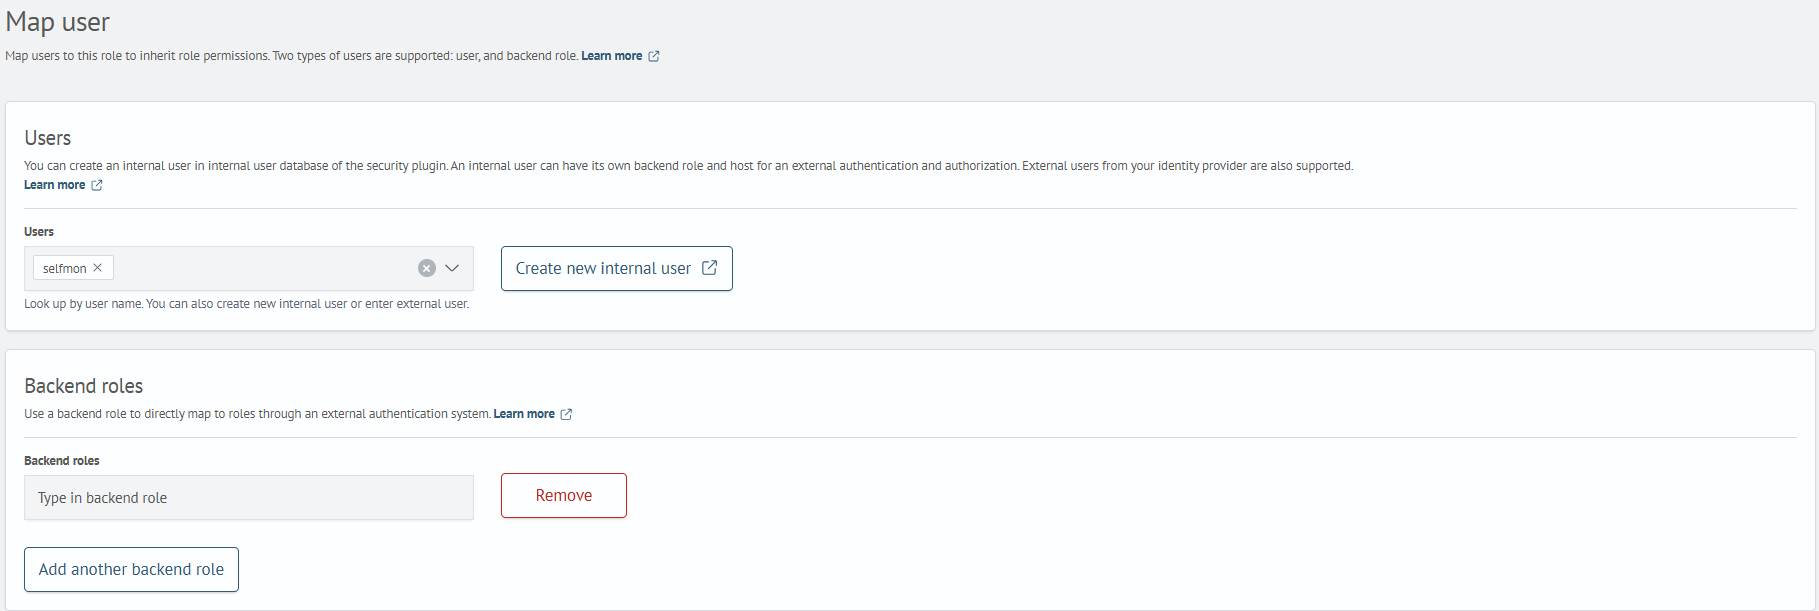
Create the
selfmonuser:- navigate to role settings:
Main Menu-Settings-Security-Internal users - click
Create Internal User - in the
Usernamefield, enterselfmon - generate a strong passphrase in the
Enter passwordandRe-enter passwordfields - click
Create
- navigate to role settings:
-
Create the
sa-monitoringrole:- navigate to role settings:
Main Menu-Settings-Security-Roles - click
Create Role - enter
sa-monitoringin theNamefield - under
Cluster Permissions, add the following permissions:cluster:monitor/maincluster:monitor/statecluster:monitor/nodes/infocluster:monitor/nodes/statscluster:monitor/health
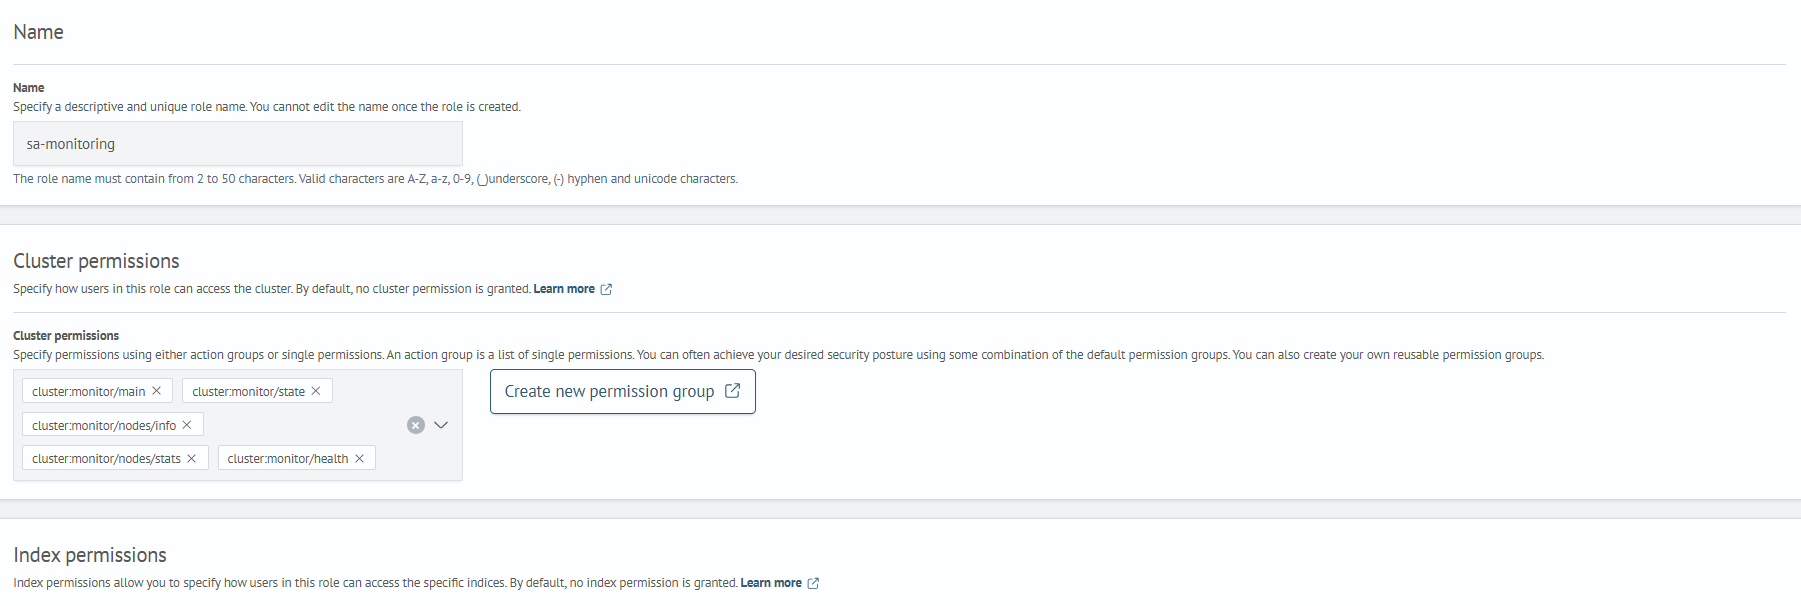
- click
Create
- navigate to role settings:
-
Assign the user to the role:
- open the newly created role and go to the
Mapped userstab - click
Map Users - select the
selfmonuser from theUserdropdown and clickMap
- open the newly created role and go to the
Updating OpenSearch
The Search Anywhere Framework 5.1 installer needs to be unpacked into a directory, for example, /app/distr/. The location where you unpack the archive contents will be referred to as $SAF_INSTALLER.
tar xzf smart-monitor-installer-*.tar.gz -C /app/distr/
SAF_INSTALLER=/app/distr/saf_5.1
For clusters consisting of multiple nodes, it is recommended to disable allocation before upgrading. This can be done through the developer console (Main Menu - System Settings - Dev Console) by executing the following command:
PUT _cluster/settings
{
  "persistent": {
    "cluster.routing.allocation.enable": "none"
  }
}
The same can be done from the terminal with the following command:
curl -XPUT -k -u admin "https://$OS_IP:9200/_cluster/settings?pretty" -H "Content-Type: application/json" -d '{"persistent":{"cluster.routing.allocation.enable": "none"}}'
When upgrading cluster nodes, do not use the update script to disable allocation. After upgrading all cluster nodes, enable allocation:
PUT _cluster/settings
{
  "persistent": {
    "cluster.routing.allocation.enable": "all"
  }
}
The same can be done from the terminal with the following command:
curl -XPUT -k -u admin "https://$OS_IP:9200/_cluster/settings?pretty" -H "Content-Type: application/json" -d '{"persistent":{"cluster.routing.allocation.enable": "all"}}'
Automatic Mode
The script requires the following pre-installed packages:
curlzipunzip
If you do not see the message indicating that Search Anywhere Framework has been updated at the end, do not rerun the update script. Take a screenshot of where the script stopped and contact technical support.
The automatic update script automates the update process and is located at $SAF_INSTALLER/opensearch/update.sh. You can specify a configuration file $SAF_INSTALLER/opensearch/example_config_opensearch.yaml when calling the script. The file format is YAML and is similar to the configuration file used during installation.
The update script supports the following launch parameters:
-c, --config <path_to_config_file_yaml>- specify the configuration file for the update-h, --help- displays help information about available commands
Start the upgrade with nodes that do not have the master role. Data nodes can connect to older versions of master nodes, but not vice versa.
To start the update, run the script:
$SAF_INSTALLER/opensearch/update.sh
After launching, the script automatically finds the paths to the main directories:
OpenSearch Home Directory- the OpenSearch installation directory, usually/app/opensearchOpenSearch Conf Directory- the OpenSearch configuration files directory, usually/app/opensearch/config/OpenSearch Data Directory- the data directory, usually/app/data/OpenSearch Logs Directory- the logs directory, usually/app/logs/
The update script does not perform any actions with the data and logs directories. The configuration files directory and systemd files will be saved to a temporary directory $SAF_INSTALLER/opensearch/staging/.
If you run the script again, the staging directory will be cleared.
================================================================================
SEARCH ANYWHERE FRAMEWORK UPDATE SCRIPT - OPENSEARCH
================================================================================

Current working directory: /app/distr/saf_5.1/opensearch

Current name of install's archive: opensearch-2.18.0-linux-x64.tar.gz

New version OpenSearch: 2.18.0

================================================================================
-- STEP 1. INSTALLATION DIRECTORIES

opensearch.service file found. Will get necessary paths from there

Final Opensearch home directory: /app/opensearch
Final Opensearch conf directory: /app/opensearch/config
Final Opensearch data directory: /app/data/opensearch
Final Opensearch logs directory: /app/logs/opensearch
Is this correct? [y/n]:
After entering the directories, you need to confirm the automatically found data by pressing y, or enter your directories manually by pressing n.
At the second step, you need to answer the question about user usage during the update. If no information output is required, enter n; if additional information output is required, enter y.
The user can be used either for information output or for allocation management, consequently requiring different permission sets. For simple information output, the permissions of the sa-monitoring role are sufficient.
-- STEP 2. GET USER

Do you want to see cluster information or manage allocation? [Y/n] :

Your account must have role "sa-monitoring"
Your account must have permission "cluster:admin/settings/update" for manage allocation
================================================================================

Enter username: admin
Enter password for user "admin":
Is this correct? [y/n]:
At the next step, you can disable all operations requiring privilege escalation to root user rights during the update.
A complete update cannot be performed without root privileges. You must:
- Execute some operations as the
rootuser - Then run the installer as the OpenSearch operating user
- After the script completes, perform additional operations again as
rootThe list of required operations will be displayed in the installer.
Failure to execute these commands before updating may result in data loss.
To launch the installer as the opensearch user, use this command:
sudo -u opensearch $SAF_INSTALLER/opensearch/update.sh
The first prompt will ask about disabling commands requiring root privilege escalation.
Next, you'll need to enter the user and group under which OpenSearch operates.
Following this, information will be displayed listing operations that must be performed before running the update script.
-- STEP 3. DISABLE OPERATIONS WHERE ROOT RIGHTS ARE REQUIRED

Want to update Search Anywhere Framework without root privileges? [y/N]: y

Final you set the non-root flag to: y

Linux username for Search Anywhere Framework [opensearch]:
Linux groupname for Search Anywhere Framework [opensearch]:

Final Search Anywhere Framework username: opensearch
Final Search Anywhere Framework groupname: opensearch
Is this correct? [Y/n]:

ATTENTION!
Before updating Search Anywhere Framework, you must run the following commands as a user with root privileges.
If yo need to disable allocation, run the following command:

curl -XPUT -k -u YOUR_USER_OPENSEARCH:YOUR_USER_OPENSEARCH_PASSWORD_HERE "https://YOUR_IP_OPENSEARCH:9200/_cluster/settings?pretty" -H "Content-Type: application/json" -d '{"persistent":{"cluster.routing.allocation.enable": "none"}}'

Change user, group and directories as needed

systemctl stop sme-re
systemctl stop opensearch
chown -R opensearch:opensearch /app/opensearch /app/opensearch/config /app/data/opensearch /app/logs/opensearch /app/distr/saf_5.1/opensearch

!!! Are you sure you have done everything from the list above? [y/N]:
At the final step, you must confirm that all commands were executed as the root user. Enter y to confirm, otherwise the update will be aborted.
At the next step, if you chose to use a user during the update, you need to answer the allocation question. If you enter y, the script will:
- Disable allocation before updating
- Re-enable it after completing the script operations
-- STEP 4. CONFIGURE ALLOCATION

Do you want to disable allocation during update? [y/N]: n

You don't want to disable allocation: n
Is this correct? [y/n]:
Then preparatory actions will be performed before the update. Before applying the update, a confirmation prompt will appear - until this point, no changes are made to the system. Additionally, some information about the current node and the cluster as a whole will be displayed, if you selected to use a user during the update at step two.
get current list of plugins
sm-core
sm-im
sm-inventory
sm-ism-action-clickhouse
sm-job-scheduler
sm-job-scheduler-actions-incident
sm-job-scheduler-actions-mitre
sm-knowledge-center
sm-mitre
sm-mssp
sm-rsm
sm-uba
sme
opensearch-security
Information about current node OpenSearch:
{
  "name" : "smos-node-00",
  "cluster_name" : "smos-cluster",
  "cluster_uuid" : "yKPPDCHGSA6rHQT948jokQ",
  "version" : {
    "distribution" : "opensearch",
    "number" : "2.18.0",
    "build_type" : "tar",
    "build_hash" : "99a9a81da366173b0c2b963b26ea92e15ef34547",
    "build_date" : "2024-10-31T19:08:39.157471098Z",
    "build_snapshot" : false,
    "lucene_version" : "9.12.0",
    "minimum_wire_compatibility_version" : "7.10.0",
    "minimum_index_compatibility_version" : "7.0.0"
  },
  "tagline" : "The OpenSearch Project: https://opensearch.org/"
}

!!! AT THIS POINT WE START TO MAKE CHANGES IN OPERATING SYSTEM !!!
Do you want to continue? [y/N]:
Pressing Enter will interrupt the update; press y to continue.
Upon successful completion of the update, you should see the message SEARCH ANYWHERE FRAMEWORK SUCCESSFULLY UPDATED!. Preliminary information about the cluster and current node will be displayed, if you selected to use a user during the update at step two.
-- STEP 10. PRINT INFORMATION
current state of cluster
{
  "cluster_name" : "smos-cluster",
  "status" : "yellow",
  "timed_out" : false,
  "number_of_nodes" : 1,
  "number_of_data_nodes" : 1,
  "discovered_master" : true,
  "discovered_cluster_manager" : true,
  "active_primary_shards" : 50,
  "active_shards" : 50,
  "relocating_shards" : 0,
  "initializing_shards" : 0,
  "unassigned_shards" : 15,
  "delayed_unassigned_shards" : 0,
  "number_of_pending_tasks" : 0,
  "number_of_in_flight_fetch" : 0,
  "task_max_waiting_in_queue_millis" : 0,
  "active_shards_percent_as_number" : 76.92307692307693
}
current state clusters nodes
172.16.0.27 14 99 8 1.47 0.63 0.26 dim data,ingest,master * smos-node-00
Information about current node OpenSearch:
{
  "name" : "smos-node-00",
  "cluster_name" : "smos-cluster",
  "cluster_uuid" : "5V2rIp1sRj-M-ANnGfF0cA",
  "version" : {
    "distribution" : "opensearch",
    "number" : "2.18.0",
    "build_type" : "tar",
    "build_hash" : "99a9a81da366173b0c2b963b26ea92e15ef34547",
    "build_date" : "2024-10-31T19:08:39.157471098Z",
    "build_snapshot" : false,
    "lucene_version" : "9.12.0",
    "minimum_wire_compatibility_version" : "7.10.0",
    "minimum_index_compatibility_version" : "7.0.0"
  },
  "tagline" : "The OpenSearch Project: https://opensearch.org/"
}

================================================================================
ATTENTION!
After updating Search Anywhere Framework, you must run the following commands as a user with root privileges.
Change user, group and directories as needed.

cp /app/distr/saf_5.1/opensearch/staging/services/sme-re.service /etc/systemd/system/
chown root:root /etc/systemd/system/sme-re.service
chcon -Rv -u system_u -r object_r -t bin_t /app/opensearch/bin
chcon -Rv -u system_u -r object_r -t bin_t /app/opensearch/jdk/bin
chcon -Rv -u system_u -r object_r -t var_run_t /app/opensearch/run
chown -R opensearch:opensearch /app/opensearch /app/opensearch/config /app/data/opensearch /app/logs/opensearch
systemctl daemon-reload
systemctl enable sme-re opensearch
systemctl start sme-re
systemctl start opensearch
systemctl status sme-re opensearch

If you disable allocation before, wait 60 seconds and run the following commands as a "opensearch" or user with root privileges:

curl -XPUT -k -u YOUR_USER_OPENSEARCH:YOUR_ADMIN_PASSWORD_HERE "https://127.0.0.1:9200/_cluster/settings?pretty" -H "Content-Type: application/json" -d '{"persistent":{"cluster.routing.allocation.enable": "all"}}'

The following plugins cannot be installed:
-- sm-job-scheduler-actions-incident
-- sm-job-scheduler-actions-mitre

================================================================================
-- Search Anywhere Framework SUCCESSFULLY UPDATED!
-- For further instructions, please refer to the documentation: https://docs.saf-systems.com/
================================================================================
If you chose to update without using commands requiring privilege escalation to the root user, an information block will be displayed listing commands that need to be executed as the root user.
If for some reason the update script fails to update certain plugins, it will additionally display information about these plugins at the end (text reading The following plugins cannot be installed).
The update script takes into account the current list of installed plugins on OpenSearch nodes. If you need to install any additional plugins, this should be done manually after completing the node update.
Updating SA Web
This script automates the OpenSearch Dashboards update process. It requires the following pre-installed packages:
curlzipunzip
The automatic update script is located at $SAF_INSTALLER/opensearch-dashboards/update.sh. You can specify a configuration file using $SAF_INSTALLER/opensearch-dashboards/example_config_dashboards.yaml. The file format is YAML and is identical to the installation configuration file.
The update script supports the following parameters:
-c, --config <path_to_config_file_yaml>- Specifies the configuration file for the update-h, --help- Displays help information about available commands
During execution, the script backs up the systemd service file, opensearch-dashboards.yml, and the configuration directory to a temporary directory: $SAF_INSTALLER/opensearch-dashboards/staging/.
The update script does not modify the data and logs directories. The configuration directory and systemd files are backed up to the temporary directory $SAF_INSTALLER/opensearch-dashboards/staging/.
Running the script again will clear the staging directory.
To update, run the script:
$SAF_INSTALLER/opensearch-dashboards/update.sh
The script automatically detects the main paths on the current server for the following directories:
OpenSearch Dashboards Home Directory- The OpenSearch Dashboards installation directory, typically/app/opensearch-dashboardsOpenSearch Dashboards Conf Directory- The OpenSearch Dashboards configuration directory, typically/app/opensearch-dashboards/config/OpenSearch Dashboards Data Directory- The data directory, typically/app/data/OpenSearch Dashboards Logs Directory- The logs directory, typically/app/logs/
Example output:
================================================================================
SEARCH ANYWHERE FRAMEWORK INSTALL SCRIPT - OPENSEARCH DASHBOARDS
================================================================================

Current working directory: /opt/saf_5.1/opensearch-dashboards

Current name of install's archive: opensearch-dashboards-2.18.0-linux-x64.tar.gz

Current version of OpenSearch-Dashboards: 2.18.0

================================================================================
-- STEP 1. INSTALLATION DIRECTORIES

opensearch-dashboards.service file found. Will get necessary paths from there

Final Opensearch Dashboards home directory: /app/opensearch-dashboards
Final Opensearch Dashboards conf directory: /app/opensearch-dashboards/config
Final Opensearch Dashboards data directory: /app/data/opensearch-dashboards
Final Opensearch Dashboards logs directory: /app/logs/opensearch-dashboards
Is this correct? [y/n]:
After the directories are displayed, confirm the information by pressing y, or enter your directories manually by pressing n.
At the next step, you can disable all operations requiring privilege escalation to root user rights during the update.
A complete update cannot be performed without root privileges.
You must:
- Execute some operations as the
rootuser - Run the installer as the SA Web runtime user
- After script completion, perform additional operations again as
rootThe operation list will be displayed in the installer
Failure to execute these commands before updating may cause data loss.
To launch the installer as the opensearch user:
sudo -u opensearch $SAF_INSTALLER/opensearch-dashboards/update.sh
The first prompt will ask about disabling commands requiring privilege escalation to the root user.
Next, you'll need to enter the user and group under which SA Web operates.
Finally, information will be displayed listing operations that must be performed before running the update script.
-- STEP 2. DISABLE OPERATIONS WHERE ROOT RIGHTS ARE REQUIRED

Want to update SEARCH ANYWHERE FRAMEWORK without root privileges? [y/N]: y

Final you set the non-root flag to: y

Linux username for SEARCH ANYWHERE FRAMEWORK [opensearch]:
Linux groupname for SEARCH ANYWHERE FRAMEWORK [opensearch]:

Final SEARCH ANYWHERE FRAMEWORK username: opensearch
Final SEARCH ANYWHERE FRAMEWORK groupname: opensearch
Is this correct? [Y/n]:

ATTENTION!
Before updating SEARCH ANYWHERE FRAMEWORK, you must run the following commands as a user with root privileges.
Change user, group and directories as needed

systemctl stop opensearch-dashboards
chown -R opensearch:opensearch /app/opensearch-dashboards /app/opensearch-dashboards/config /app/data/opensearch-dashboards /app/logs/opensearch-dashboards /app/distr/saf_5.1/opensearch-dashboards

!!! Are you sure you have done everything from the list above? [y/N]:
At the final step, you must confirm that all commands were executed as the root user. Enter y to confirm; otherwise, the update will be terminated.
Next, preparatory actions will be performed before the update. Before applying the update, you'll be prompted for confirmation - until this point, no system-impacting operations are performed. Additional information about the current node will also be displayed.
Current list of plugins:
-- smartMonitor
-- smartMonitorColumnChart
-- smartMonitorCyberSecurity
-- smartMonitorDrawio
-- smartMonitorHeatmapChart
-- smartMonitorHtmlChart
-- smartMonitorIncidentManager
-- smartMonitorInventory
-- smartMonitorKnowledgeCenter
-- smartMonitorLineChart
-- smartMonitorLookupManager
-- smartMonitorMitreAttack
-- smartMonitorPDFExport
-- smartMonitorPieChart
-- smartMonitorSingleValue
-- smartMonitorTable
-- smartMonitorUserBehaviorAnalytics

Current version of OpenSearch-Dashboards: 2.18.0

!!! AT THIS POINT WE START TO MAKE CHANGES IN OPERATING SYSTEM !!!
Do you want to continue? [y/N]:
If the update was selected without using commands requiring privilege escalation to the root user, an information block will be displayed containing the list of commands that must be executed as the root user.
================================================================================
ATTENTION!
After updating SEARCH ANYWHERE FRAMEWORK, you must run the following commands as a user with root privileges.
Change user, group and directories as needed.

cp /app/distr/saf_5.1/opensearch-dashboards/staging/services/opensearch-dashboards.service /etc/systemd/system/
chown root:root /etc/systemd/system/opensearch-dashboards.service
chcon -Rv -u system_u -r object_r -t bin_t /app/opensearch-dashboards/bin
chown -R opensearch:opensearch /app/opensearch-dashboards /app/opensearch-dashboards/config /app/data/opensearch-dashboards /app/logs/opensearch-dashboards
systemctl daemon-reload
systemctl enable opensearch-dashboards
systemctl start opensearch-dashboards
systemctl status opensearch-dashboards

================================================================================
-- SEARCH ANYWHERE FRAMEWORK DASHBOARDS SUCCESSFULLY UPDATED!
-- For further instructions, please refer to the documentation: https://docs.saf-systems.com/
================================================================================
Upon successful completion of the update script, the following message is displayed: SEARCH ANYWHERE FRAMEWORK DASHBOARDS SUCCESSFULLY UPDATED.
Post-Update Actions
Configuring System Limits for Background Tasks
To limit disk space usage and retention time for background task results:
- Open the Developer Console:
Main Menu-Settings-Developer Console - Execute the following command:
PUT _core/limits_user/base_limit
{
  "background_disk_quota": 5000000000,
  "background_result_ttl": 86000
}
Enabling "Related Incidents" Feature
If the Incident Manager module is not installed, proceed to the next step.
To enable incident linking functionality:
- Open the Developer Console:
Main Menu-System Settings-Developer Console - Execute the following command:
PUT _core/im_settings/incident-manager-settings
{
  "editFields": {
    "related_incidents": {
      "runame": "Related incidents",
      "name": "related_incidents",
      "enabled": true,
      "group": "main"
    }
  }
}
Incident Identifier Format Settings in Incident Manager
If the Incident Manager module is not installed, proceed to the next step.
In Search Anywhere Framework 5.1, the format of identifiers in Incident Manager has changed. First, check whether the new settings are available. To do this, open the Developer Console (Main Menu - System Settings - Developer Console) and execute the following command:
GET _core/im_settings/incident-id-lock
The response may either be a document or a message indicating that the document was not found, as shown below:
"""{"message":"Config with id: 'incident-id-lock' not found."}"""
If the response indicates that the document was not found, execute the following request:
If the previous request returned a document, you do not need to run the request below.
POST _core/im_settings/incident-id-lock
{
  "lock": false,
  "current_incident_id": 0
}
Incident Aggregations Migration
If the Incident Manager module is not installed, proceed to the next step.
To ensure proper functioning of aggregations after the update, you need to perform migration:
- Open the Developer Console:
Main Menu-Settings-Developer Console - Execute the following command:
POST _reindex
{
   "source":{
      "index":".sm_incident_aggs"
   },
   "dest":{
      "index":".sm_incident_aggs_backup_sa_50"
   }
}
Next, display information about the current .sm_incident_aggs index settings:
GET .sm_incident_aggs/_settings
GET .sm_incident_aggs/_mappings
Save the output of the previous commands. Then delete the old index:
DELETE .sm_incident_aggs
Next, you need to create a new index with the same settings as the previous index. Transfer the fields for the settings object from the outputs saved in the previous step:
PUT .sm_incident_aggs
{
  "settings": {
    "index": {
      "replication": {
        "type": "DOCUMENT"
      },
      "number_of_shards": "1",
      "auto_expand_replicas": "0-all",
      "max_result_window": "10000",
      "priority": "10000"
    }
  },
  "mappings": {
    "dynamic_templates":[
      {
        "message_text":{
          "match_mapping_type":"string",
          "mapping":{
              "type":"text",
              "fields": {
                "keyword": {
                  "type": "keyword",
                  "ignore_above": 256
                }
              }
          }
        }
      }
    ]
  }
}
Aggregation Settings Migration:
POST _reindex
{
  "source":{
    "index":".sm_incident_aggs_backup_sa_50"
  },
  "dest":{
    "index":".sm_incident_aggs"
  },
  "script": {
    "source": """
        void updateMvFields(Map map) {
          Map changedFields = new HashMap();
          for (entry in map.entrySet()) {

            if (entry.getValue() instanceof List || entry.getValue() instanceof Set) {
              Set tmpValues = new HashSet();
              for (custom_field in entry.getValue()) {
                if (custom_field instanceof Map) {
                  tmpValues.add(custom_field.get("label"));
                }
              }
              changedFields.put(entry.getKey(), tmpValues)
            }
          }
          map.putAll(changedFields);
        }
        if (ctx._source.containsKey("custom_fields")) {
            updateMvFields(ctx._source.get("custom_fields"));
        }
    """,
    "lang": "painless"
  }
}
Incident Card Field Structure Migration
If the Incident Manager module is not installed, proceed to the next step.
Version 5.1 introduced changes to the field structure of the Incident Manager module's incident card. The migration must be performed using commands in the Developer Console.
Preparatory Steps
The installer includes a migration utility. The utility is located in the $SAF_INSTALLER/utils/migrations/migrations_5.0-5.1/im_fields_migration/ directory and runs on Python. The utility's main requirements:
- Python 3.8+
- plugin opensearch-py
The remaining packages are included in the standard Python installation. For a more detailed package list:
- certifi==2023.7.22
- charset-normalizer==3.3.2
- idna==3.4
- opensearch-py==2.3.2
- python-dateutil==2.8.2
- requests==2.31.0
- six==1.16.0
- urllib3==2.0.7
The Search Anywhere Framework 5.1 installation package comes bundled with Python 3.12, including all necessary dependencies.
Configuration File
Before running the utility, configure the parameters in the file:
$SAF_INSTALLER/utils/migrations/migrations_5.0-5.1/im_fields_migration/default.ini
Below is an example configuration file:
[server]
host = 127.0.0.1
port = 9200

[user]
name = admin
pass = password
The server.host parameter should specify the IP address of any OpenSearch node. It is recommended to specify a node with the data role and the routing_mode: hot attribute. If the user.pass parameter is omitted, the utility will prompt for the OpenSearch user password interactively.
Utility Launch Parameters
The utility has the following launch parameters:
-c, --config- Configuration file (Optional). Defaults to./default.ini-h, --help- Display help information
Developer Console Operations
Now you need to load the scripts to check if migration is required and execute them.
To do this:
- Open the Developer Console:
Main Menu-System Settings-Developer Console - Run the following command:
POST _im/migration_scripts
The above command will load the required verification scripts.
Next, execute the following commands to identify objects requiring migration:
GET _im/check_objects?obj=jobs
GET _im/check_objects?obj=aggs
GET _im/check_objects?obj=incidents
GET _im/check_objects?obj=agg_results
If the response object contains an empty hits field and size = 0, this object doesn't require updates. Example of an empty response:
{
	"hits": {},
	"size": 0
}
If the field values are not empty, you must migrate this object using the script below.
After the script completes, recheck for objects requiring migration using the command above. If non-empty values are found again, rerun the migration.
Utility Execution
To perform migrations, you need to run the utility. During execution, the script will prompt you to specify which objects require migration (jobs, aggs, incidents, agg_results). Execute the script with this command:
$SAF_INSTALLER/utils/python/bin/python3 $SAF_INSTALLER/utils/migrations/migrations_5.0-5.1/im_fields_migration/main.py -c $SAF_INSTALLER/utils/migrations/migrations_5.0-5.1/im_fields_migration/default.ini
Verification Scripts Removal
The verification scripts are no longer required for further operations and should be removed. Execute this command in the Developer Console:
DELETE _im/migration_scripts
RCM 2.0 Migration
When upgrading Search Anywhere Framework from version 5.0.0 to 5.1.0 (skipping version 5.0.1), for configurations using Resource-Service Model v2.0, execute the following query:
POST .sm_rsm_v2_metrics/_update_by_query
{
  "query": {
    "match_all": {}
  },
  "script": {
    "source": "ctx._source.enabled = true",
    "lang": "painless"
  }
}
If RCM 2.0 is already in use, you must perform migrations.
To do this:
- Open the Developer Console:
Main Menu-Settings-Developer Console - Execute the following command:
GET _core/rsm/migrate/pseudo_metrics
GET _core/rsm/migrate/create_snapshots