Lookup Manager
Lookup (lookup) - lookup is a static data table used to enrich or transform data during a search.
The Lookup Manager module is responsible for creating, viewing, editing, and deleting lookups, as well as managing the values contained within them. It provides centralized management of reference data used in the system.
Configuration Structure
| Name | Field in the index | Syntax | Description | Data example |
|---|---|---|---|---|
| Lookup name | name | <string> | Lookup name | lookup_name |
| Index name | idx | <string> | Index name corresponding to the lookup | index_name |
| Fields | fields | <array> | List of lookup fields used for enrichment | field1, field2 |
| Number of rows to display | size | <int> | Number of rows to display lookup data | 1000 |
| Case sensitivity | case_sensitive | <array> | List of reference table fields that are case-sensitive when matching | field1, field2 |
| Wildcard | wildcards | <array> | List of reference table fields that act as Wildcard for matching | field1, field2 |
| Cidrmatch | cidrmatch | <array> | List of reference table fields that act as CidrMatch for matching | field1, field2 |
| Condition | condition | <string> | Filter condition applied before matching lookup records | status != "Dismissed" |
| Limit | limit | <int> | Limitation on the size of lookup data before matching | 1000 |
| Maximum number of matches | max_match | <int> | Maximum number of matches from the lookup for a single search result when executing a command lookup | 100 |
--
Lookup Creation
We recommend assigning index names for lookups according to the lookup name.
To create a lookup, you need to:
-
Go to
Lookup List(Main Menu-Lookup Manager-Lookup List):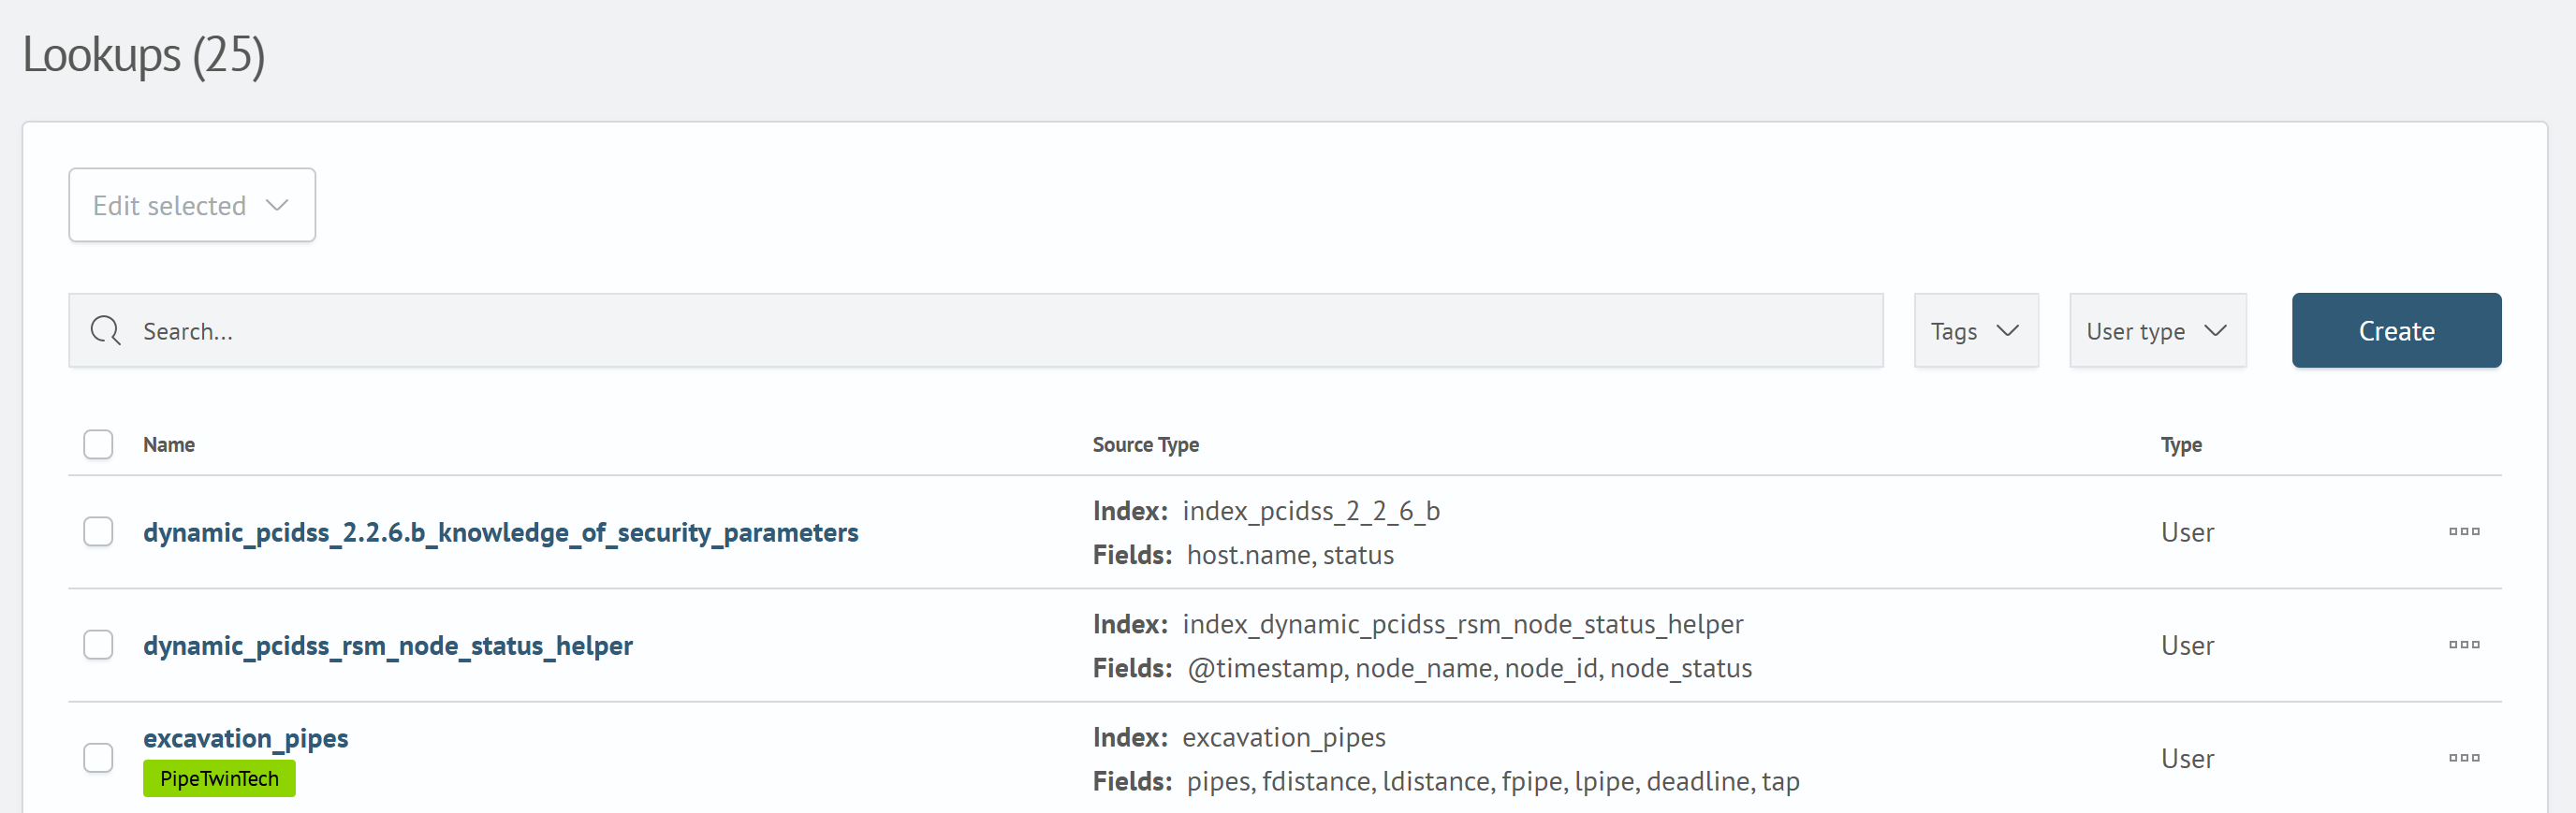
-
Click the
Createbutton. A window with lookup parameters will appear: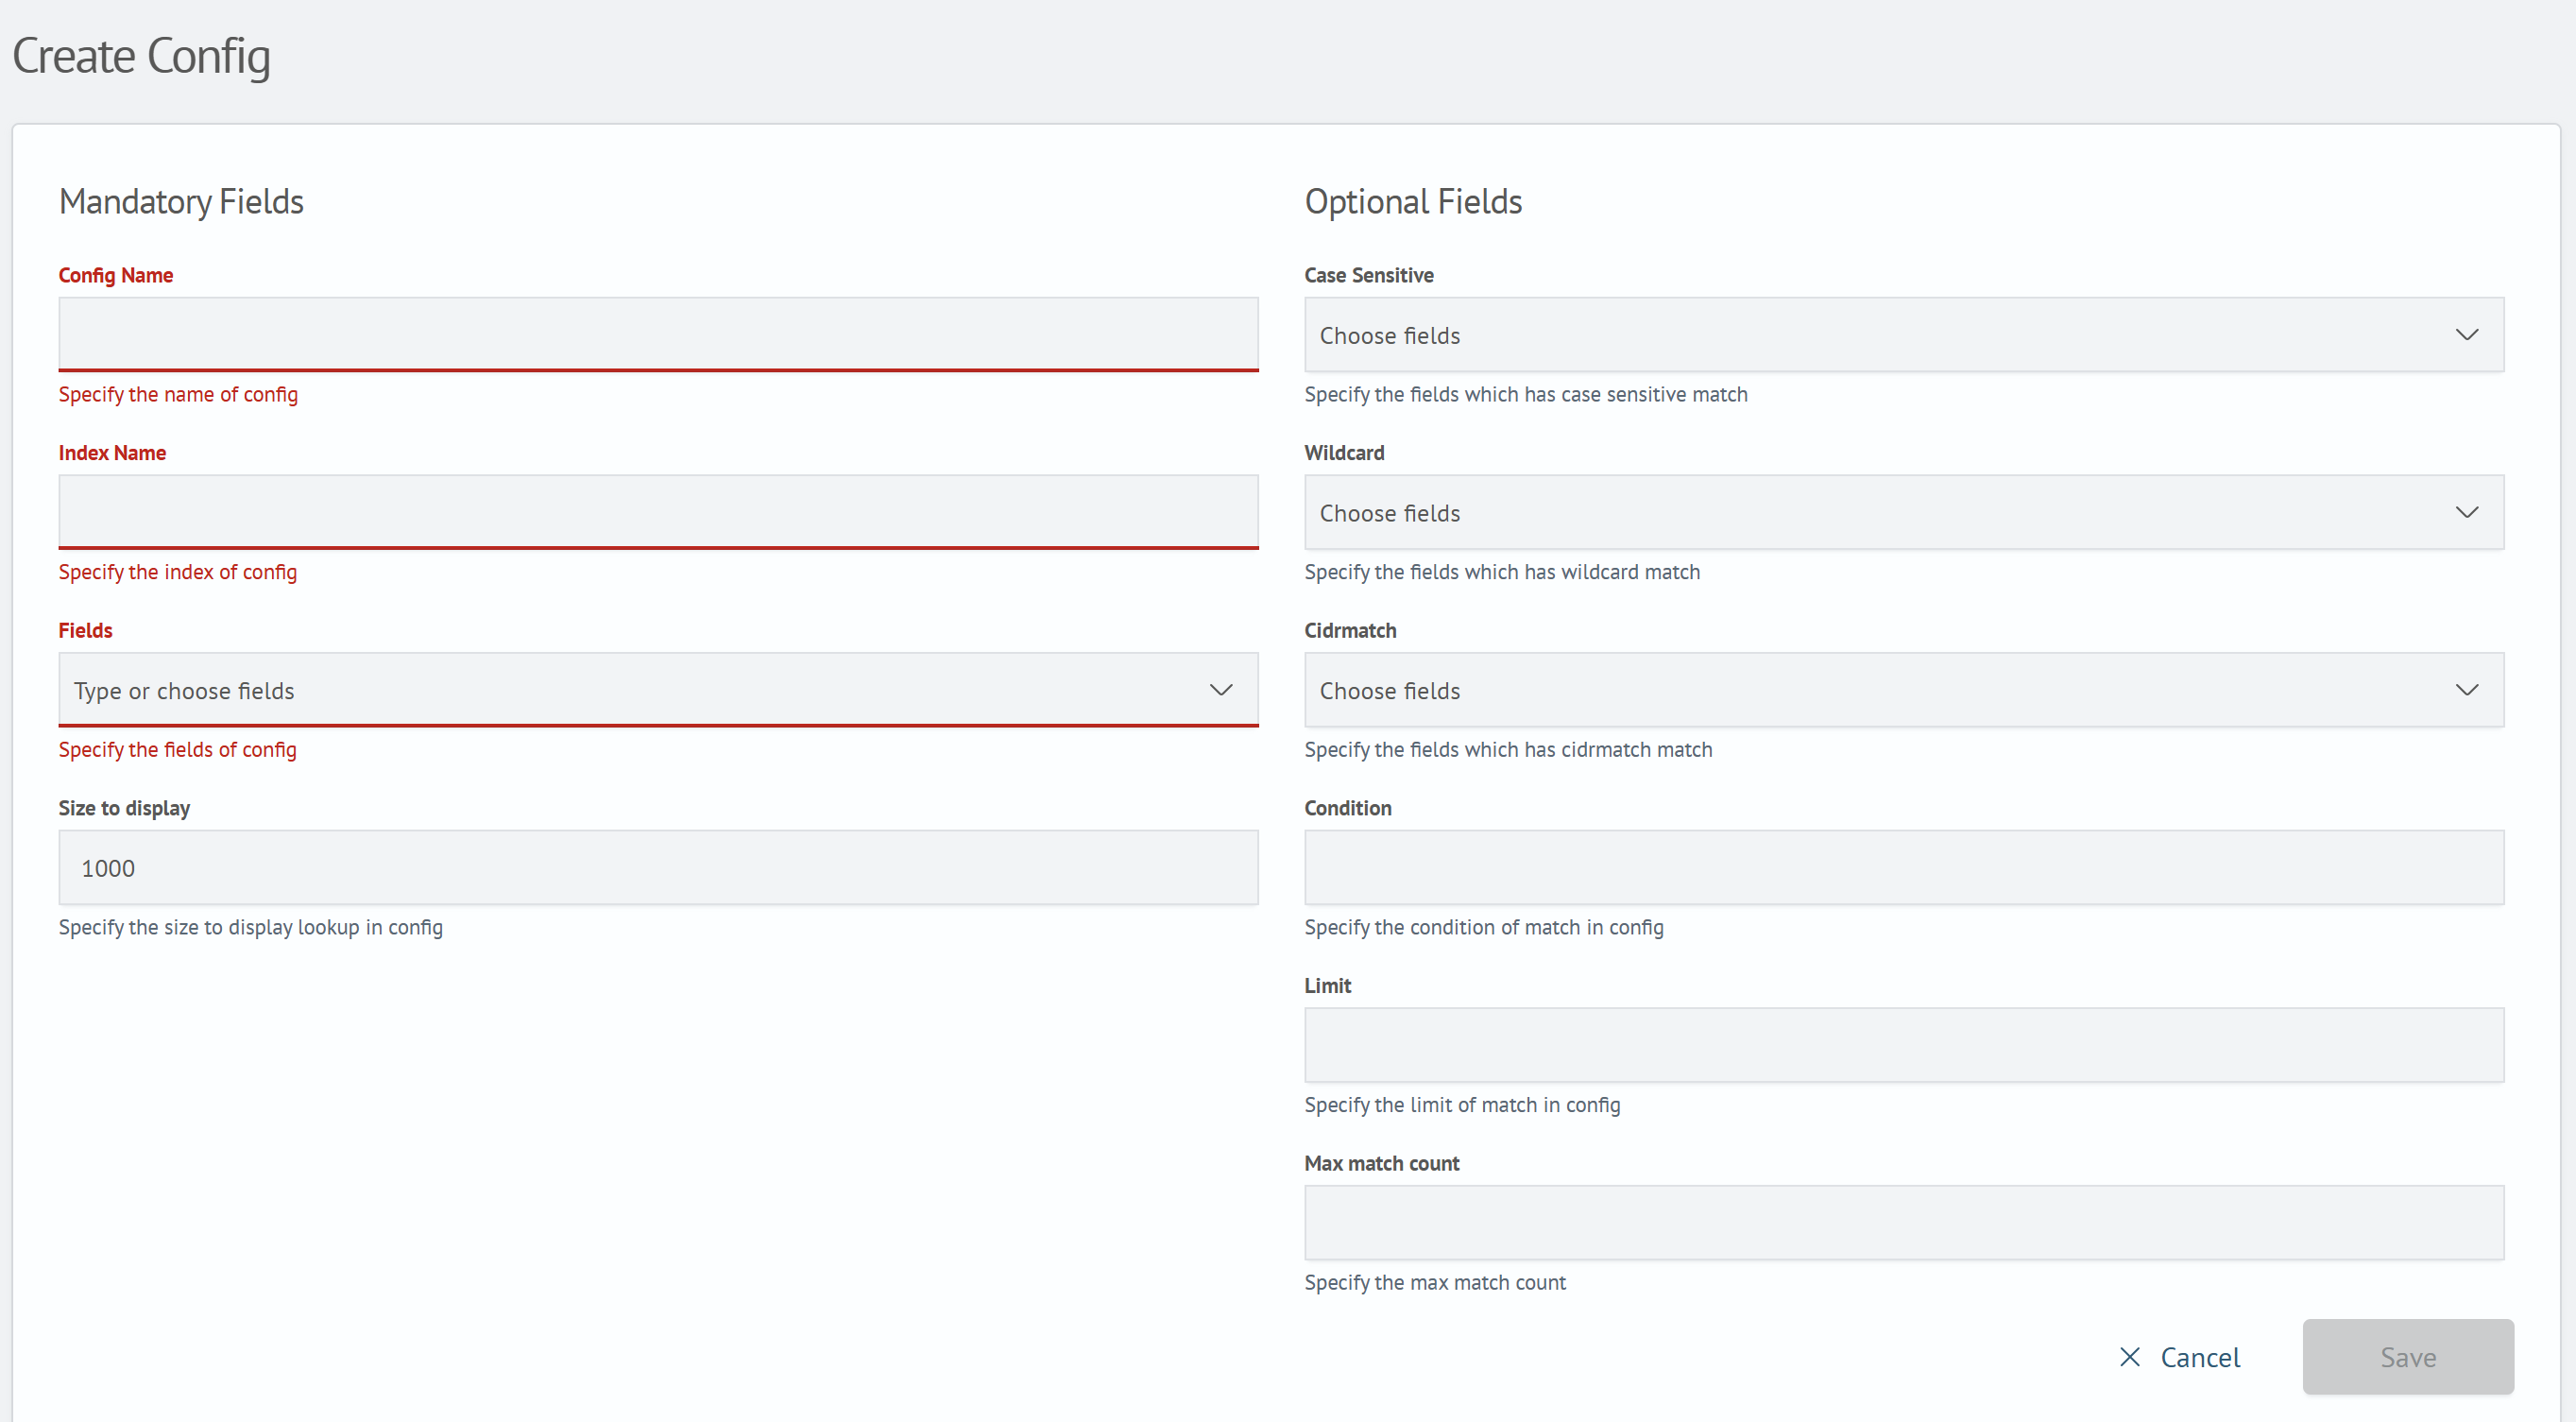
In this window, you need to fill in the configuration structure.
-
Click the
Savebutton. After clicking, the created lookup will be displayed in the general list.
Before creating a lookup, you can pre-create an index with data via the Developer Console, where the field names will correspond to the column names, and their values will correspond to the values in a specific row. Then, perform the above steps, specifying the name of the created index in the Index Name field in the lookup configuration.
Adding a New Row
If the lookup is empty, to add a new row you need to:
-
Click the
Add databutton. After clicking, a new row with empty fields will appear -
Fill in the fields of the new row with values
-
Click the
Savebutton. After clicking, the changes will take effect
To add a new row in a populated lookup, you need to:
-
Right-clickon an existing row. After clicking, a context menu will appear: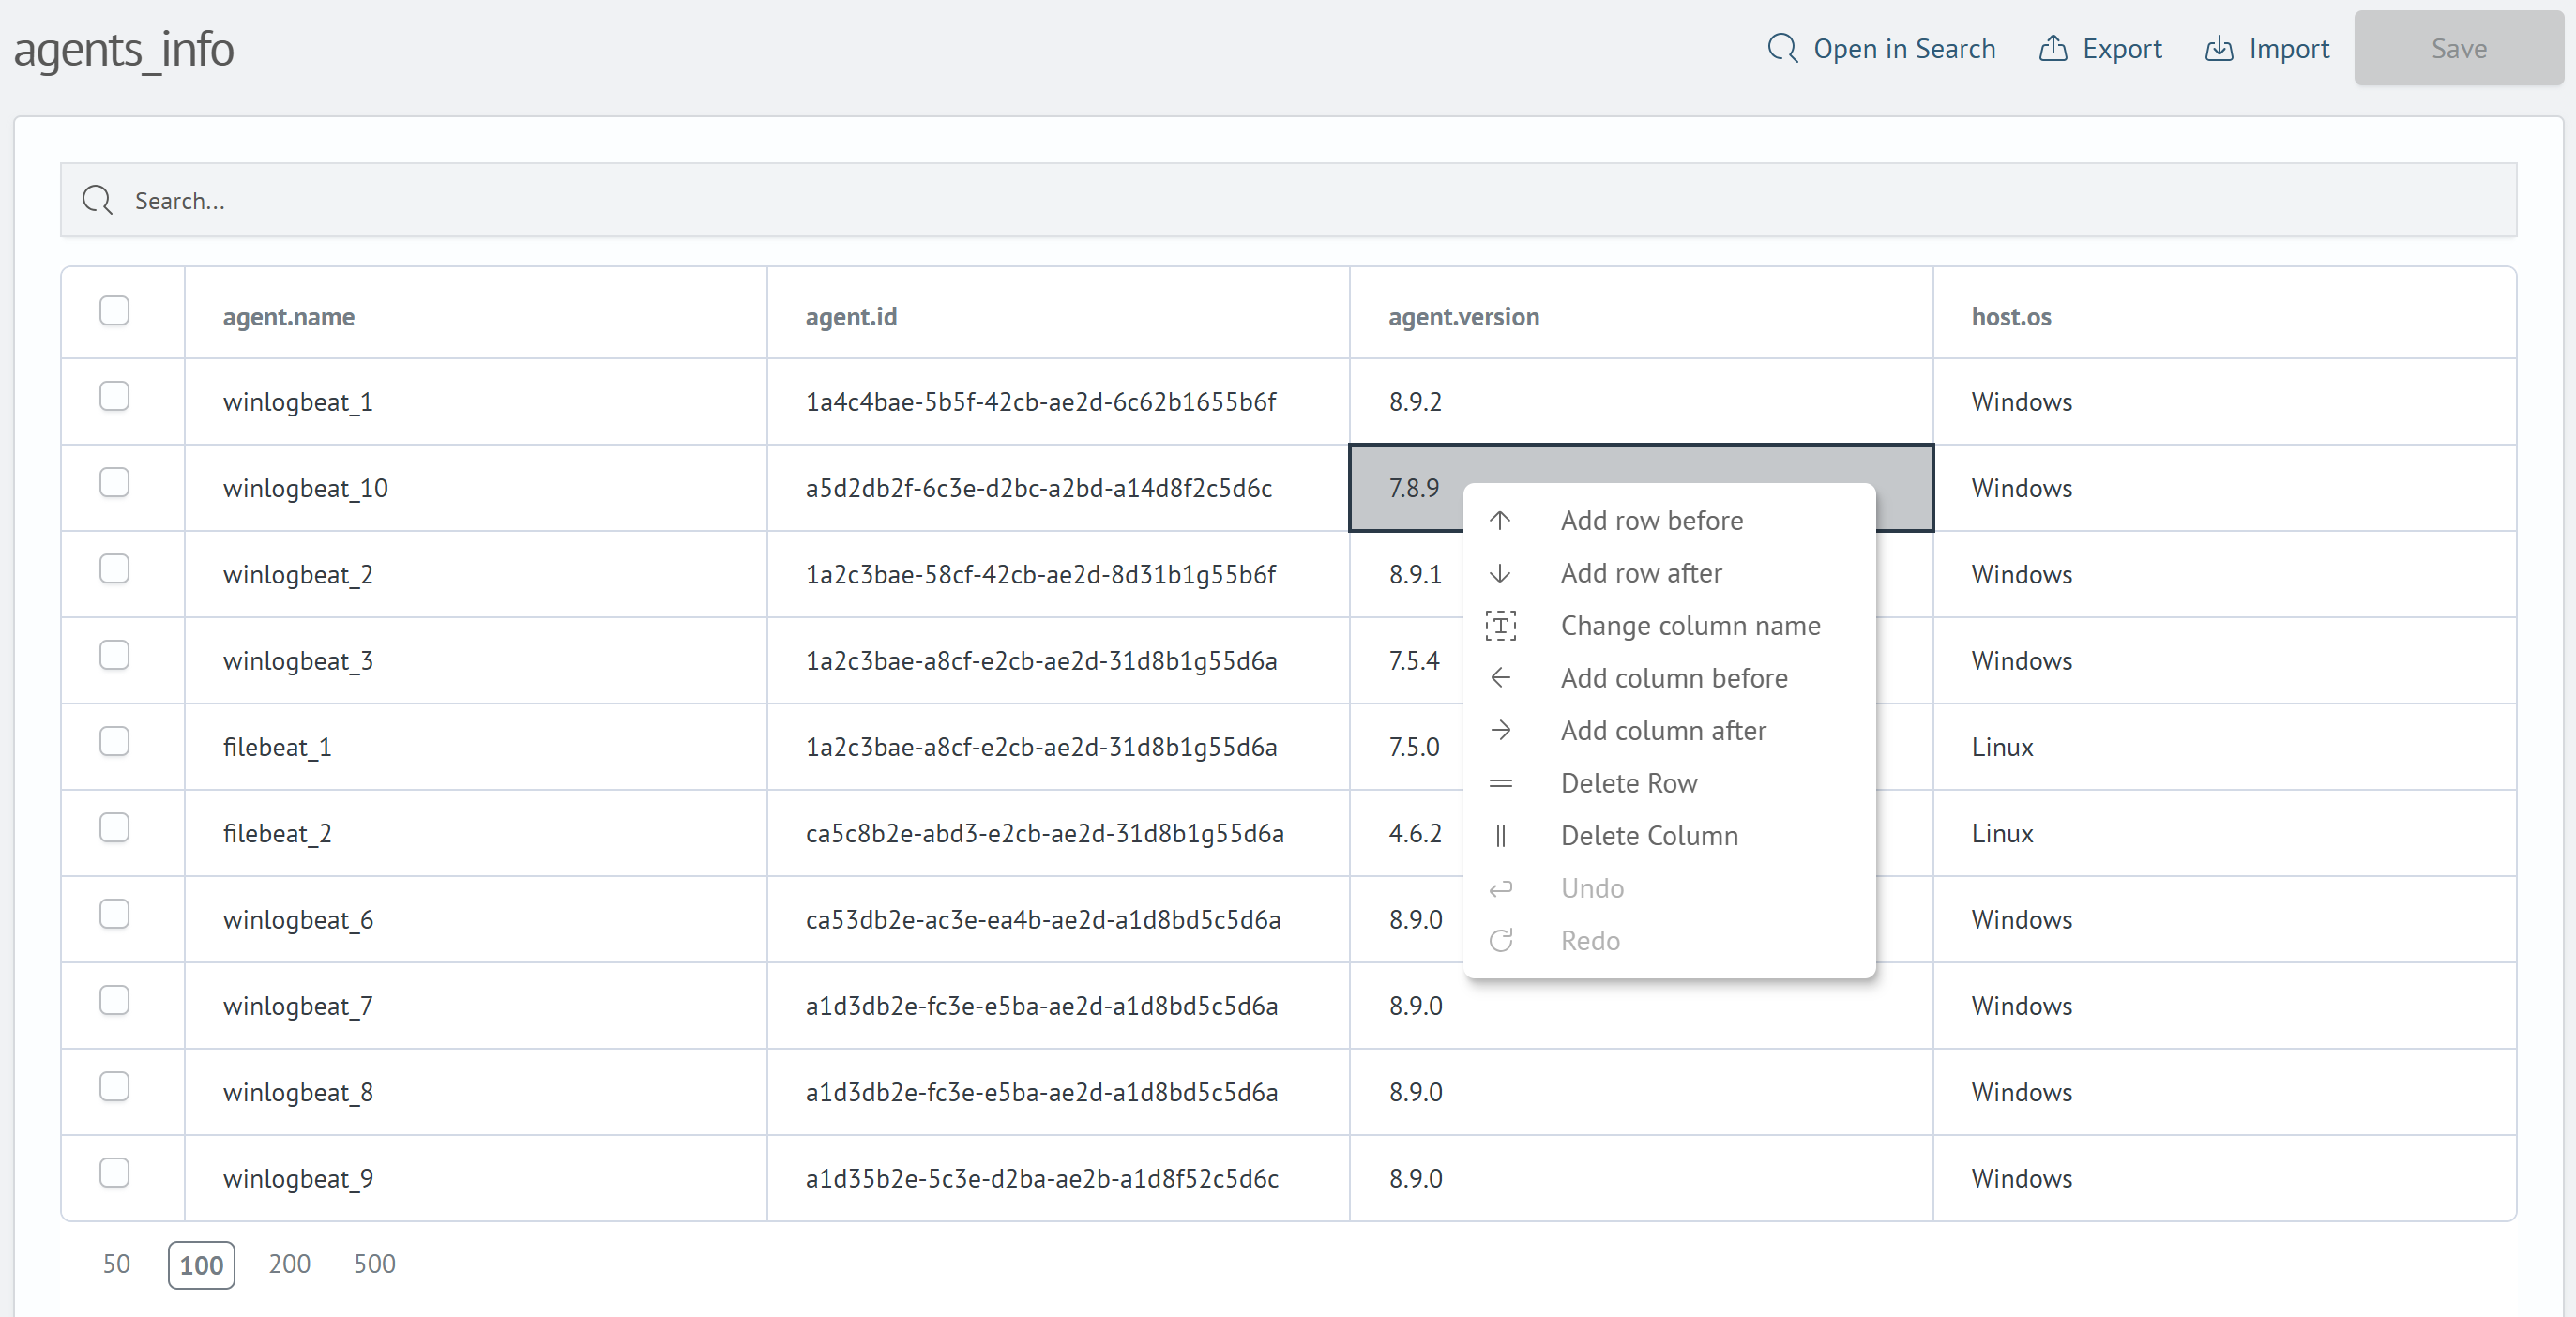
In this menu, you need to select the
Add row beloworAdd row afteritem. After clicking, a new row with empty fields will appear. -
In the created row, fill in the fields with values
-
Click the
Savebutton. After clicking, the changes will take effect
Adding a New Column
To add a new column to an already populated lookup, you need to:
-
Right-clickon an existing row or column header. After clicking, a context menu will appear:In this menu, you need to select the
Add column beloworAdd column afteritem. After clicking, a modal window will appear: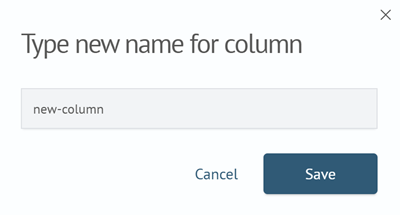
-
In the modal window, you need to enter the column name
-
Click the
Savebutton in the modal window. After clicking, a new column will appear in the lookup -
Click the
Savebutton
Adding Data
Data can be added in several ways:
-
Manually creating and filling the fields of a new row. Adding a new row was described in the corresponding section adding a new row
-
To supplement the lookup with existing data, use the
outputlookupcommand.Note!This method can overwrite fields, in which case the previous data will be deleted. This behavior occurs when the append parameter of the
outputlookupcommand is set tofalse. Otherwise, new data will be added to the existing data in the lookup. -
Import a CSV file into the lookup. To import data from a CSV file, go to the lookup page and click the
Importbutton. After clicking, a modal window will appear:
In this window, you need to select a CSV file by clicking on the
Select CSV for import. After selection, new data will be added to the existing data. -
Supplement the lookup index with new data via the
Developer Console. After adding new records, the changes will be saved automatically
Field Matching Examples
All the examples below use the lookup command to enrich source events with data from the lookup.
General Rules
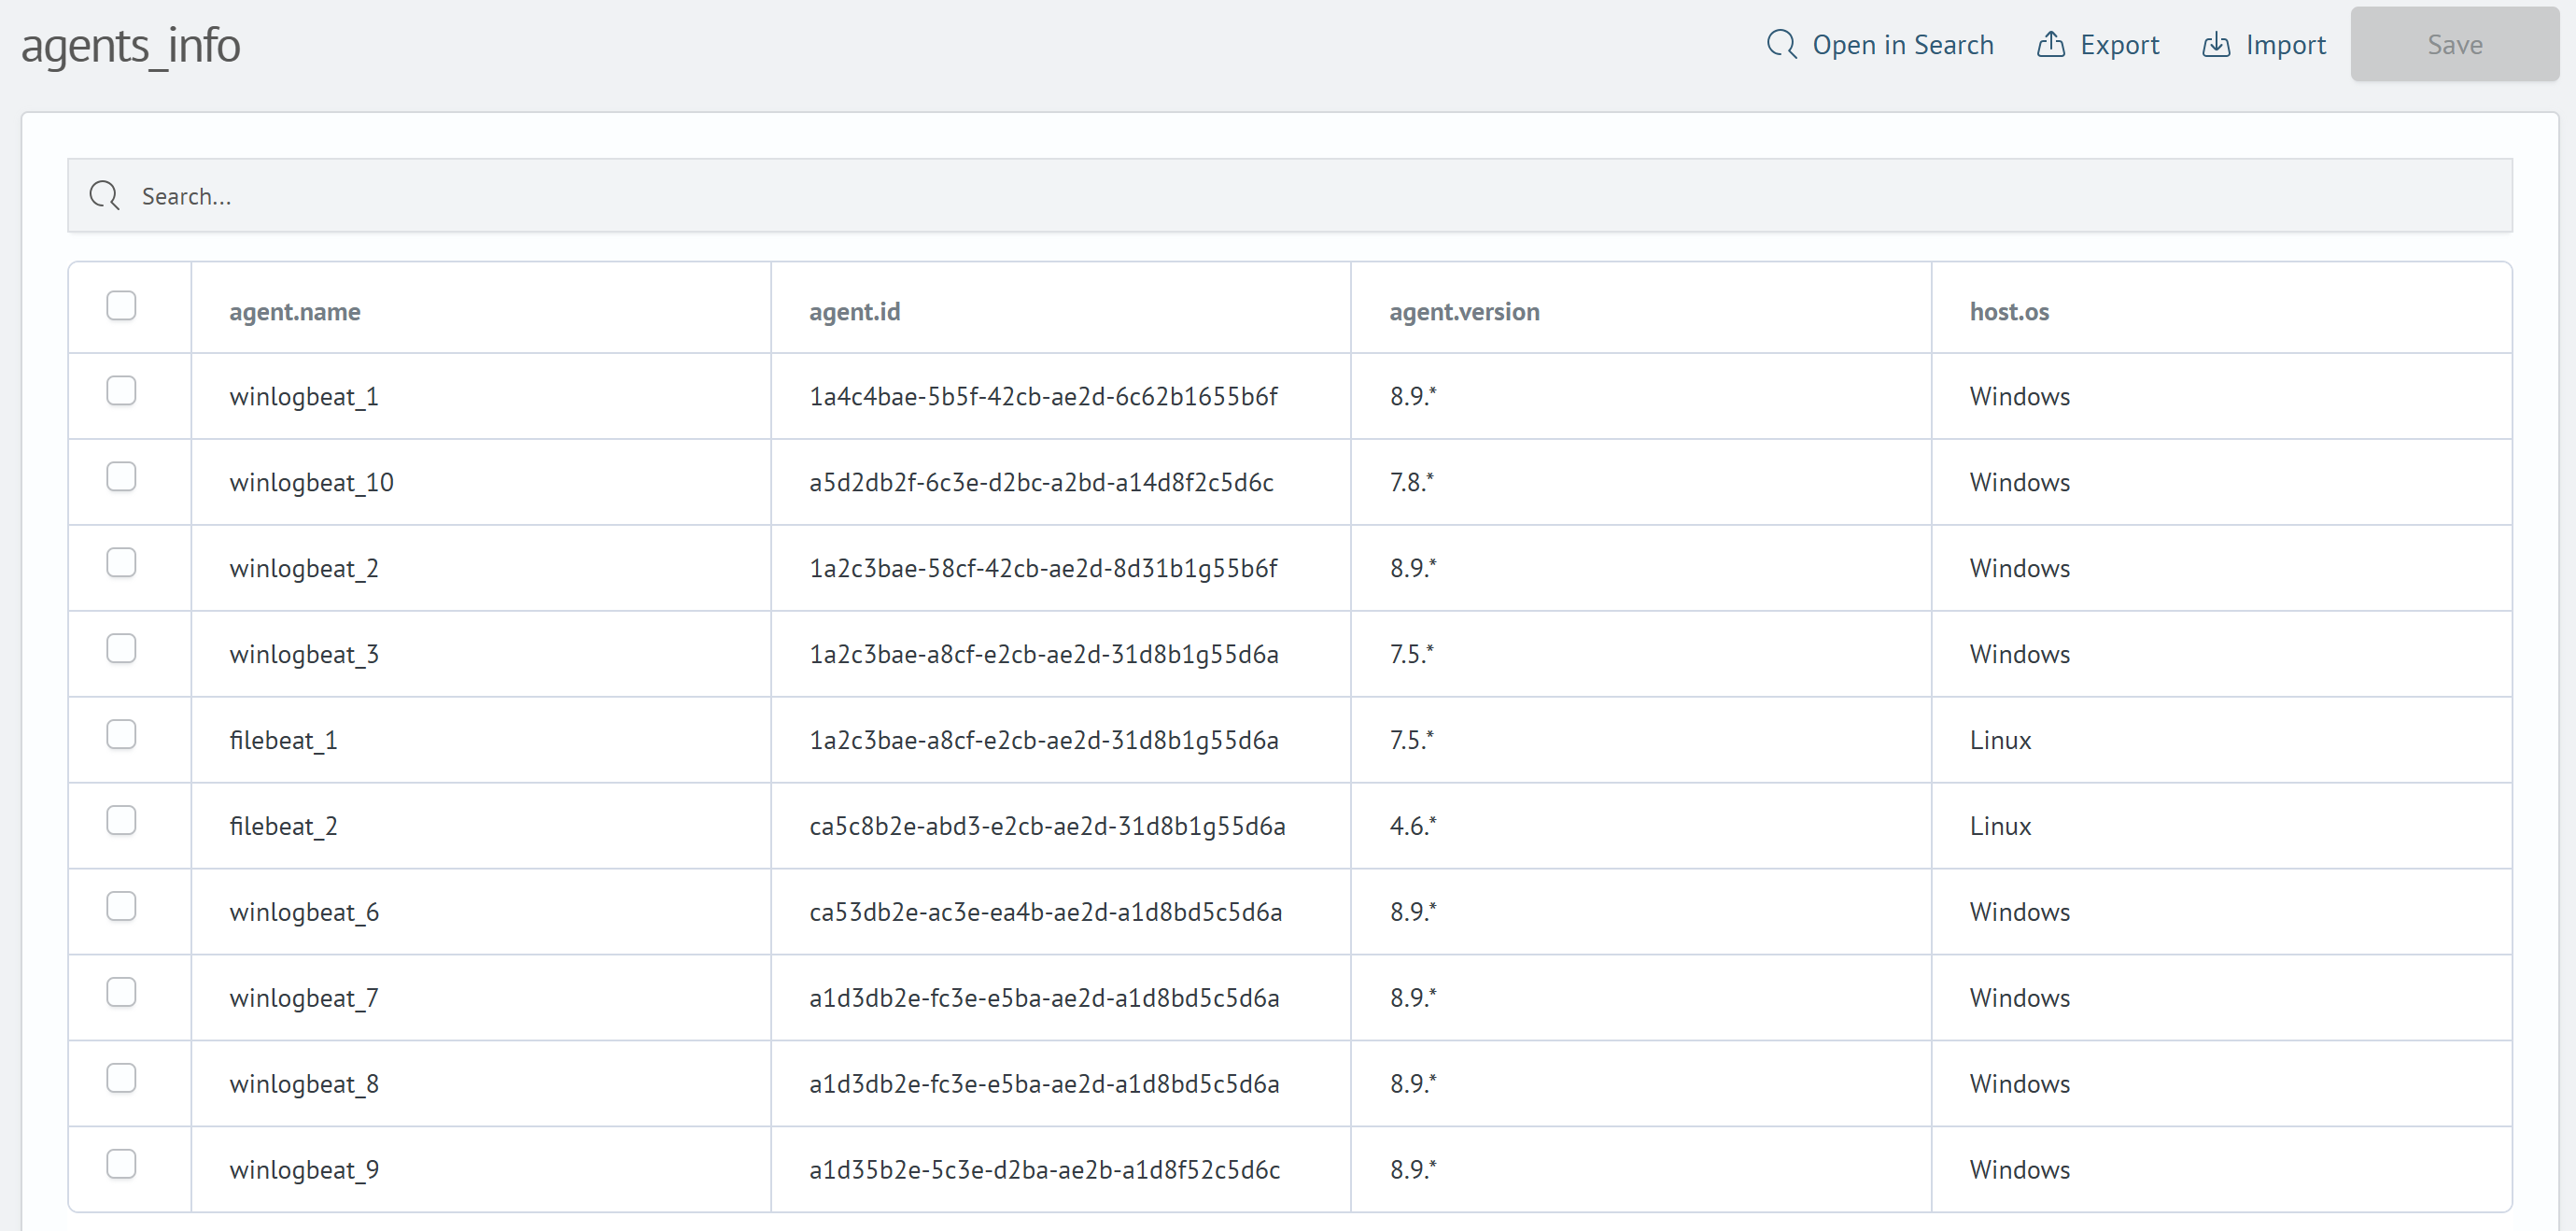
This section will cover matches without special rules, where the value from the field exactly matches the value of the corresponding field from the event. All examples will be based on the following lookup:
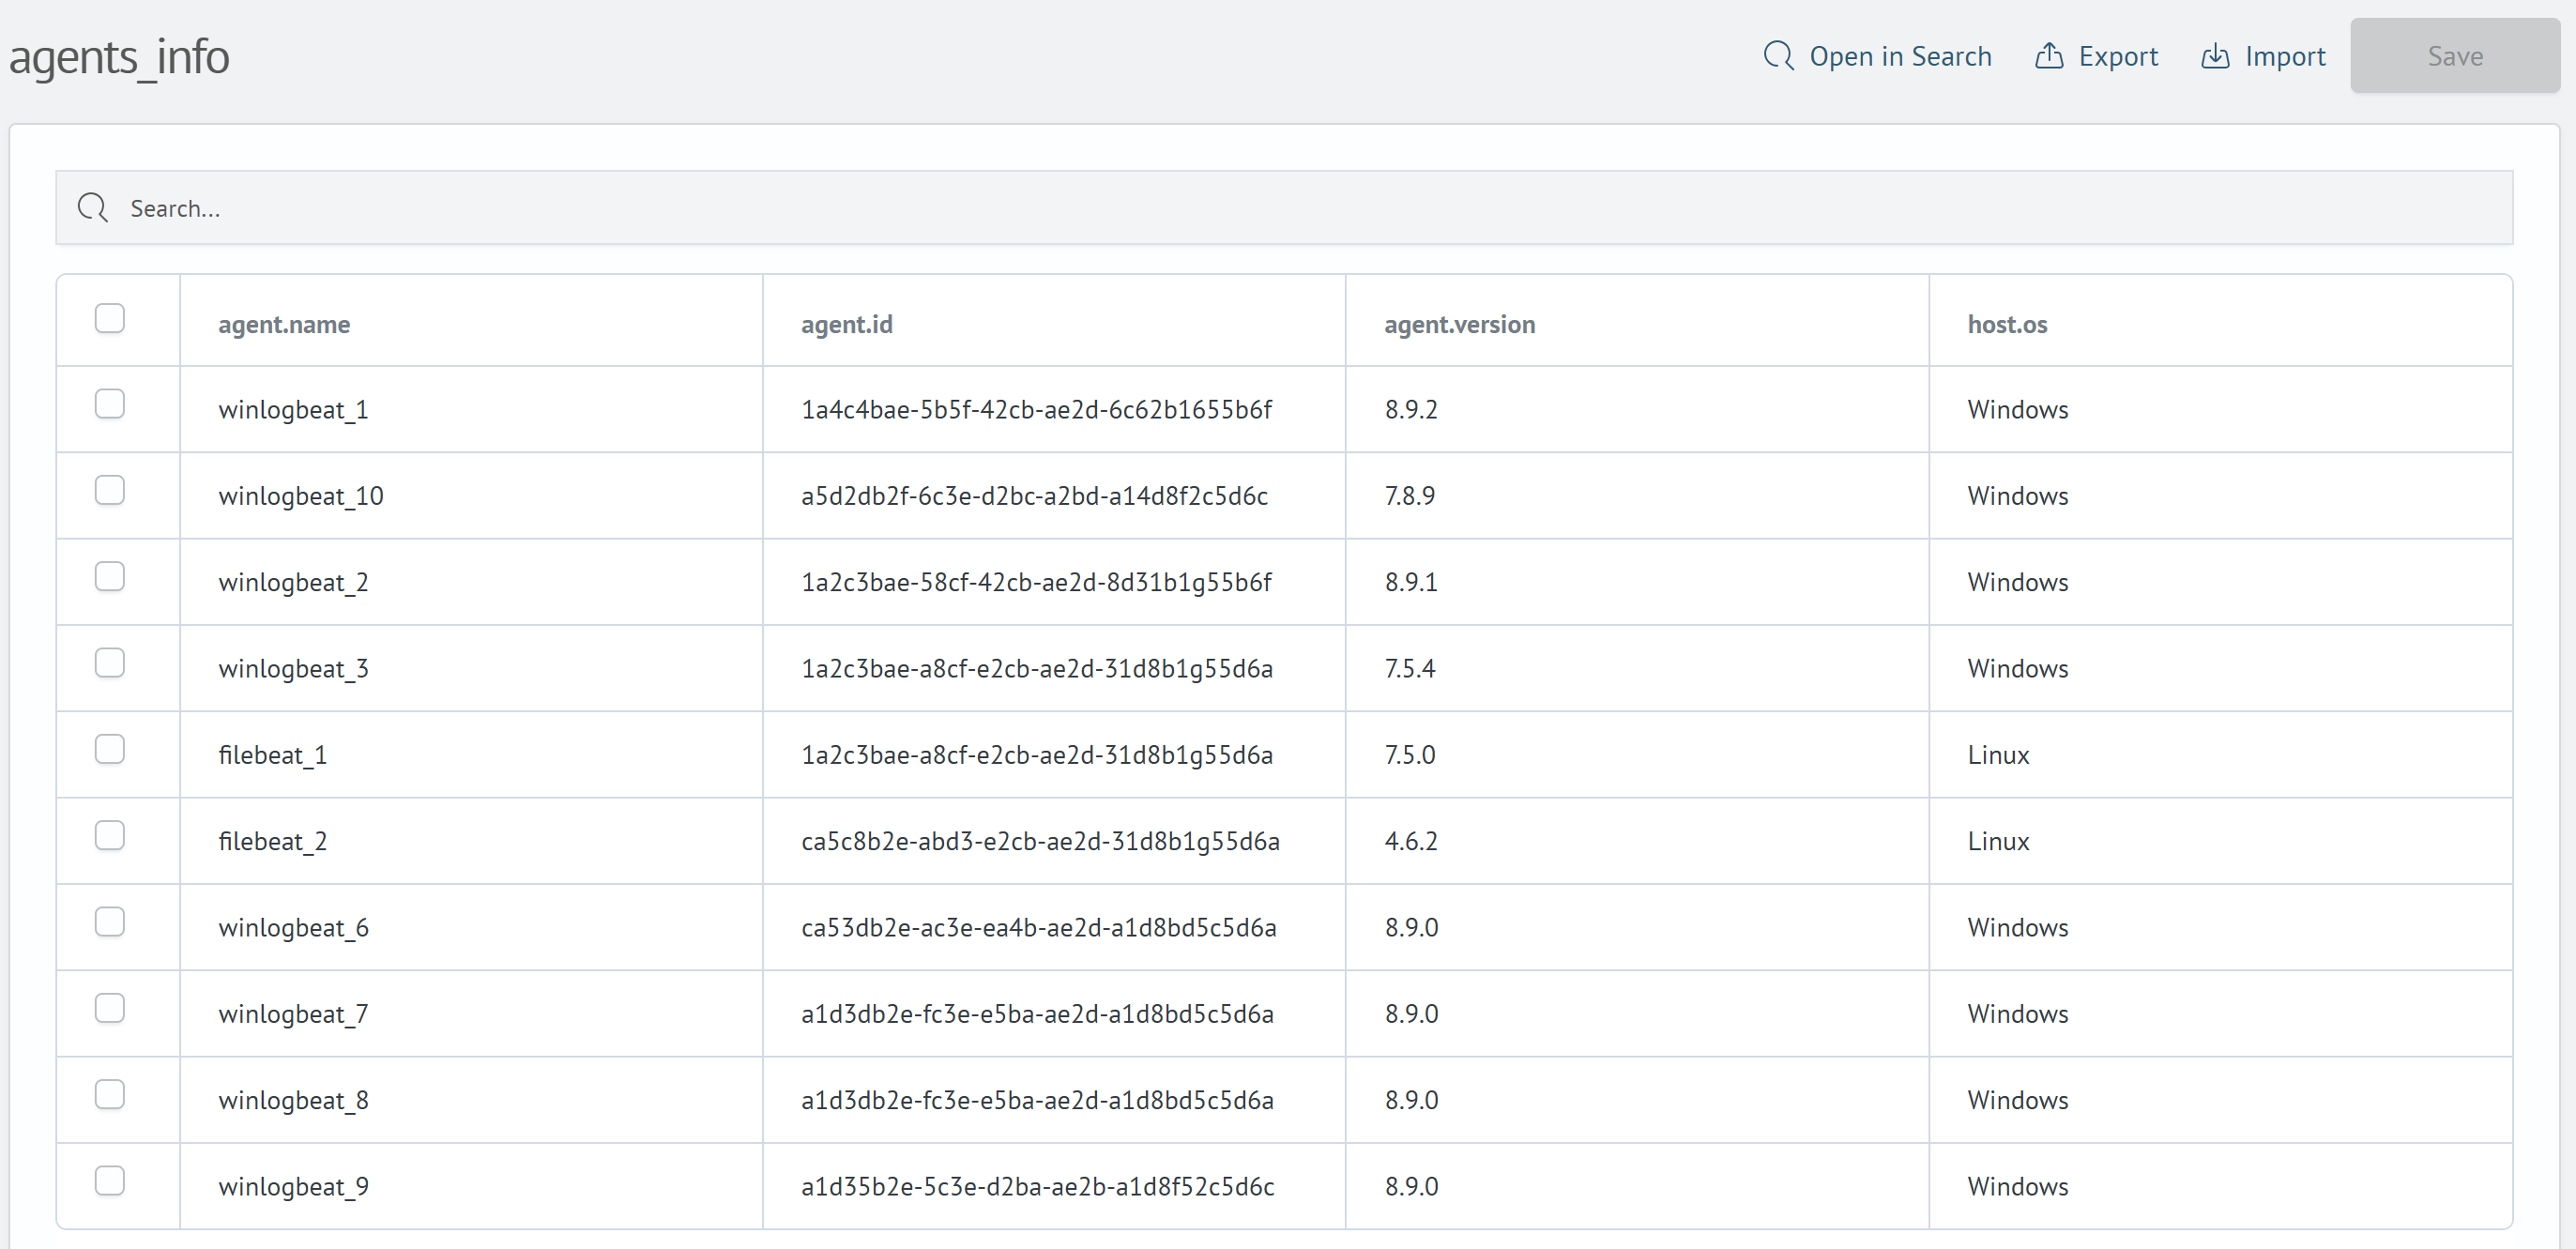
Example of Matching a Single Lookup Row
If a single lookup row matches, the source event is enriched with its data. For example:
When executing the following query:
| makeresults
| fields - @timestamp
| eval agent.version="8.9.2"
| lookup agents_info agent.version OUTPUT agent.id, agent.name, host.os
The execution result will be as follows:
The event was enriched with the fields agent.id, agent.name, and host.os with the corresponding values from the lookup row.
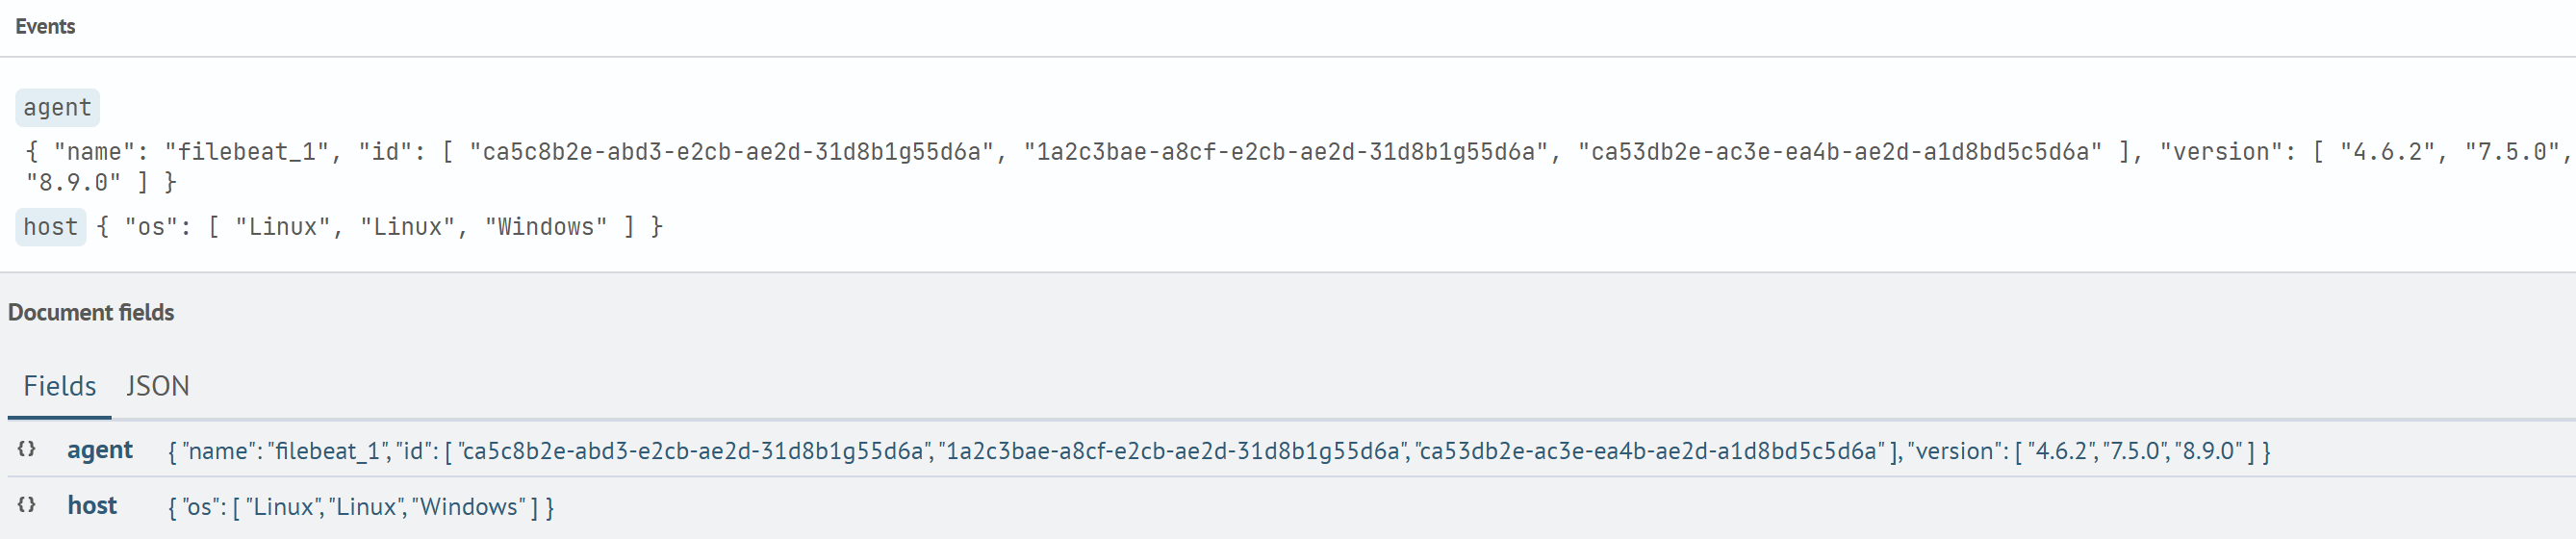
Example of Matching Multiple Lookup Rows
If multiple lookup rows match, the resulting fields are converted into an array of values from their data. For example:
When executing the following query:
| makeresults
| fields - @timestamp
| eval agent.version="8.9.0"
| lookup agents_info agent.version OUTPUT agent.id, agent.name, host.os
The execution result will be as follows:

The event was enriched with the fields agent.id, agent.name, and host.os with an array of values from the corresponding rows.
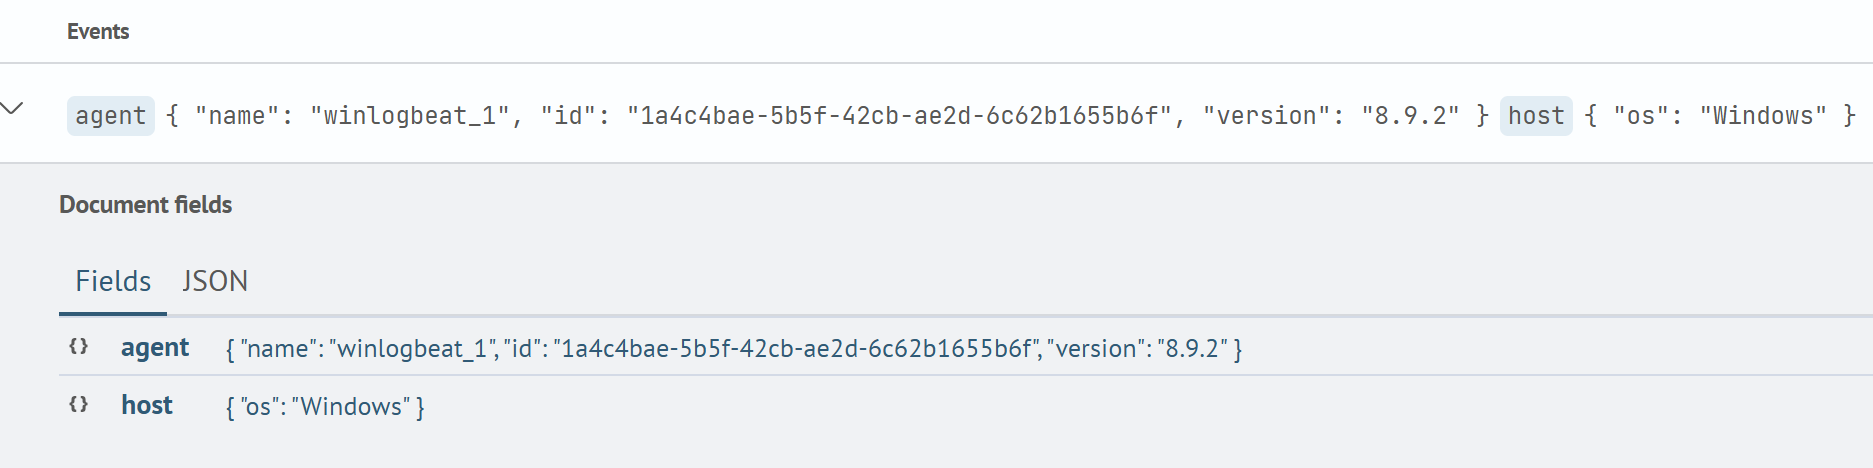
Example of No Match in the Lookup
If there is no match with the lookup fields, the event is not enriched with data. For example:
When executing the following query:
| makeresults
| fields - @timestamp
| eval agent.version="7.5.5"
| lookup agents_info agent.version OUTPUT agent.id, agent.name, host.os
The execution result will be as follows:
The event was not enriched with the fields agent.id, agent.name, and host.os because the lookup does not contain a field agent.version with the required value.
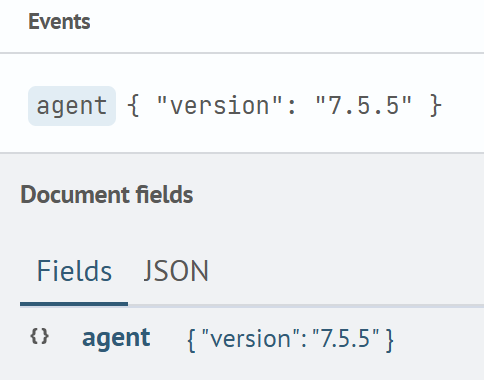
Example of Matching Multiple Lookup Fields
The inputlookup command allows matching based on multiple fields, which helps specify the events that need to be enriched with data. For example:
When executing the following query:
| makeresults
| fields - @timestamp
| eval agent.version="8.9.0", agent.name="winlogbeat_6"
| lookup agents_info agent.version, agent.name OUTPUT agent.id, host.os
The execution result will be as follows:
Based on the example of matching multiple rows, a search only by agent.version enriches the event with data from multiple rows. In this case, since the match is based on both agent.version and agent.name, the event is enriched only with data from the specific row - winlogbeat_6.
Using a Case-Sensitive Field
When creating a lookup, it is possible to specify fields that will be case-sensitive. The demonstration will use the lookup specified in the General Rules section, where the agent.name field is case-sensitive.
When executing the following query:
| makeresults
| fields - @timestamp
| eval agent.name="WinLogBeat_1"
| lookup agents_info agent.name OUTPUT agent.id, agent.version, host.os
The execution result will be as follows:
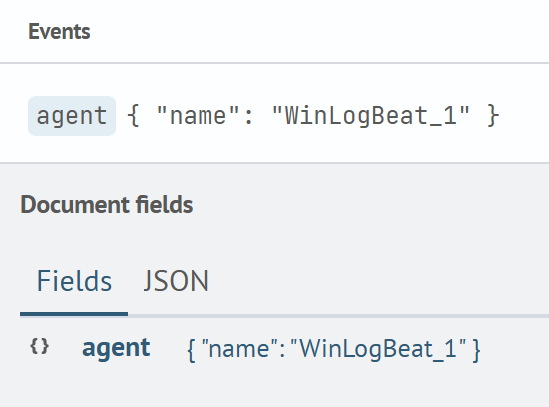
Data from the lookup row where agent.name has the value winlogbeat_1 was not added to the event.
If the agent.name field were not case-sensitive, the result would be as follows:
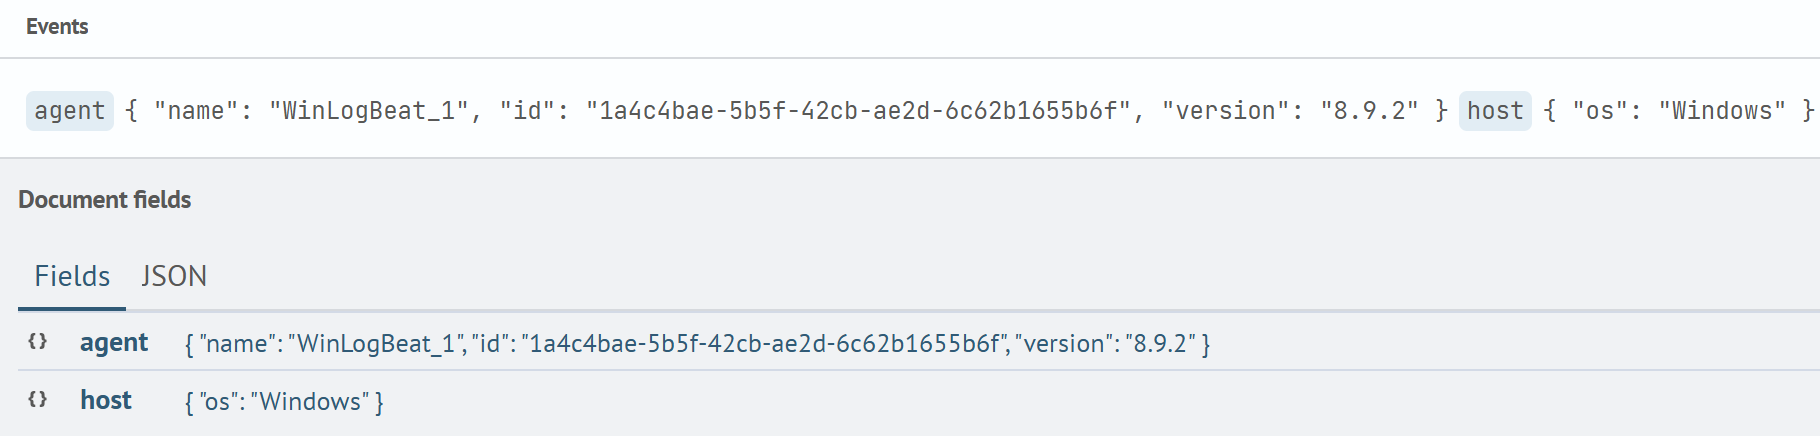
The event was enriched with data from the lookup row where agent.name has the value winlogbeat_1.
Wildcard
When creating a lookup, it is possible to specify fields that will be matched using the Wildcard rule.
The data in the specified field must have wildcard values.
- Example №1
- Example №2
- Example №3
Lookup for the first example:
The agent.version field is matched using the wildcard principle.
When executing the following query:
| makeresults
| fields - @timestamp
| eval agent.version="4.6.5"
| lookup agents_info agent.version OUTPUT agent.id, agent.name, host.os
The execution result will be as follows:
The event was enriched with the fields agent.id, agent.name, and host.os with the corresponding values from the lookup row.
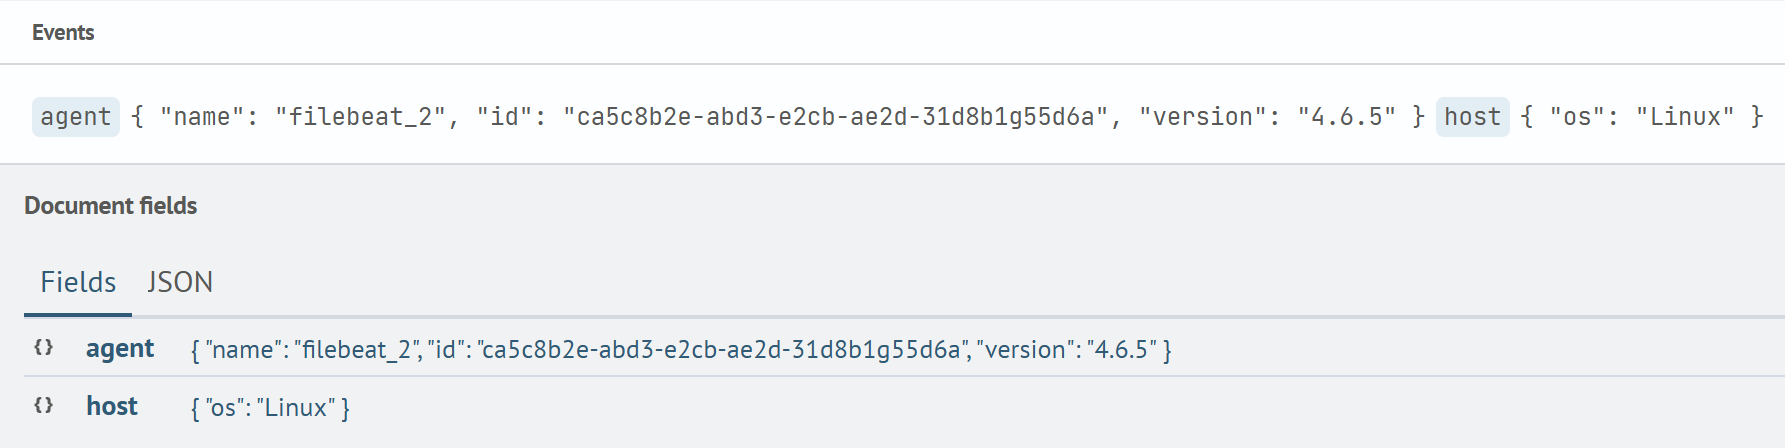
Lookup for the second example:

The agent.name field is matched using the wildcard principle.
When executing the following query:
| makeresults
| fields - @timestamp
| eval agent.name="filebeat_1"
| lookup agents_info agent.name OUTPUT host.os, agent.version, agent.id
The execution result will be as follows:
The event was enriched with the fields host.os, agent.version, and agent.id with an array of values from the corresponding rows.
Lookup for the third example:
The agent.version field is matched using the wildcard principle.
When executing the following query:
| makeresults
| fields - @timestamp
| eval agent.version="9.6.0"
| lookup agents_info agent.version OUTPUT agent.id, agent.name, host.os
The execution result will be as follows:
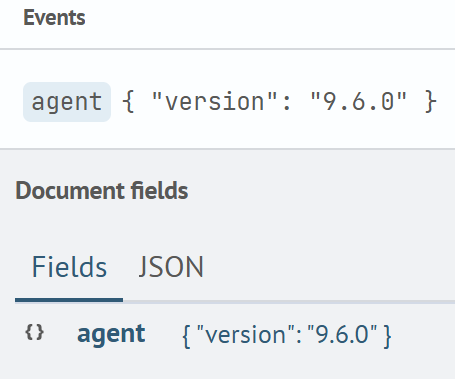
The event was not enriched with the fields agent.id, agent.name, and host.os because the lookup does not contain the agent.version field with the necessary wildcard value.
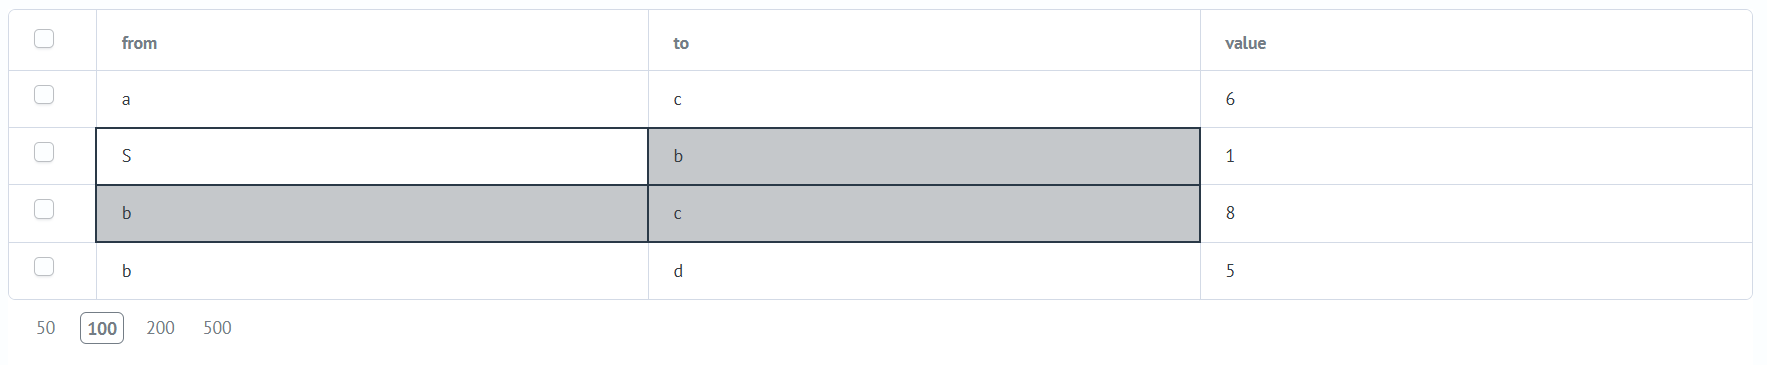
Cidrmatch
When creating a lookup, it is possible to specify fields that will be matched using the Cidrmatch rule.
The data in the specified field must have cidrmatch values.
All examples will be based on the following lookup:
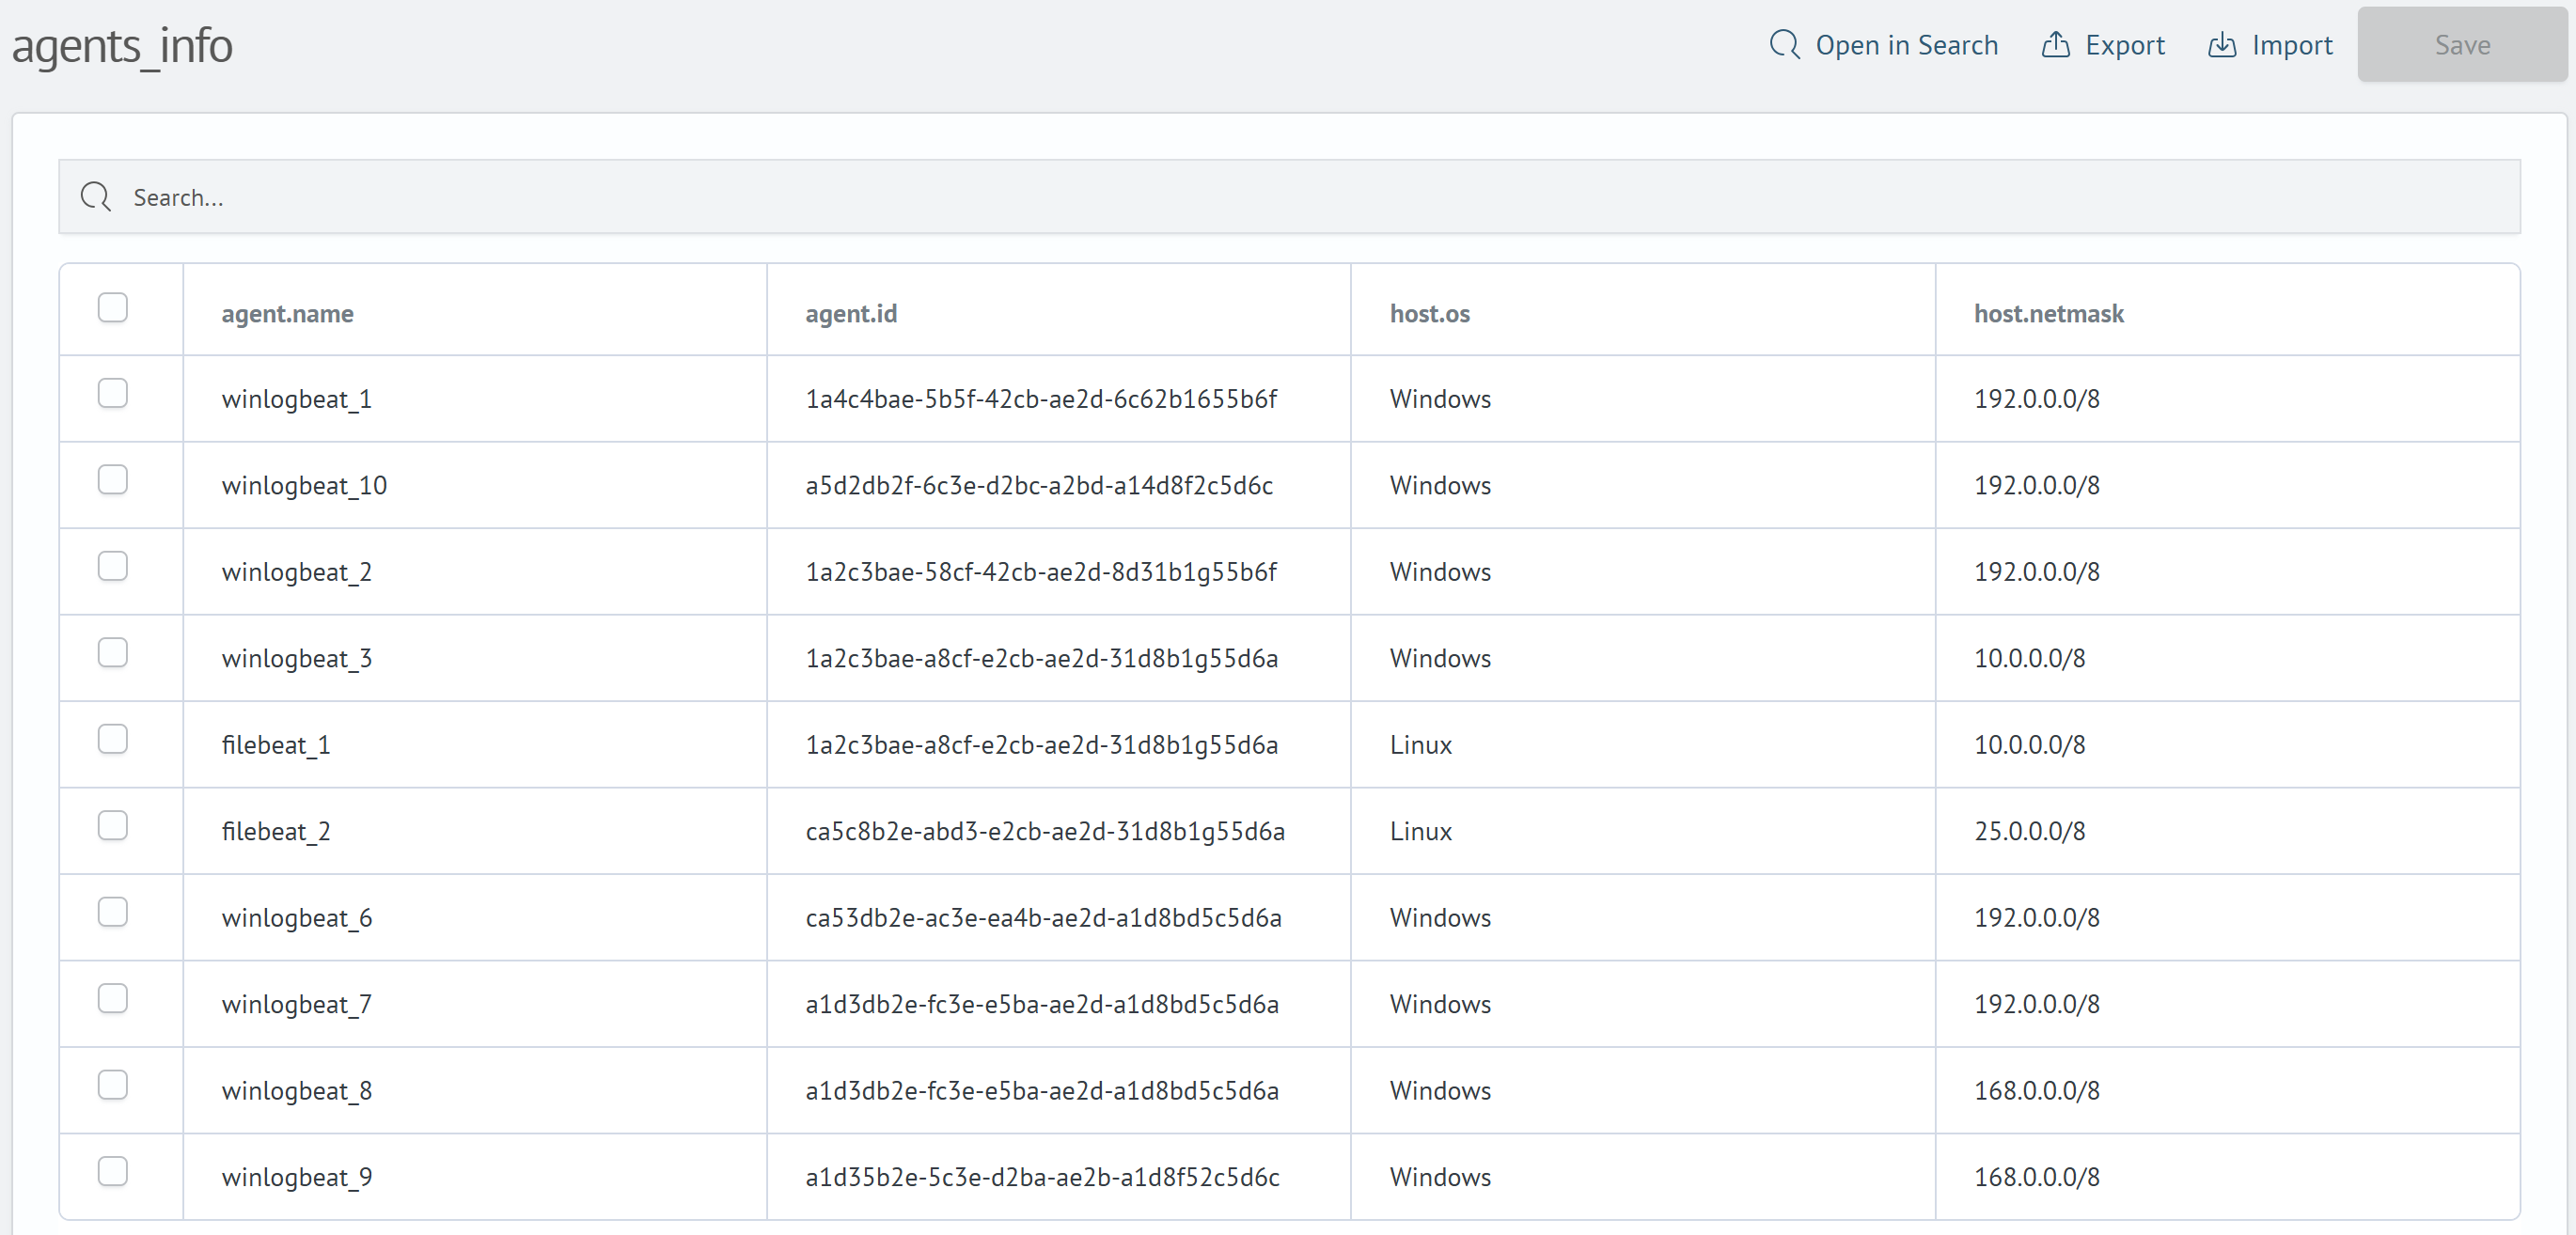
The host.netmask field is matched using the cidrmatch principle.
- Example №1
- Example №2
- Example №3
When executing the following query:
| makeresults
| fields - @timestamp
| eval host.ip="25.22.8.3"
| lookup agents_info host.netmask AS host.ip OUTPUT agent.id, agent.name, host.os, agent.version, host.netmask
The execution result will be as follows:

The event was enriched with the fields agent.id, agent.name, host.os, agent.version, and host.netmask with the corresponding values from the lookup row.
When executing the following query:
| makeresults
| fields - @timestamp
| eval host.ip="192.168.16.8"
| lookup agents_info host.netmask AS host.ip OUTPUT agent.id, agent.name, host.os, agent.version, host.netmask
The execution result will be as follows:
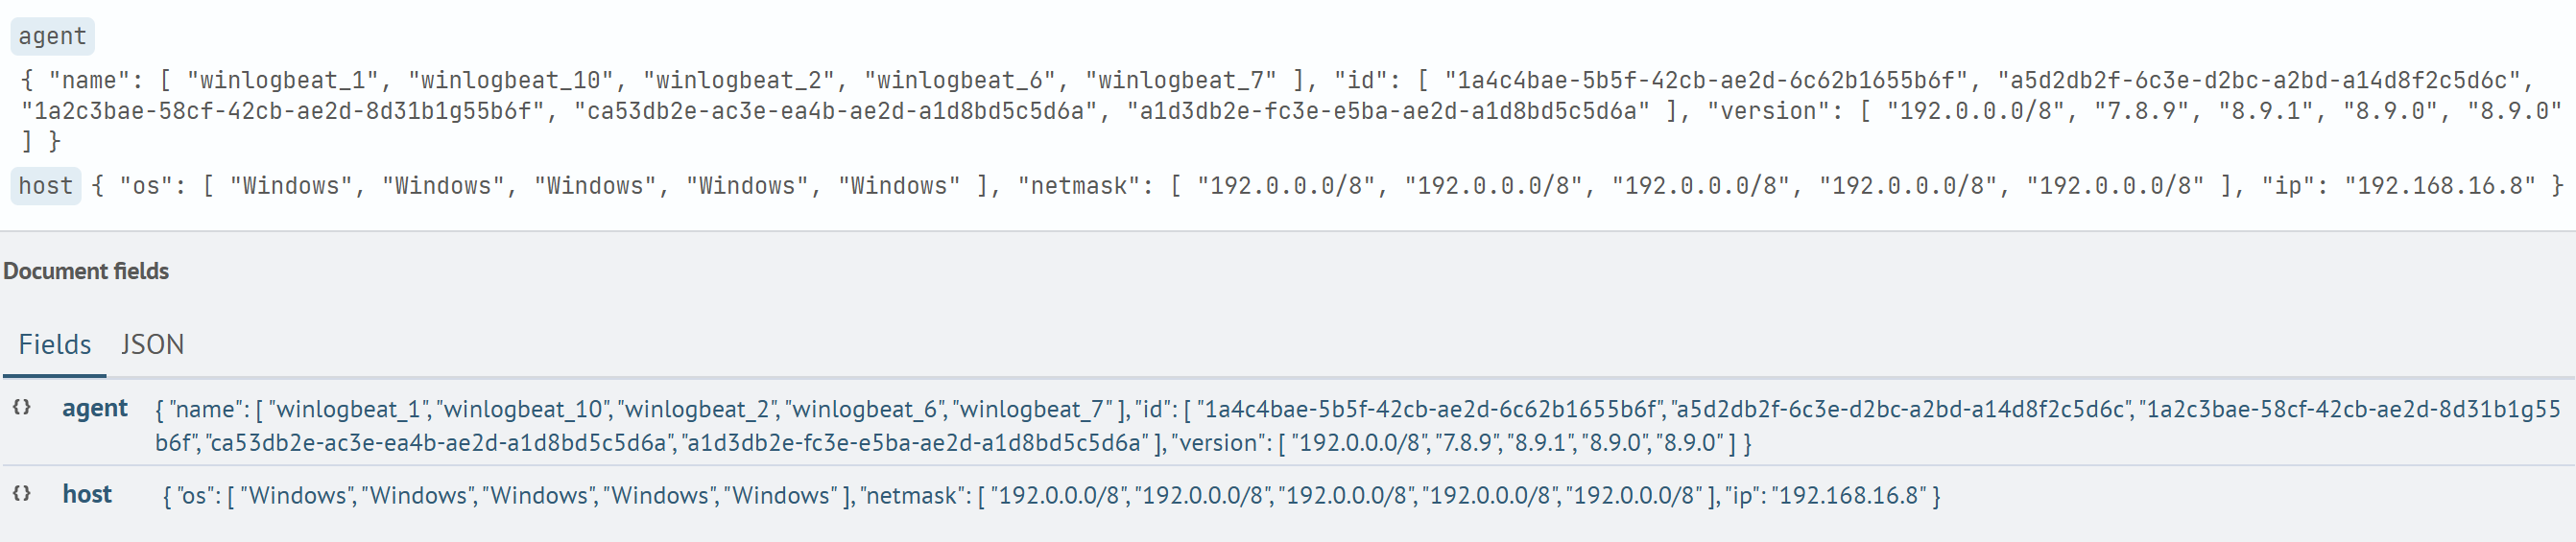
The event was enriched with the fields agent.id, agent.name, host.os, agent.version, and host.netmask with an array of values from the corresponding rows.
When executing the following query:
| makeresults
| fields - @timestamp
| eval host.ip="32.16.8.5"
| lookup agents_info host.netmask AS host.ip OUTPUT agent.id, agent.name, host.os, agent.version, host.netmask
The execution result will be as follows:
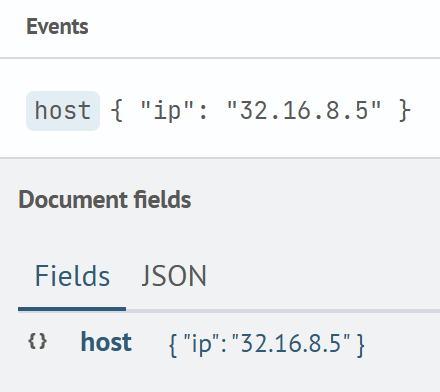
The event was not enriched with the fields agent.id, agent.name, host.os, agent.version, and host.netmask because the lookup does not contain the host.netmask field with the necessary cidrmatch value.
Interaction
The reference guide provides an advanced set of data manipulation features:
- selecting individual cells or ranges by dragging the cursor while holding the left mouse button
- copying selected elements to the clipboard and pasting content into the table
- clearing values in selected cells
- undoing operations using hotkeys
Pasting from Clipboard
To paste data from the clipboard, follow these steps:
- Copy the desired range in TSV format using
Ctrl + C/Cmd + C - Select one or more target cells in the table where you want to paste the data
- Press
Ctrl + V/Cmd + V
The data will be automatically inserted into the selected area. If needed, the table will expand (adding new rows), while column names remain unique.
Selected cells are visually highlighted when working with the table.
How Pasting Works
Anchor-Based Pasting
Used when the selected area in the table is smaller than the clipboard data.
- pasting starts from the "anchor" cell (the top-left cell of the selected area) and continues rightward and downward
- if the clipboard runs out of data, values repeat cyclically
Range-Based Pasting
Used when the selection area matches the clipboard data size.
- each value from the clipboard is placed into the corresponding cell in the same relative position
Keyboard shortcuts
| Operation | Keyboard shortcuts | Description | |
|---|---|---|---|
| Windows | Mac | ||
| Select All | Ctrl + A | Cmd + A | Selects all column headers and data cells |
| Copying | Ctrl + C | Cmd + C | Copies selected cells (including headers) in TSV format |
| Insert | Ctrl + V | Cmd + V | Pastes clipboard contents into the current selection range |
| Clearing | Delete | Clears the contents of selected cells | |
| Undo action | Ctrl + Z | Cmd + Z | Undoes the last change |
| Redo action | Ctrl + Y | Cmd + Shift + Z | Repeats the last undone action |