Configuring Kerberos Authentication
Overview
Kerberos is a network authentication protocol designed to securely verify the identities of users and services. The protocol uses symmetric encryption and trusted key distribution centers (KDC - Key Distribution Center). One common use case for Kerberos is enabling Single Sign-On (SSO), which eliminates the need for repeated password entry across different services.
Mechanism of Operation
Kerberos authentication is implemented through an external proxy server (e.g., Apache or Nginx) positioned in front of the web interface server. The proxy validates the user's Kerberos token and passes the authentication result as an HTTP header to the web interface service, which is configured to trust the proxy.
Workflow:
- The user accesses the Search Anywhere Framework web interface URL in a browser (e.g.,
company.searchanywhereframework.com). The request is routed to the proxy server - The proxy server responds with a 401 (Unauthorized) status code and the header
WWW-Authenticate: Negotiate, prompting Kerberos authentication via the SPNEGO protocol - If the browser supports Kerberos and the host making the request is within the domain, it performs the following steps automatically:
- requests a Kerberos ticket (TGS) from the KDC server for the service (e.g.,
HTTP/COMPANY.SEARCHANYWHEREFRAMEWORK.RU@CORP.COM) - returns the ticket to the proxy server in the header:
Authorization: Negotiate <base64-encoded Kerberos token>
- requests a Kerberos ticket (TGS) from the KDC server for the service (e.g.,
- The proxy server uses GSSAPI libraries and the administrator-provided keytab file to verify the token:
- reads the local Kerberos configuration from
/etc/krb5.confto correctly interpret the Kerberos ticket (realm, DNS, etc.) - extracts the username from the token (e.g.,
smith.p@CORP.COM)
- reads the local Kerberos configuration from
- The proxy server adds an HTTP header with the username (e.g.,
x-proxy-user: smith.p@corp.com) and forwards the request to the web interface service - The web interface service is configured to operate in proxy mode, where:
- basic authentication is not checked
- full trust is placed in the
x-proxy-userheader value provided by the proxy - this username is used for interacting with Search Anywhere Framework nodes
- Search Anywhere Framework, configured to trust external authentication mechanisms, retrieves the username from the
x-proxy-userheader passed by the web interface service and uses it as a backend role
Ensure that direct user access to the web interface service and Search Anywhere Framework nodes (bypassing the proxy server) is blocked at the network level, for example, using a firewall or routing rules.
Otherwise, an attacker could send a request directly to the web interface service or Search Anywhere Framework nodes with a forged x-proxy-user header, bypassing the authentication mechanism.
Some security measures will be described later in this article.
Prerequisites
Required Files
- keytab-file - contains encrypted Kerberos service credentials used by the proxy server to validate incoming Kerberos tokens. This file is created using Active Directory or
ktutilby the system administrator responsible for the directory service - SSL-certificate and private key (PEM format) - the certificate used by the proxy server to establish HTTPS connections between the user's browser and the server. The certificate should be signed by a trusted domain certificate authority (CA) to prevent security warnings and ensure proper SPNEGO functionality across all browsers
Additional Information
- Kerberos principal name (SPN) - a unique service identifier registered in the Kerberos realm. For a web proxy, the principal name follows the format
HTTP/<SERVICE_FQDN>@<KRB_REALM>(e.g.,HTTP/COMPANY.SEARCHANYWHEREFRAMEWORK.COM@CORP.COM). This name must match the entry in the keytab file and be registered in the KDC - KDC server IP address or FQDN - the authentication server (e.g., an Active Directory domain controller) that issues Kerberos tickets to clients. Its address is specified in the Kerberos configuration file (
/etc/krb5.conf) on the proxy server and is used to validate incoming tokens
Placeholder Definitions
OS_IP- IP address of the Search Anywhere Framework master nodeOS_HOME- Search Anywhere Framework home directory, typically/app/opensearch/OSD_HOME- SA Web home directory, typically/app/opensearch-dashboards/CLUSTER_NAME- OpenSearch cluster nameKEYTAB_PATH- full path to thekeytabfile used by the proxy for Kerberos authenticationSERVICE_FQDN- Fully Qualified Domain Name (FQDN) of the web interface service accessed by the client browser (e.g.,company.searchanywhereframework.com)KRB_PRINCIPAL- Kerberos principal name for the web interface serviceKRB_REALM- Kerberos realm (authentication domain, e.g.,EXAMPLE.COM)KDC_IP- IP address of the Kerberos server (KDC), often the same as the domain controllerSSL_CERT- path to the server's SSL certificate (PEM format) used by the proxySSL_KEY- path to the private key for the specified SSL certificate (PEM format)
Ensure that the values of SERVICE_FQDN and KRB_REALM form the KRB_PRINCIPAL parameter according to the following scheme:
HTTP/<SERVICE_FQDN>@<KRB_REALM>
Note that some bash commands in this article use placeholder substitution in shell variable format (${SYMBOL} instead of <SYMBOL>). Before executing such a command, set the corresponding variable in the shell:
SYMBOL=<SYMBOL>
Configuring Local Kerberos Settings
Before configuring the proxy server, you must first install the krb5 package. The installation should be performed on the server where the proxy will be deployed. The proxy can be deployed on the same server running the web interface service (SA Web).
The krb5 package (Kerberos 5) provides core libraries and utilities for working with the Kerberos protocol.
Execute the following commands to install the krb5 package:
sudo apt update
sudo apt install krb5-user
During installation, you will see the Pending kernel upgrade screen. Press Space to continue.

Next, the Daemons using outdated libraries screen will appear.
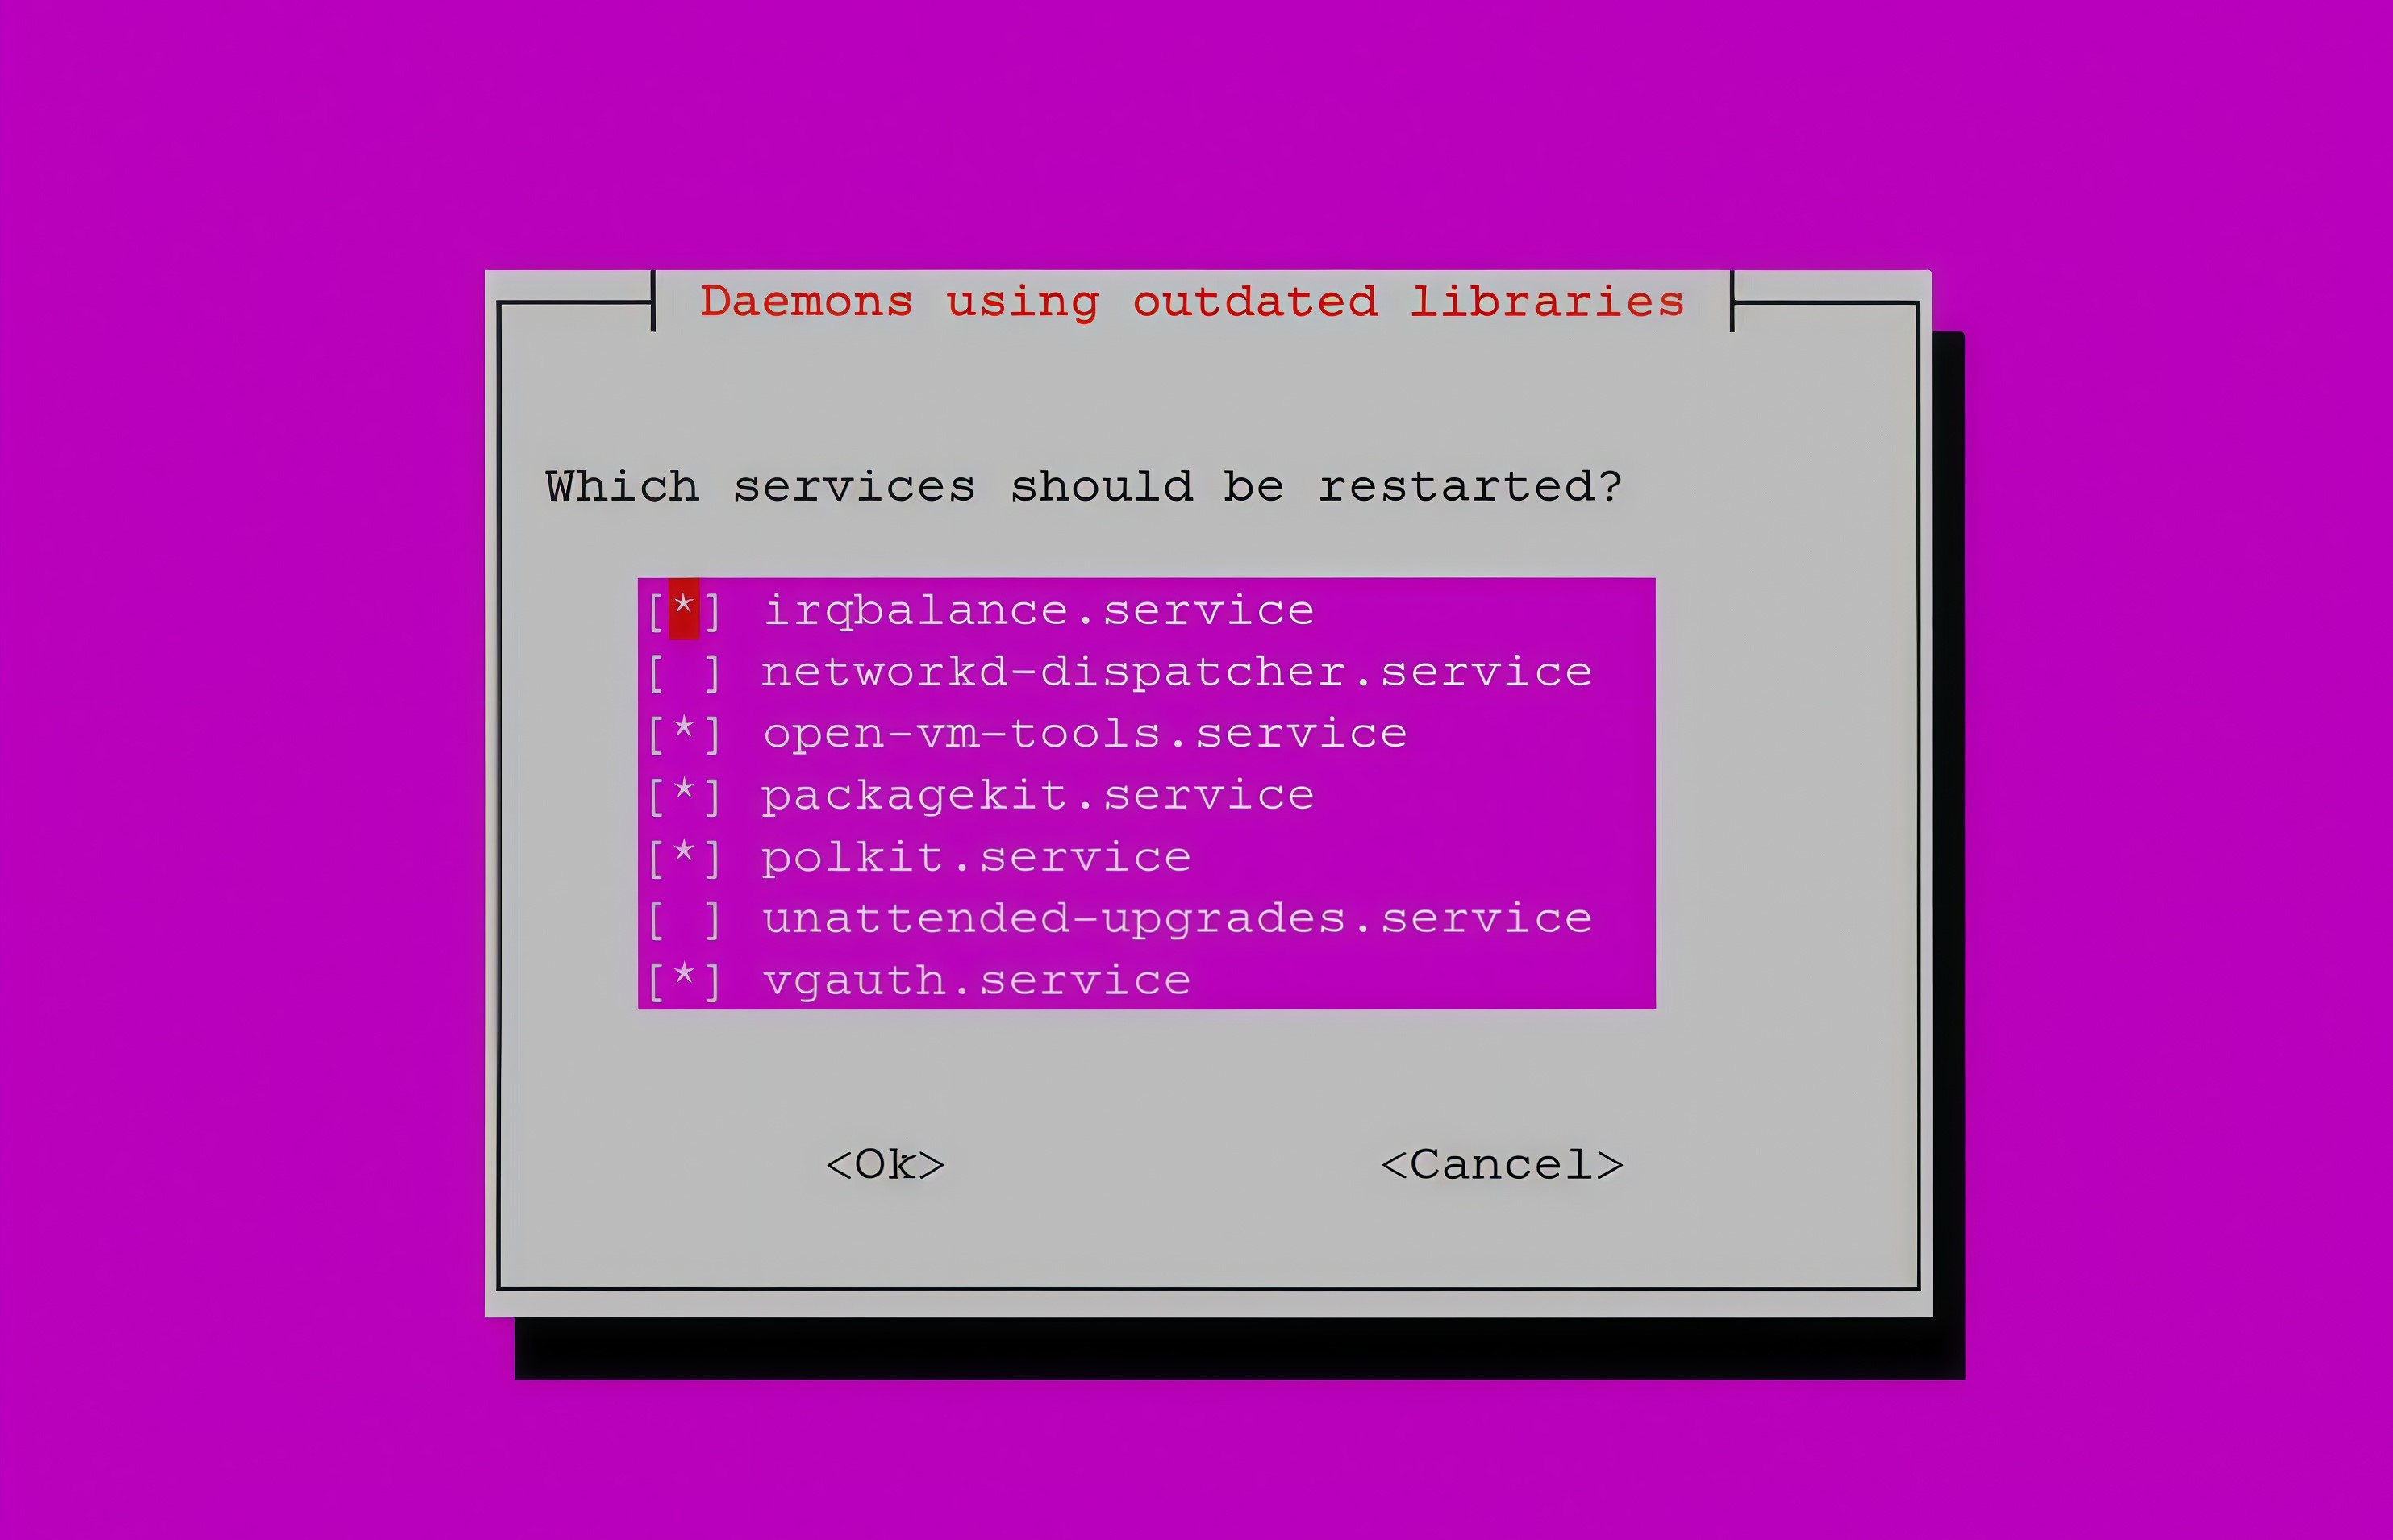
Remove all checkmarks * from the highlighted services. Use the Space key to toggle selections and arrow keys to navigate between items.
After clearing all selections, press Enter to complete the installation.
Once installed, a configuration file named krb5.conf should appear in the /etc directory. This file is used by the mod_auth_gssapi proxy module, which participates in processing requests with Kerberos credentials.
This file must be configured so that the GSSAPI library (used by Apache) can properly identify the Kerberos server (KDC) parameters, realm, and domain mapping rules.
Open /etc/krb5.conf for editing and set the following content:
[libdefaults]
default_realm = <KRB_REALM>
dns_lookup_realm = true
dns_lookup_kdc = true

[realms]
<KRB_REALM> = {
  kdc = <KDC_IP>
  admin_server = <KDC_IP>
}

[domain_realm]
.<SERVICE_FQDN> = <KRB_REALM>
<SERVICE_FQDN> = <KRB_REALM>
The configuration file consists of the following sections:
-
[libdefaults]- general parametersdefault_realm- the primary Kerberos realm name (e.g.,EXAMPLE.COM), to which all users and services will belong by default. Must be specified in uppercasedns_lookup_realmanddns_lookup_kdc- enable automatic realm and Kerberos server address resolution via DNS. In most cases, these can remain enabled (true)
-
[realms]- realm parameters. This section defines how to connect to a specific Kerberos realmkdc- IP address (or FQDN) of the KDC server that issues ticketsadmin_server- address of the Kerberos administration server (usually matches the KDC)
-
[domain_realm]- domain-to-realm mapping. This section allows the Kerberos client to determine which realm to use for specific DNS domains.<SERVICE_FQDN> = <KRB_REALM>- means all subdomains*.<SERVICE_FQDN>will automatically be bound to the<KRB_REALM>.<SERVICE_FQDN> = <KRB_REALM>- indicates that the primary domain name is also bound to the realm
These mappings are required for proper SPNEGO functionality in the client's browser – Kerberos uses them to determine which token to generate when accessing the web service.
In the [domain_realm] section:
- domain names (left of
=) must always be in lowercase - realms (right of
=) must always be in UPPERCASE
Principals (service names) are specified without the realm (e.g., HTTP/example.com).
Verifying Kerberos Configuration and Keytab File
To verify the configuration and the keytab file provided by the administrator, you can attempt to request a TGT ticket.
TGT (Ticket-Granting Ticket) – the primary Kerberos ticket issued by the KDC after successful authentication. It validates the identity of a user/service and is used to access other resources.
TGT retrieval is only for testing purposes. In the production setup, the proxy does not directly query the KDC, so persistent network access to the KDC is not required. Skip this step if verification is impossible due to lack of KDC connectivity.
To request a TGT ticket on behalf of the service, execute:
kinit HTTP/<SERVICE_FQDN> -k -t <KEYTAB_PATH>
Option descriptions:
-k– usekeytabfile instead of password-t– path to thekeytabfile
This command initiates TGT retrieval on behalf of the specified principal.
Next, verify the obtained tickets using the following command:
klist
Example command output:
Ticket cache: FILE:/tmp/krb5cc_0
Default principal: user.u@EXAMPLE.COM

Valid starting     Expires            Service principal
05/28/25 07:00:32  05/28/25 17:00:32  krbtgt/EXAMPLE.COM@EXAMPLE.COM
        renew until 05/29/25 07:00:20
Output explanation:
- Ticket cache – path to the temporary ticket storage file
- Default principal – authenticated entity
- Service principal – KDC that issued the TGT
- Valid starting / Expires – TGT validity period
- renew until – final deadline for automatic ticket renewal
If you successfully obtained a TGT, this confirms that:
- The Kerberos configuration is correct
- The
keytabfile is valid
Proxy Installation and Configuration
The next step is to configure a reverse proxy that will perform Kerberos authentication for incoming HTTP requests. This guide uses Apache as the web server.
To install Apache, execute the following commands to install the apache2 package:
sudo apt update
sudo apt install apache2
Create and configure the Apache configuration file by executing:
nano /etc/apache2/sites-available/apache-kerberos.conf
Insert the following configuration template into the file, replacing parameters with your actual values:
apache-kerberos.conf
HostnameLookups Off
KeepAlive On
MaxKeepAliveRequests 500
KeepAliveTimeout 5

ProxyPreserveHost On

<VirtualHost *:80>
    ServerName <SERVICE_FQDN>
    RewriteEngine On
    RewriteCond %{HTTPS} off
    RewriteRule (.*) https://%{HTTP_HOST}%{REQUEST_URI}
</VirtualHost>

<VirtualHost *:443>
  ServerName <SERVICE_FQDN>

  LogLevel warn
  ErrorLog /var/log/apache2/error.log
  CustomLog /var/log/apache2/access.log common

  SSLEngine on
  SSLCertificateFile /path/to/your/<SSL_CERT>
  SSLCertificateKeyFile /path/to/your/<SSL_KEY>

  RedirectMatch ^/$   https://<SERVICE_FQDN>/

  ProxyRequests Off
  ProxyVia On
  RemoteIPHeader X-Forwarded-For

  <Proxy *>
    Require all granted
  </Proxy>

  SSLProxyEngine on
  SSLProxyVerify none
  SSLProxyCheckPeerCN off
  SSLProxyCheckPeerName off
  SSLProxyCheckPeerExpire off

  <Location / >
    ProxyPass         https://127.0.0.1:5601/
    ProxyPassReverse  https://127.0.0.1:5601/

    RequestHeader set x-proxy-user %{REMOTE_USER}s
    RequestHeader set x-proxy-roles %{REMOTE_USER}s
    RequestHeader set x-forwarded-for 127.0.0.1

    AuthType GSSAPI
    AuthName "GSSAPI Login"
    GssapiCredStore keytab: <KEYTAB_PATH>

    GssapiLocalName On
    GssapiAllowedMech krb5
    GssapiBasicAuthMech krb5
    GssapiConnectionBound on
    GssapiUseSessions On

    Require valid-user
  </Location>
</VirtualHost>
Key Parameter Descriptions
GssapiLocalName On- convertsuser@REALMformat touserGssapiAllowedMech krb5- allows only Kerberos as authentication mechanismGssapiBasicAuthMech krb5- basic authentication mechanism (if used)GssapiConnectionBound On- binds session to connectionGssapiUseSessions On- enables session caching to reduce KDC load
For Apache to work with Kerberos, it must have access to the keytab file:
sudo chmod 644 <KEYTAB_PATH>
Restart the apache2 service and verify its status using these commands:
sudo systemctl restart apache2
sudo systemctl status apache2
Open port 443 in the firewall settings.
For RHEL-based systems:
sudo firewall-cmd --permanent --zone=public --add-port=443/tcp
sudo firewall-cmd --reload
sudo firewall-cmd --list-all
For Debian-based systems:
sudo ufw allow 443/tcp
sudo ufw reload
sudo ufw status verbose
The proxy server configuration is now complete.
Search Anywhere Framework Security Configuration
Configuring Search Anywhere Framework Security Plugin
Before modifying the configuration, synchronize it with the current cluster state. This prevents loss of changes made directly via API.
Execute the following command:
JAVA_HOME=${OS_HOME}/jdk/ ${OS_HOME}/plugins/opensearch-security/tools/securityadmin.sh -h ${OS_IP} \
-cacert ${OS_HOME}/config/ca-cert.pem \
-cert ${OS_HOME}/config/admin-cert.pem \
-key ${OS_HOME}/config/admin-key.pem \
--accept-red-cluster -nhnv -icl \
-backup ${OS_HOME}/config/opensearch-security/
This command creates a current backup of the configuration in <OS_HOME>/config/opensearch-security/.
Open the security configuration file config.yml located in <OS_HOME>/config/opensearch-security/:
nano ${OS_HOME}/config/opensearch-security/config.yml
Add the following settings while considering the existing content:
config:
  dynamic:
    http:
      anonymous_auth_enabled: false
      xff:
        enabled: true
        remoteIpHeader: "x-forwarded-for"
        internalProxies: "127.0.0.1"
    authc:
      proxy_auth_domain:
        http_enabled: true
        transport_enabled: true
        order: 0
        http_authenticator:
          type: "proxy"
          challenge: false
          config:
            user_header: "x-proxy-user"
            roles_header: "x-proxy-roles"
        authentication_backend:
          type: "noop"
The parameter config.dynamic.authc.proxy_auth_domain.order must be set to 0. All other authentication schemes listed in the config.dynamic.authc block must have order strictly greater than 0.
The config.dynamic.http.xff.internalProxies parameter must specify the proxy server address that is trusted. Requests from this proxy are considered authenticated. The values of headers (x-proxy-user and x-proxy-roles) specified in the user_header and roles_header parameters will be used as the authenticated user's name and roles. No one except the proxy server should be able to access Search Anywhere Framework with these headers, otherwise the authentication status could be forged.
To load the updated configuration back into the cluster, execute:
JAVA_HOME=${OS_HOME}/jdk/ ${OS_HOME}/plugins/opensearch-security/tools/securityadmin.sh \
-cacert ${OS_HOME}/config/ca-cert.pem \
-cert ${OS_HOME}/config/admin-cert.pem \
-key ${OS_HOME}/config/admin-key.pem \
--accept-red-cluster --clustername ${CLUSTER_NAME} \
-f ${OS_HOME}/config/opensearch-security/config.yml \
-t config -h ${OS_IP}
Configuring SA Web
Now configure the SA web interface to properly process proxy headers.
Open the configuration file $OSD_HOME/config/opensearch-dashboards.yml and add these parameters at the end:
# ---------------------------- Proxy Authentication ----------------------------
opensearch.requestHeadersWhitelist: ["securitytenant", "Authorization", "x-forwarded-for", "x-proxy-user", "x-proxy-roles"]
smart_monitor.auth.type: "proxy"
smart_monitor.proxycache.user_header: "x-proxy-user"
smart_monitor.proxycache.roles_header: "x-proxy-roles"
Parameter descriptions:
opensearch.requestHeadersWhitelist- list of headers allowed to be forwarded from client to OpenSearch. Must include the headers used by the proxy for username and rolessmart_monitor.auth.type- sets SA Web operation mode. Here configured for proxy operationsmart_monitor.proxycache.user_headerandroles_header- define which headers Search Anywhere Framework should use to extract user and role information
To apply changes, restart the web interface service:
sudo systemctl restart opensearch-dashboards
The configuration setup is now complete.
Browser Configuration for Kerberos
For proper Kerberos authentication in browsers, you need to enable automatic Kerberos token transmission for specific sites (in our case - the Search Anywhere Framework web interface).
Chrome and Edge Configuration
Both browsers use Windows system settings, so configuration is done through system settings.
Follow these steps:
- Press
Win+R, typeinetcpl.cpland pressEnter- this opensInternet Properties - Go to the
Securitytab - Click
Local intranet-Sites - Enter the site address (
<SERVICE_FQDN>in lowercase), clickAdd, thenClose
Firefox Configuration
Firefox doesn't use system settings, so configuration must be set in the browser.
Follow these steps:
- Open Firefox and type
about:configin the address bar - Accept the warning about making changes
- Search for
negotiate - Configure parameters following the example, replacing
smart.localwith your<SERVICE_FQDN>(in lowercase)
For domain-joined computers, Kerberos TGT is obtained automatically at login. For computers outside the domain, the browser will prompt for domain username and password when accessing the web interface.
The Kerberos authentication setup is now complete.