Policies
Description
Policies are index management configurations that describe:
- the states an index can be in, representing stages of its lifecycle (e.g., hot, warm, delete, etc.)
- the actions to be performed on indexes in a given state (e.g., relocating to cold storage nodes or deleting the index)
- the conditions that must be met for an index to transition from one state to another. For example, if the index age exceeds eight weeks, it should transition to a state where a delete action is defined
You can define any number of states, transitions between them, and actions to be performed in each state within a policy.
The following table lists the corresponding policy fields available when creating a policy via the interface (Main Menu - Index Management - Index Policies - Create policy):
| Field Identifier | Field Name | Description | Type | Required | Editable |
|---|---|---|---|---|---|
policy_id | Policy ID | The identifier (display name) of the policy | string | Yes | No |
description | Description | A description of the policy | string | Yes | Yes |
ism_template | ISM Templates | Index patterns to which the policy will apply | array<object> | No | Yes |
states | States | States defined in the policy | array<object> | Yes | Yes |
States
A state describes the current status of a managed index. A managed index can only be in one state at a time.
The following table describes the parameters that can be configured for a state:
| Field Identifier | Field Name | Description | Type | Required |
|---|---|---|---|---|
name | State Name | The name of the state | string | Yes |
actions | Actions | The actions to perform upon entering the state. See the "Actions" section for more details | array<object> | Yes |
| Defined by order | Order | Position relative to other states. Selected via a dropdown containing the names of created states | string | Yes |
transitions | Transitions | Next states and the conditions required to transition to them. If no transitions are defined, the policy is considered complete and stops managing the index. If multiple transitions exist, the first condition to match will be applied. See the "Transitions" section for details. | array<object> | Yes |
Actions
Actions are the steps that a policy sequentially performs on an index when it enters a specific state.
ISM (Index State Management) executes actions in the order they are defined. For example, if actions [A, B, C, D] are specified, ISM performs action A and then goes into a sleep period, as configured by the cluster setting plugins.index_state_management.job_interval. After the sleep interval, ISM continues executing the remaining actions one by one. However, if ISM fails to successfully perform action A, the operation stops and actions B, C, and D are not executed. In such cases, a retry mechanism is available (described below).
Optionally, a timeout period can be defined for an action. If the timeout is exceeded, the operation is forcibly terminated. For example, if the timeout is set to 1d and the action is not completed within one day (even after retries), the action fails.
Each action can be configured with timeout and retry settings:
| Field Identifier | Field Name | Description | Type | Required | Default |
|---|---|---|---|---|---|
timeout | Timeout | Maximum allowed duration for the action | string (time unit, e.g., 30m, 4h, 7d) | No | Not set |
count | Retry Count | Number of times the action should be retried upon failure | number | Yes | Not set |
backoff | Retry Backoff Policy | Backoff function used between retry attempts | string (Exponential, Constant, Linear) | No | Exponential |
delay | Retry Delay | Waiting period between retry attempts | string (time unit) | No | Not set |
The following example configures an action with a timeout of one hour. The policy retries the action up to three times using exponential backoff, with an initial delay of 10 minutes:
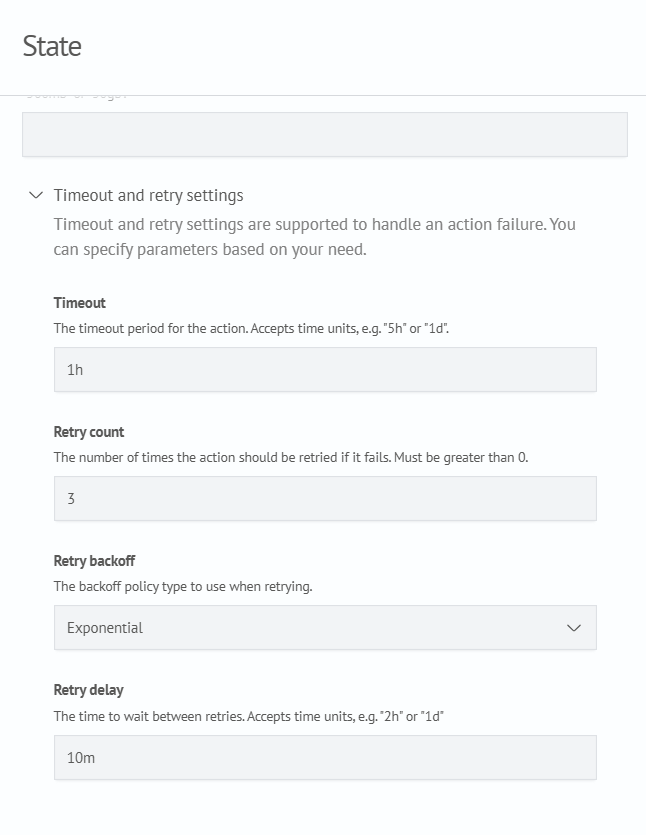
Equivalent JSON configuration:
{
  "actions": {
    "timeout": "1h",
    "retry": {
      "count": 3,
      "backoff": "exponential",
      "delay": "10m"
    }
  }
}
Other parameters are defined by the specific action itself.
Available Actions
ISM supports the following actions:
- force_merge
- read_only
- read_write
- replica_count
- shrink
- close
- open
- delete
- rollover
- notification
- snapshot
- index_priority
- allocation
- rollup
- Move to ClickHouse
Force Merge
Reduces the number of index segments by merging shard segments. Before starting the merge, ISM attempts to set the index to read-only.
| Parameter | Description | Type | Required |
|---|---|---|---|
max_num_segments | The number of segments to reduce the shard to | number | Yes |
wait_for_completion | Whether to wait for the action to complete or return immediately after start | boolean | No |
task_execution_timeout | Timeout for task execution. Only applies if wait_for_completion is false | string (time unit) | No |
Example configuration:
{
  "force_merge": {
    "max_num_segments": 1
  }
}
Read Only
Sets the managed index to read-only mode.
Example configuration:
{
  "read_only": {}
}
Read Write
Sets the index to read-write mode.
Example configuration:
{
  "read_write": {}
}
Replica Count
Sets the number of replicas for the index.
| Parameter | Description | Type | Required |
|---|---|---|---|
number_of_replicas | Defines the number of replicas to assign to the index. | number | Yes |
Example configuration:
{
  "replica_count": {
    "number_of_replicas": 2
  }
}
Shrink
Allows reducing the number of primary shards in an index. This action supports the following parameters:
| Parameter | Description | Type | Required |
|---|---|---|---|
num_new_shards | The maximum number of primary shards in the shrunken index. | integer | Yes, but cannot be used with max_shard_size or percentage_of_source_shards |
max_shard_size | The maximum shard size in bytes for the target index. | string (size unit, example values: 500mb, 1gb) | Yes, but cannot be used with num_new_shards or percentage_of_source_shards |
percentage_of_source_shards | The percentage of the source primary shards to shrink. This parameter specifies the minimum percentage to use when shrinking the number of primary shards. Must be in the range from 0.0 to 1.0 (exclusive). | number | Yes, but cannot be used with max_shard_size or num_new_shards |
target_index_name_template | The name of the shrunken index. Accepts strings and Mustache variables (e.g., {"source": "_shrunken"}). | string | No |
aliases | Aliases to add to the new index. | array<object> | No |
force_unsafe | Whether to perform the action even when no replicas are present. | boolean | No |
Example configuration:
{
  "shrink": {
    "num_new_shards": 1,
    "target_index_name_template": {
      "source": "_shrunken"
    },
    "aliases": [
      {
        "my-alias": {}
      }
    ],
    "force_unsafe": false
  }
}
If aliases need to be assigned, the aliases parameter should contain an array of alias objects. For example:
"aliases": [
  {
    "my-alias": {}
  },
  {
    "my-second-alias": {
      "is_write_index": false,
      "filter": {
        "multi_match": {
          "query": "QUEEN",
          "fields": ["speaker", "text_entry"]
        }
      },
      "index_routing" : "1",
      "search_routing" : "1"
    }
  },
]
Delete
Deletes the index.
Example configuration:
"delete": {}
Rollover
Creates a new index when the current one exceeds specified limits (size, age, or document count).
| Parameter | Description | Type | Required |
|---|---|---|---|
min_index_age | Minimum index age | string (time unit) | No, only one of the parameters must be specified. |
min_doc_count | Minimum document count | integer | No, only one of the parameters must be specified. |
min_size | Minimum total index size | string (size unit) | No, only one of the parameters must be specified. |
min_primary_shard_size | Minimum primary shard size | string (size unit) | No, only one of the parameters must be specified. |
Example configuration:
"rollover": {
  "min_size": "100gb",
  "min_index_age": "1d",
  "min_primary_shard_size": "20gb",
  "copy_alias": false
}
Allocation
Updates the index allocation settings, causing it to move to nodes with specified attributes.
| Parameter | Description | Type | Required |
|---|---|---|---|
require | The index is allocated only to nodes whose attributes match all of the specified values. | object | No |
include | The index may be allocated to nodes whose attributes match at least one of the specified values. | object | No |
exclude | The index is not allocated to nodes whose attributes match any of the specified values. | object | No |
wait_for | If set to true, the policy waits until all shards are relocated. If false (default), the action is async. | boolean | No |
"allocation": {
  "require": {
    "routing_mode": "cold"
  },
  "include": {},
  "exclude": {},
  "wait_for": false
}
When configuring this action, consider any existing index allocation rules applied to indices under this policy. For example, if the original index configuration includes include: hot, then you should only use the include field in the action settings (without require). Using both include and require may result in conflicting conditions, preventing shards from being allocated to any node.
Move to ClickHouse
Transfers data to ClickHouse.
| Parameter | Description | Type | Required |
|---|---|---|---|
table_name_template | A regular expression defining the table name in ClickHouse based on the index name. A named capture group in the regex will be used as the table name. The capture group must be named name. | string (e.g., (?<name>.*?)-\d+) | Yes |
connection_id | The ClickHouse connection ID configured in the OpenSearch settings. | string | Yes |
batch_size | The number of events sent to ClickHouse in a single batch. | integer | No |
Policy Configuration Examples
General Information
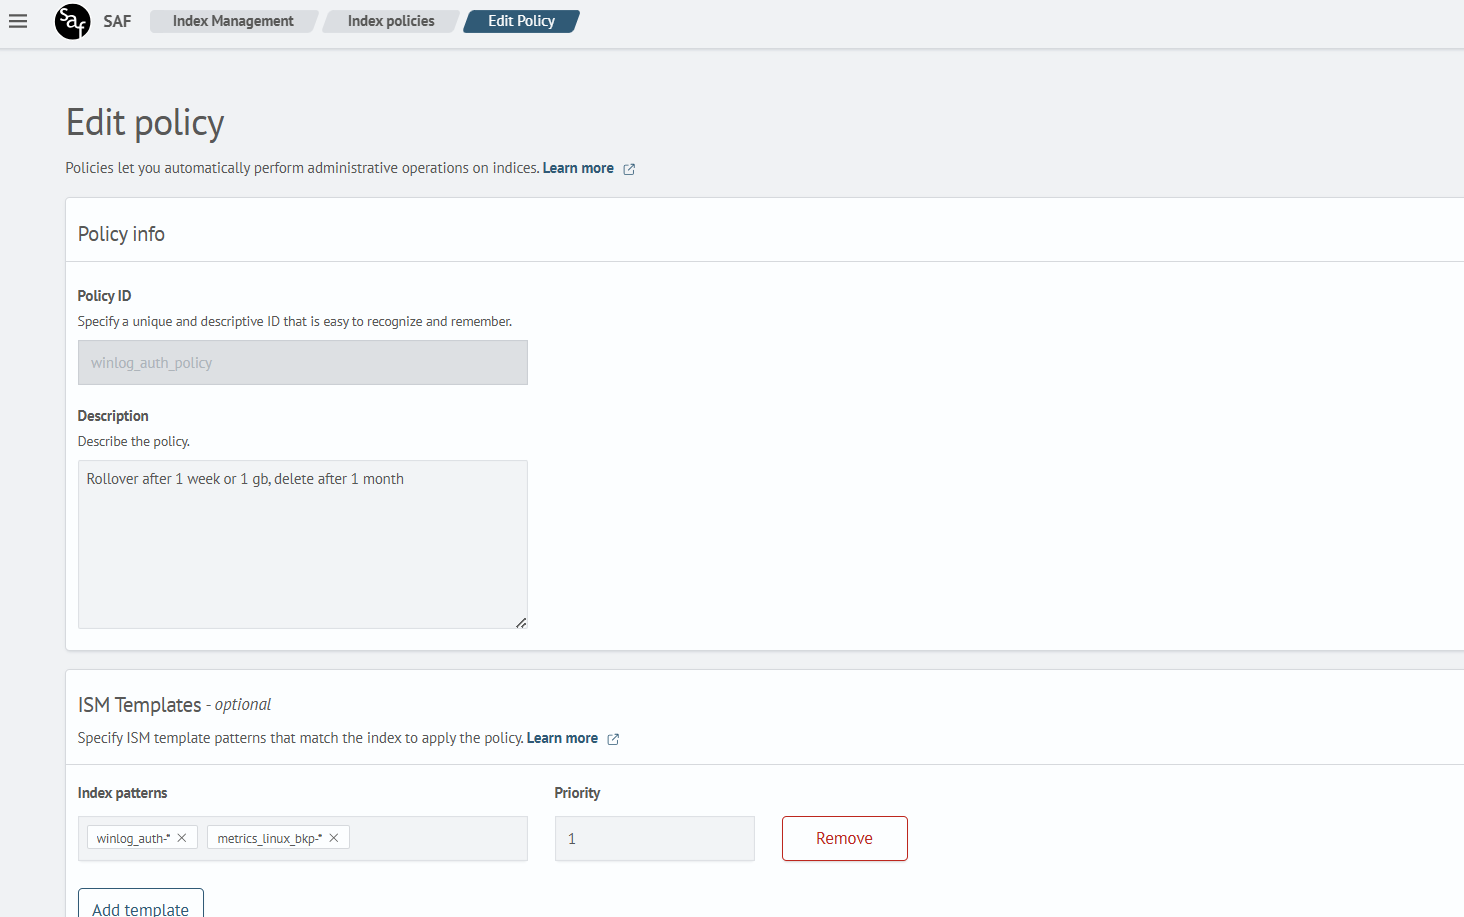
To get started, create a new policy. Navigate to Index Policies (Main menu - System settings - Index management - Index policies) and click Create policy. In the popup window, select Visual editor and click Continue.
In the creation form, specify the following fields:
- Policy ID — a unique name for the policy
- Description — a brief explanation of its purpose
In the ISM Templates section, define the index patterns that this policy will automatically apply to when new indices are created.
Example configuration:
Configuring a Policy with Rollover
- Add the
initstate
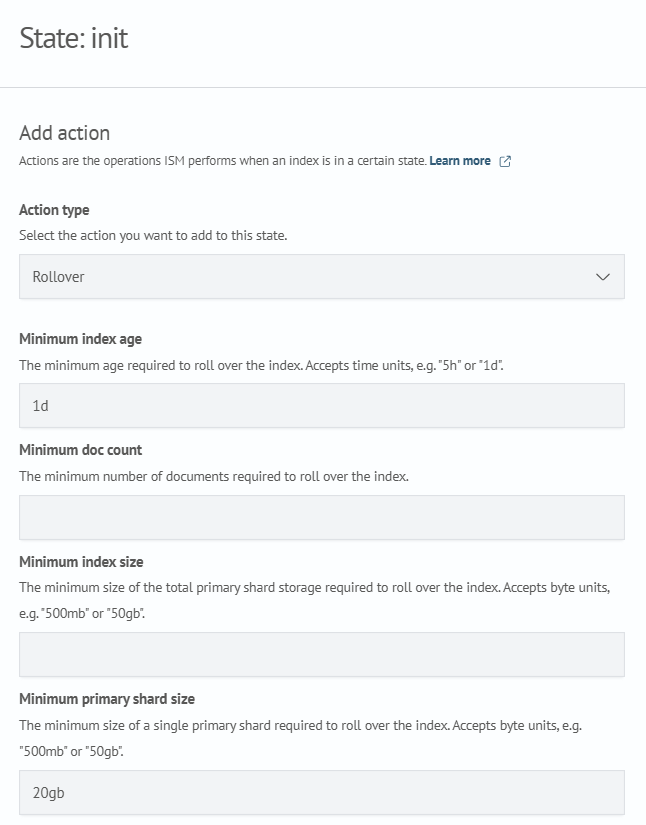
Go to the State section and click Add state. Name the state init, then click Add action and select the Rollover action type. Set the necessary parameters according to your configuration needs.
In this example, the following parameters are defined:
- minimum index age
- minimum primary shard size
See the detailed Rollover section for more on these parameters.
- Configure Retry Settings
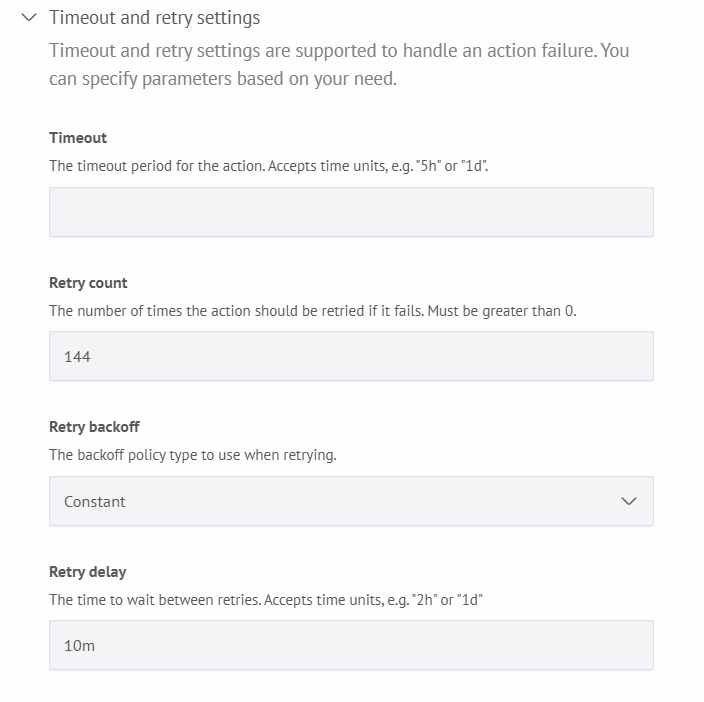
In the Timeout and Retry Settings block, it is recommended to use the following values:
- retry count:
144 - retry delay:
10m
These settings allow retrying for 24 hours with a 10-minute interval, which improves action reliability.
After entering the parameters, click Add action, then Save state.
The Order and Transitions sections are not configured at this stage.
- Add the delete state
Click Add state, name it delete, and configure it as shown below:
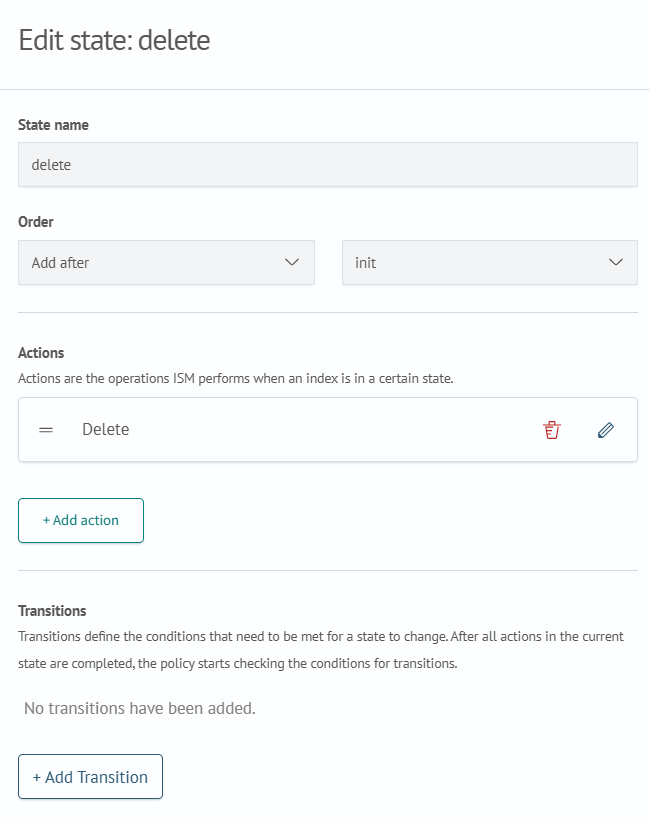
Add the delete action and specify the appropriate Timeout and retry settings:
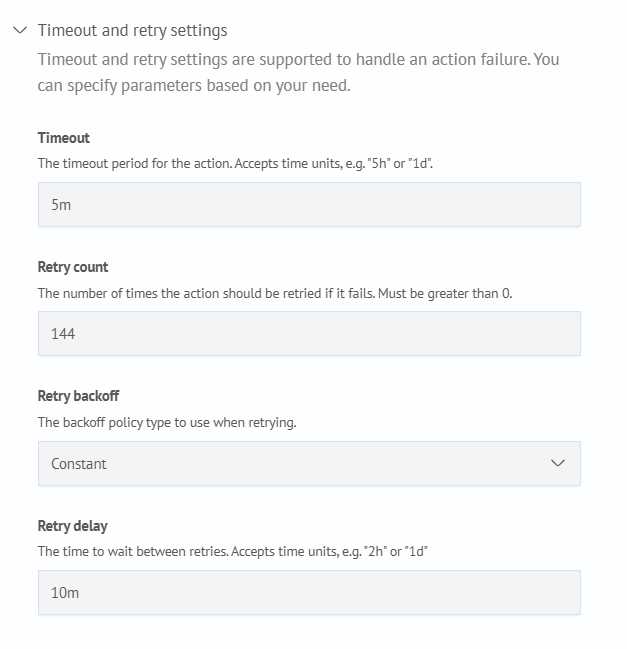
Once configured, click Add action, then Save state.
- Configure Order and Transitions
Return to the init state and in the Order section, click Add before and select the delete state.
Next, click Add transition and specify:
- destination state:
delete - condition: the condition under which the transition should occur
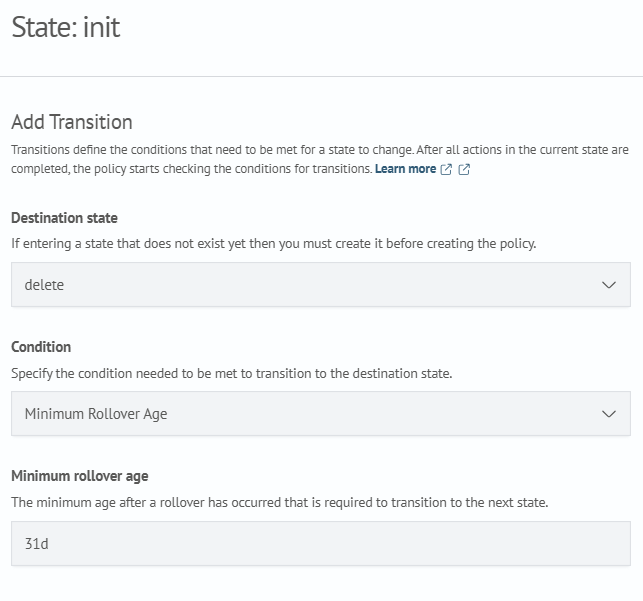
Click Add transition, then Update state to complete the setup.
- Create the Policy
After completing all steps, click Create.
You have now successfully configured a rollover-based policy.
Configuring a Policy with Relocation
This setup demonstrates how to configure the allocation action in an existing policy.
- Add a New State
Create a new state, for example named cold. In the Order section, set: Add after - select the init state.
- Configure the Allocation Action
Add a new action of type - allocation. Fill in the parameters as follows:
{
  "require": {},
  "include": {
    "routing_mode": "cold"
  },
  "exclude": {},
  "wait_for": false
}
When configuring this action, it's important to consider the current index allocation rules. See the allocation section for details.
In the Timeout and Retry Settings, you may apply the same recommended values used in the delete action (as described earlier in this guide).
- Configure the Transition
Click Add transition and set the following:
- destination state — select the target state
- condition — define the condition under which the transition will occur
Example:
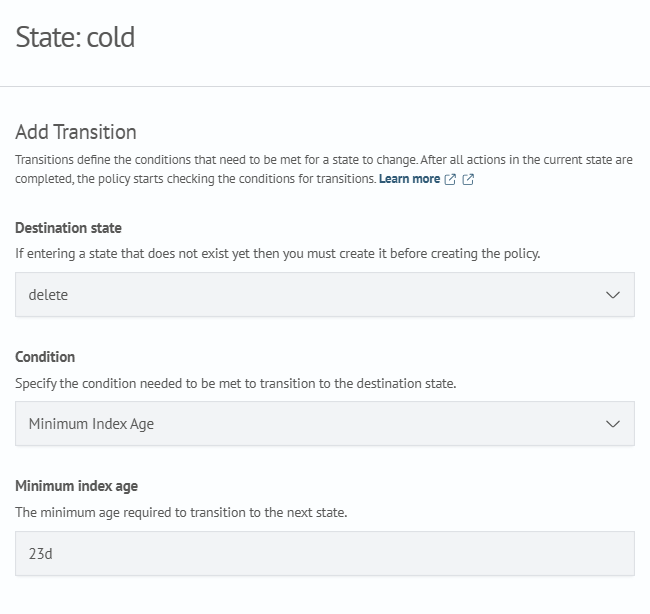
Click Add transition, then Save state.
- Update State Order:
initanddelete
- open the
initstate and set its order:Add before-cold - open the
deletestate and set:Add after-cold
This completes the policy configuration with relocation.
Configuring a Policy with a Wait State Before Rollover
To apply this configuration, you must already have a policy that uses rollover. For more information, see the corresponding section: Configuring a Policy with Rollover.
- Create the State
Add a new state, for example named wait_events. Open it for editing and in the Order section, select: Add before - init.
No actions are added for the wait_events state.
- Configure the Transition
Click Add transition and set the following parameters:
- destination state — select the target state
- condition — define the condition that triggers the transition
Example:
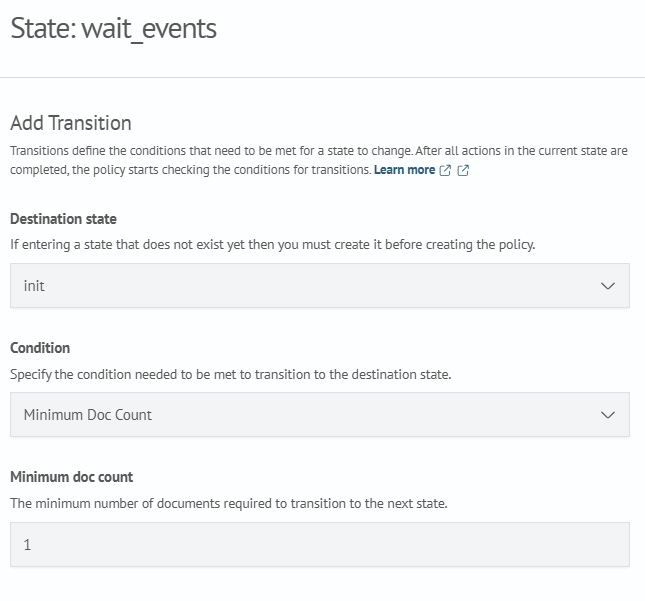
After completing the parameters, click Add transition, then Save state.
- Update State Order
Open the init state and set its order: Add after - wait_events.
This completes the configuration of the policy with a wait state before the rollover countdown begins.