Storage Preparation
Legend
INDEX_NAME- the name of the index where data will be written (e.g., theindexparameter in the Logstash output plugin pipeline)
It is assumed that by the time you follow the instructions below, the data collection connector is already configured. Data ingestion from the source is temporarily paused during configuration. If data collection hasn't been configured yet, it's recommended to first review the details of data collection configuration in the following documentation sections: Agent Data Collection and Agentless data collection.
Index Template Configuration
Creating an Index Template
The first step is to create an index template that automatically defines parameters for all new indexes related to the data source. The template must specify an index name pattern in the <INDEX_NAME>-*, format to cover all automatically created indexes during rotation (e.g., <INDEX_NAME>-000001, <INDEX_NAME>-000002 etc.). When using the rollover mechanism, you need to configure a rollover alias.
The alias name doesn't have to match the index name, but for simplified configuration and consistent naming conventions, it's recommended to use <INDEX_NAME> as the alias name. The template name can also be arbitrary, though it's common to use the <INDEX_NAME>_template suffix for easy identification.
The parameters for replica count and primary shards are provided as examples - in a production environment, these should be selected individually based on the volume of incoming data, performance requirements, and fault tolerance levels. The index.routing.allocation.include.routing_mode parameter value must match the routing_mode attribute of the cluster nodes where the index should be created. You can check cluster node attributes using the GET _cat/nodeattrs.
To create the template, open the Developer Console (Main Menu- System Settings - Developer Console) and execute the following command:
PUT _index_template/<INDEX_NAME>_template
{
  "index_patterns": [
    "<INDEX_NAME>-*"
  ],
  "template": {
    "settings": {
      "number_of_shards": 2,
      "number_of_replicas": 1,
      "index": {
        "routing": {
          "allocation": {
            "include": {
              "routing_mode": "hot"
            }
          }
        },
        "opendistro": {
          "index_state_management": {
            "rollover_alias": "<INDEX_NAME>"
          }
        }
      }
    }
  }
}
After executing the command, the operation result will be displayed in the right panel:
{
  "acknowledged": true
}
An alternative way to create a template is through the graphical interface. To do this, open the Templates (Main Menu - System Settings - Index Management - Templates), click Create Template and specify the parameters described above.
Extracting Index Mapping
When connecting a data source, it's recommended to verify the index field types (mapping). First, you need to retrieve the current index mapping that was automatically created during the data source connection testing phase. To do this, open the Developer Console (Main Menu- System Settings - Developer Console) and execute the following command:
GET <INDEX_NAME>/_mapping
In the command above, the request is made directly to <INDEX_NAME>, because it's assumed that during the data source connection testing phase - before configuring the alias and index rotation - data was written directly to the index without a partition suffix.
In the query results, copy the contents of the mappings — field - it will be needed for further configuration.
Configuring Mapping in the Template
Navigate to the Templates (Main Menu - System Settings - Index Management - Templates), find the previously created template named <INDEX_NAME>_template and open it. Go to the Configuration tab - here you can modify parameters set when creating the template via the developer console. For example, you can set the priority parameter if it wasn't specified earlier.
Go to the Index Mapping section, select the JSON Editor tab, and paste the content previously copied from the mappings field.
Then switch to the Visual Editor tab - you'll be able to manually specify the field type for each field. Configuration example:
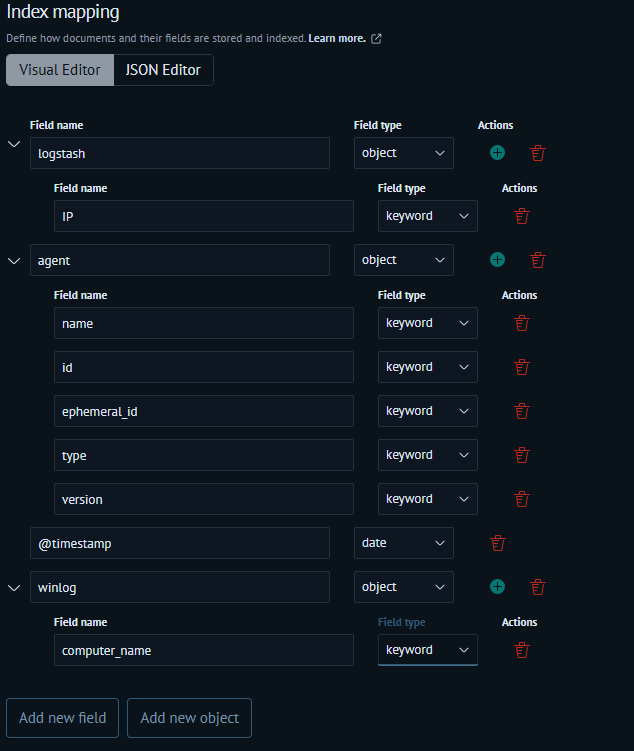
Field type recommendations:
- use
keywordtype for all text fields, except those containing long word sequences (e.g.,message).In such cases, usetexttype - for timestamps like
@timestamp, usedatetype - for large integer values —
long - for fractional values —
double - for IP addresses —
ip
For text type fields, you cannot build aggregations or perform wildcard searches (using * pattern matching).
Additional information on configuring field types and indexes can be found in the relevant General recommendations.
Configuring Rollover Policy for Index Preparation
Detailed instructions for creating and configuring policies can be found in this article.
The index pattern must be specified in the <INDEX_NAME>-*. format. This is required for the policy to apply to new indexes matching the specified pattern.
Creating the First Index
Before creating the first index for the source, delete the old index used during testing:
DELETE <INDEX_NAME>
Go to the Developer Console (Main Menu- System Settings - Developer Console) and execute the following command to create the first index that will be managed by the previously configured policy:
PUT <INDEX_NAME>-000001
{
  "aliases": {
    "<INDEX_NAME>": {
      "is_write_index": true
    }
  }
}
Configuring Index Pattern
Before configuring the index pattern, you need to enable Logstash and resume data transmission. This is necessary to have the temporal field available for selection in the index pattern. Information about fields in the index pattern will only become available after data enters the index.
Restart Logstash in the terminal on the appropriate host using the following command:
systemctl restart logstash
If you don't specify a temporal field in the index pattern, index searches won't respect the time interval you specify.
Navigate to the Index Patterns (Main Menu - System Settings - Module Settings - OPENSEARCH - Index Patterns), click Create Index Pattern and enter your <INDEX_NAME>. In the next step, select the temporal field (e.g., @timestamp), then click Create Index Pattern to complete the process.
At this point, index preparation for data storage is complete.
It's recommended to verify that the data flow from the source doesn't negatively impact either the data collection layer or the data storage, and that there are no indexing errors. You can review potential issues in the Data collection issues troubleshooting.