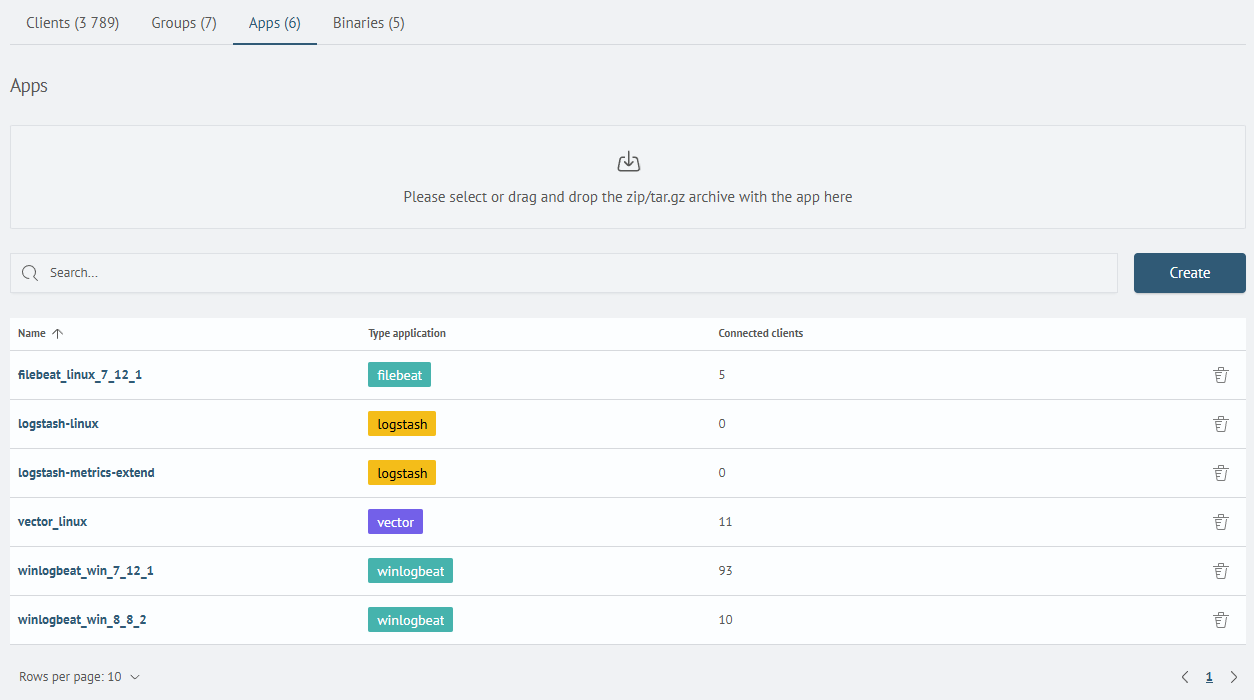
Apps
The Agent Management interface includes functionality for viewing application data, uploading applications from an archive, as well as creating, editing, and deleting applications. To open the Applications page in the SAF Beat Manager interface, navigate to: Main Menu - Settings - Smart Beat Management - Apps.
For a more user-friendly table format, the Applications tab features a search tool that allows quick access to the desired applications. The search bar is located at the top of the interface.:
Application Search
The Search field allows you to search for applications by their Name.
To use the search:
-
Enter a query into the
Searchfield -
Press
Enter
The search is case-insensitive and matches partial input.

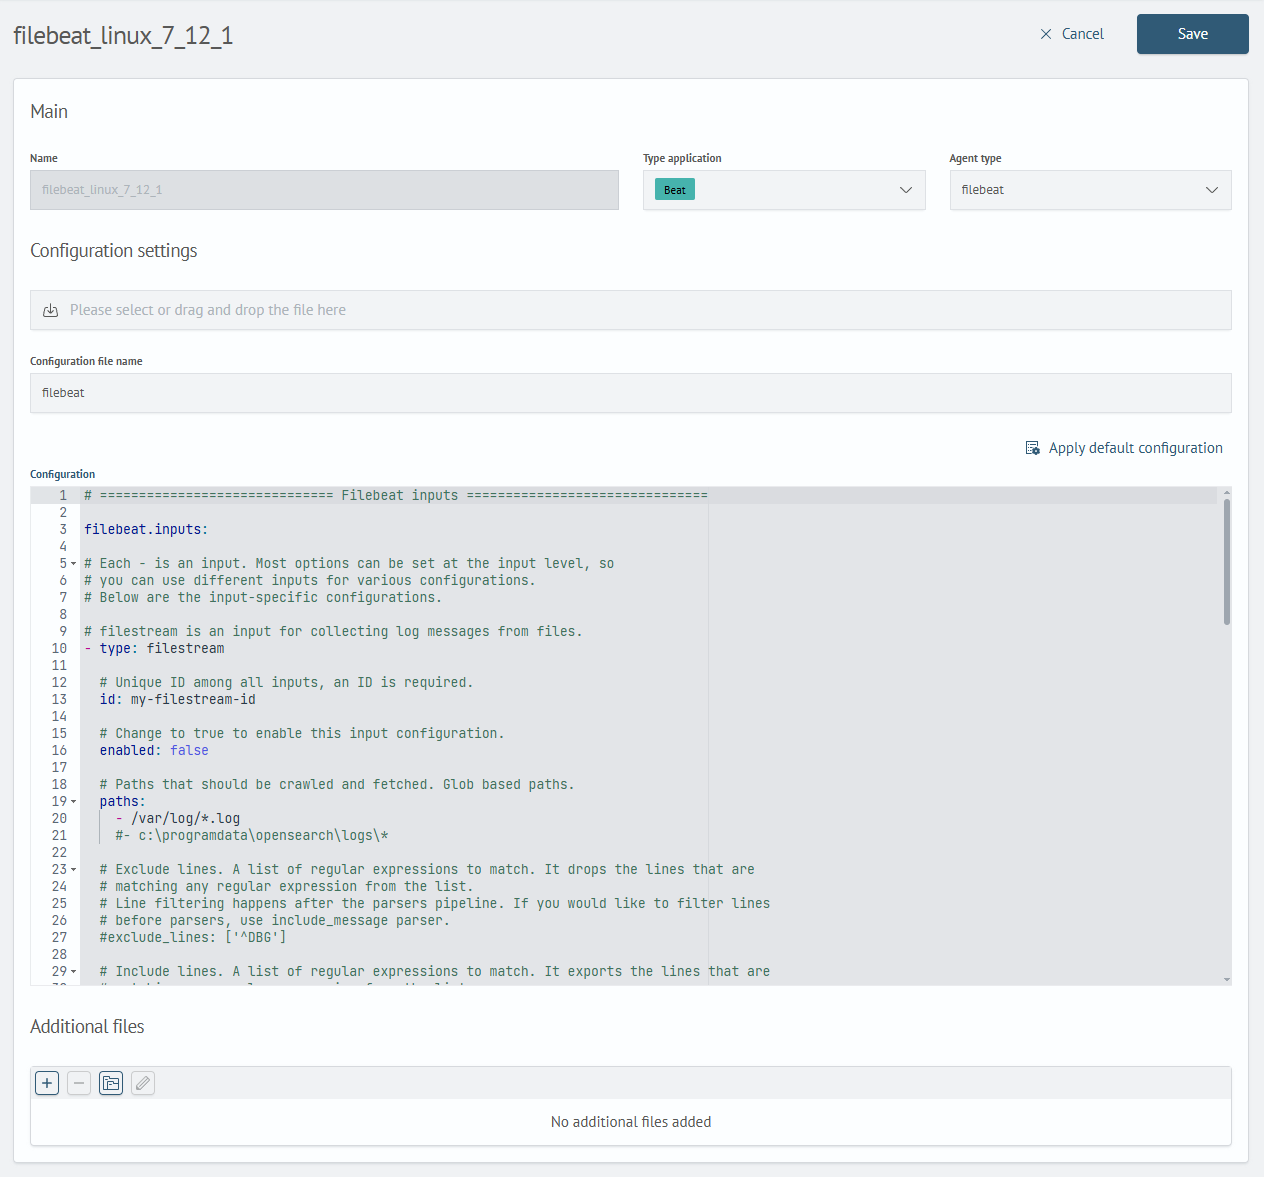
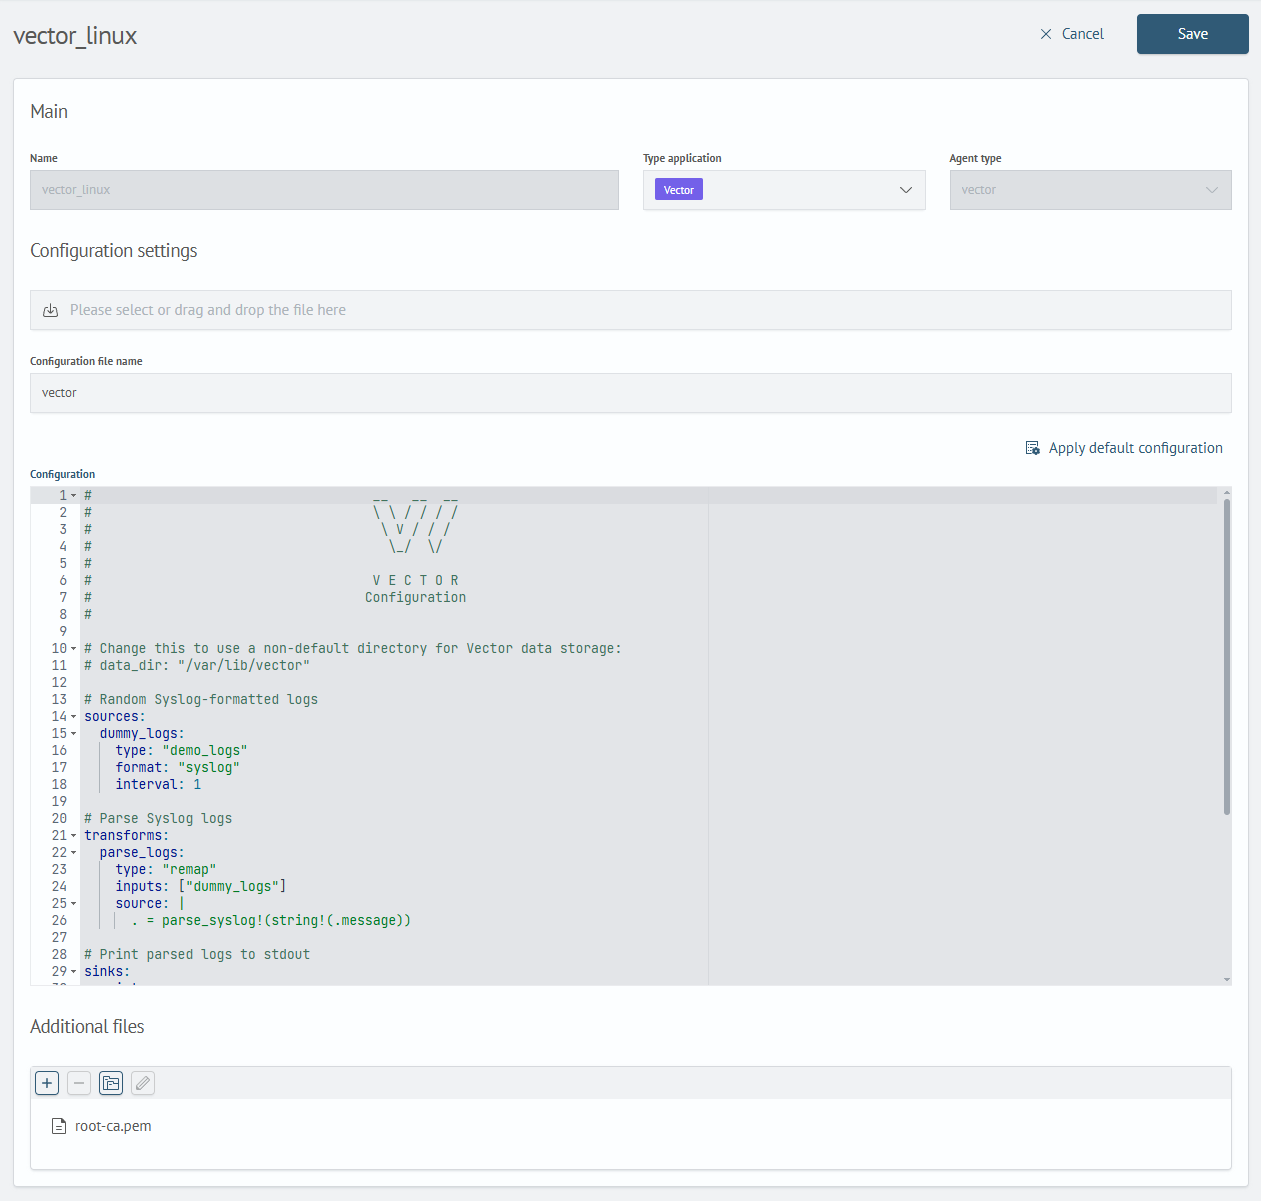
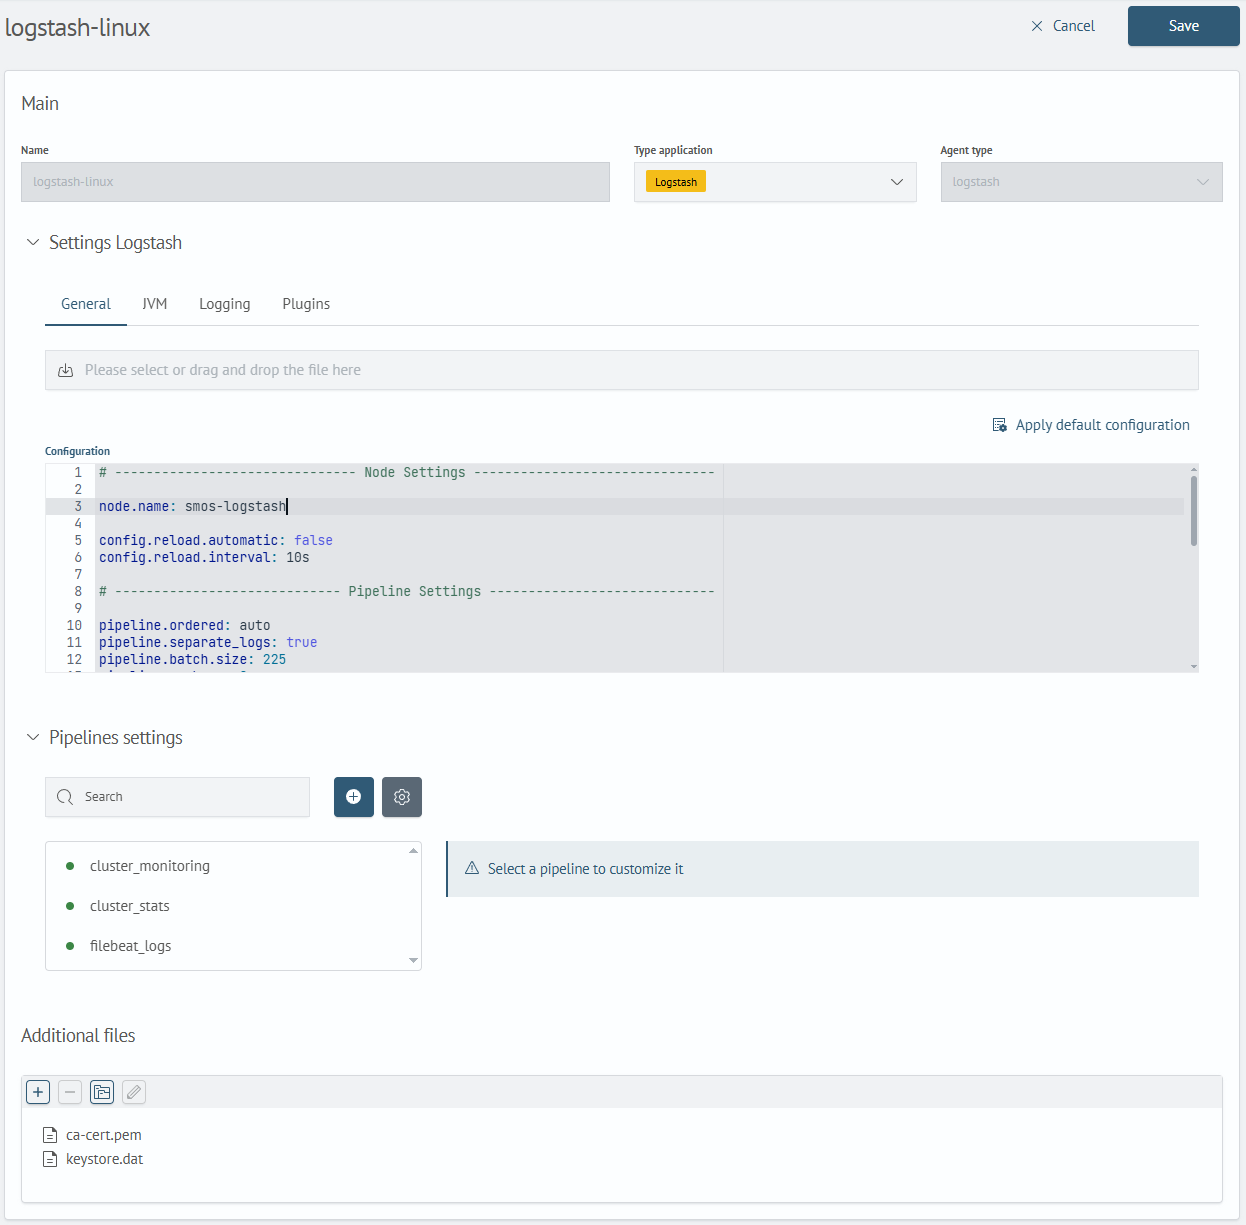
Application Details
To view detailed information about an application, select the corresponding row in the table and click on the application name. The card displays different information depending on the application type:
- Beat
- Vector
- Logstash
- Name – identifies the application
- Type application – specifies which agent group the application belongs
- Agent type – indicates the type of agent associated with the application
- Configuration file name – designates the configuration file
- Configuration – the content of the configuration file
- Additional files – a list of embedded files related to the application
- Name – identifies the application
- Type application – specifies which agent group the application belongs
- Agent type – indicates the type of agent associated with the application
- Settings Logstash - settings for running Logstash
- General - the
logstash.ymlfile - Logstash startup parameters - JVM - the
jvm.optionsfile - JVM settings - Logging - the
log4j2.propertiesfile - Logstash logging settings - Plugins - additional plugin archives for Logstash
- General - the
- Pipeline settings - configuration of pipelines to be loaded into Logstash
- Additional files – a list of embedded files related to the application
Working with the Logstash Application Type
Plugins
The plugin management interface allows you to select which plugins a specific Logstash application will use. These plugins are automatically installed before Logstash starts:
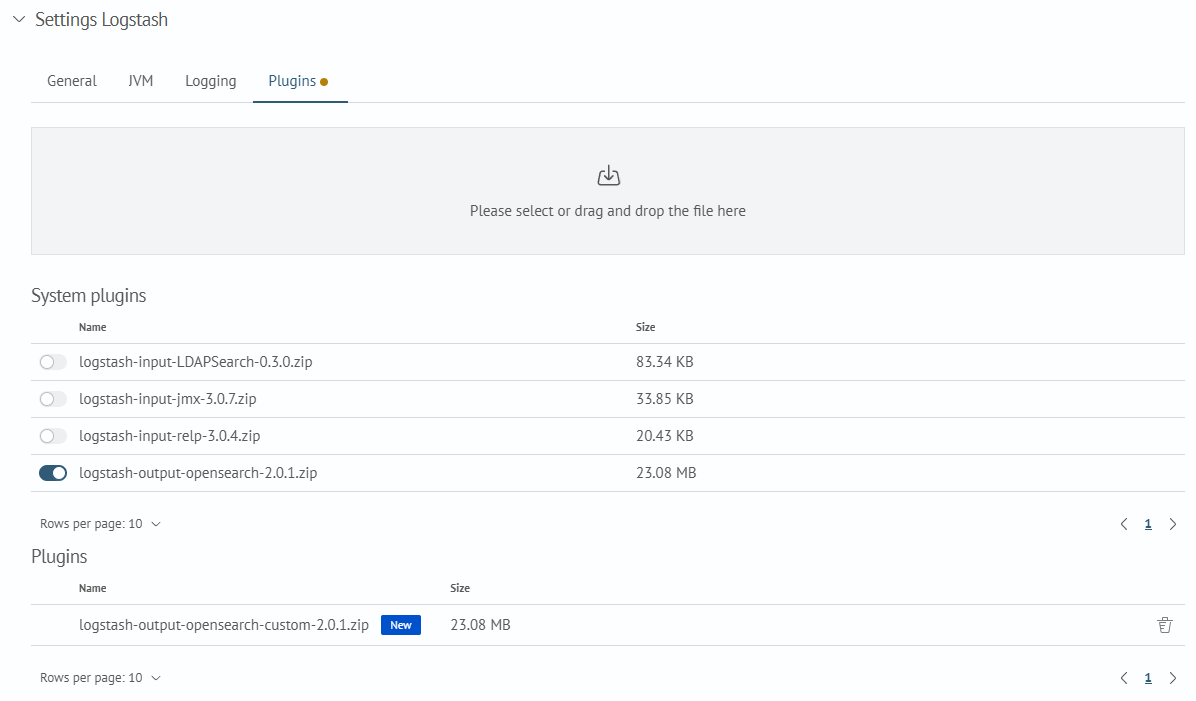
You can choose from SAF Beat Manager pre-installed system plugins System plugins, which are required for working with OpenSearch.
You can also upload your own custom plugins, which will be displayed in the Plugins section.
After the application is saved, the plugin files are placed in the plugins folder.
Pipeline Settings
The pipeline management interface allows you to prepare Logstash pipeline configurations and manage their entries in the pipeline.yml file, enabling or disabling them for execution in Logstash:
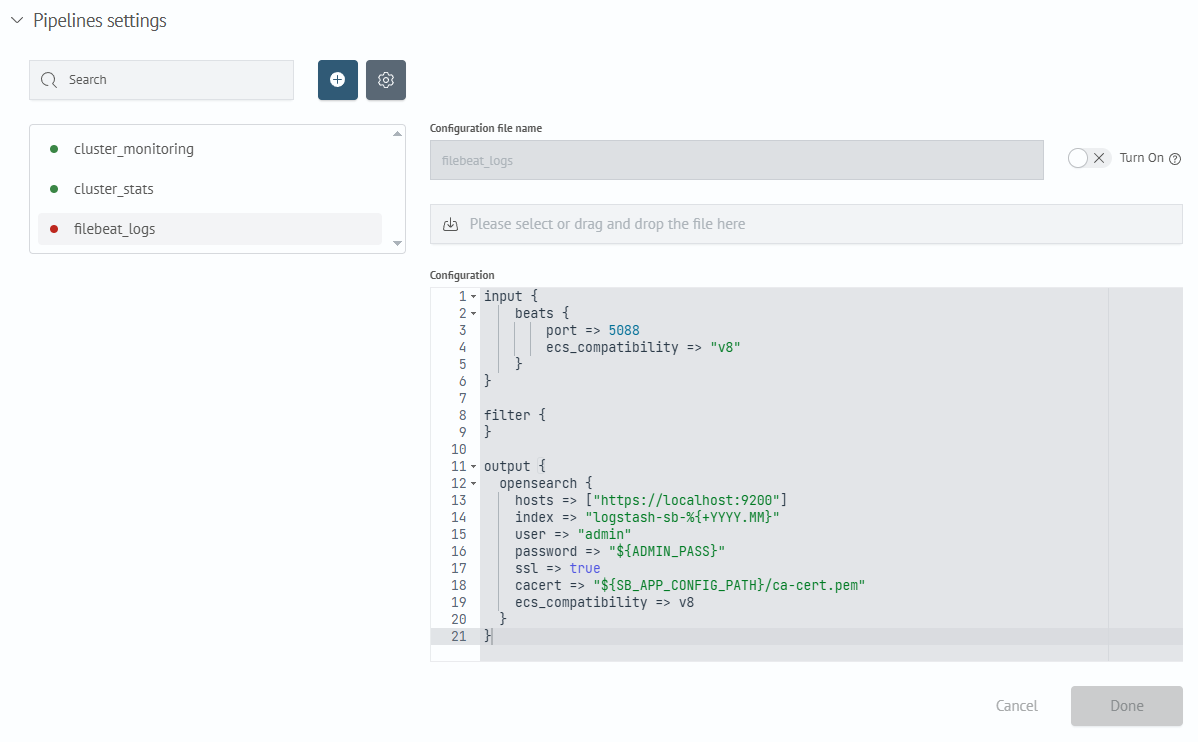
Pipeline configuration management includes creating a new pipeline configuration, importing from a file, editing, and deletion.
The Turn On switch allows you to control whether a pipeline configuration is included in the pipeline.yml file.
To configure the pipeline.yml, click the "gear" icon:
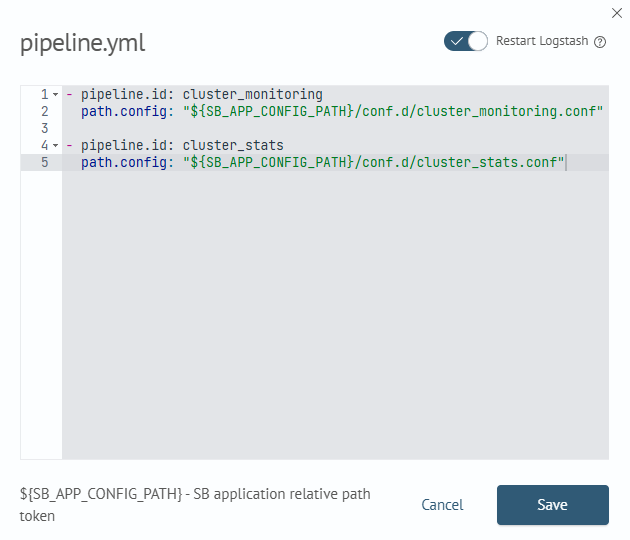
The modal window displays information about the enabled pipeline configurations.
To prevent Logstash from restarting when pipeline settings are modified, you can deactivate the Restart Logstash toggle switch.
After the application is saved, the pipeline configuration files are placed in the conf.d folder.
To add a keystore, you must upload the logstash.keystore file to the application's additional files.
Uploading an Application from an Archive
To upload an application from an archive via the SAF Beat Management interface:
- Prepare the application archive file and drag it into the upload area or click the upload area to select the archive from your file system:

- Click the
Uploadbutton:

The application archive file must meet the following criteria:
- archive extension must be
tar.gzorzip - the archive must contain only one root folder at its root level and no loose files
Additionally, for correct agent type detection and configuration file binding, the root folder must include a property.yml file with the following format:
property:
  config_name: <config_name>.yml
  app_type: <app_type>
  agent_type: <agent_type>
  is_disable_reload: bool
Where:
<config_name>— the configuration file name<app_type>— the application type<agent_type>— the agent type in lowercase<is_disable_reload>— the flag to disable Logstash restart when pipeline settings are modified
If the application property file is missing, the application's agent type and configuration file name will be derived from the application name prefix before the first _ character.
Creating an Application
To create an application using the SAF Beat Management interface:
- Click the
Createbutton to the right of the search bar:
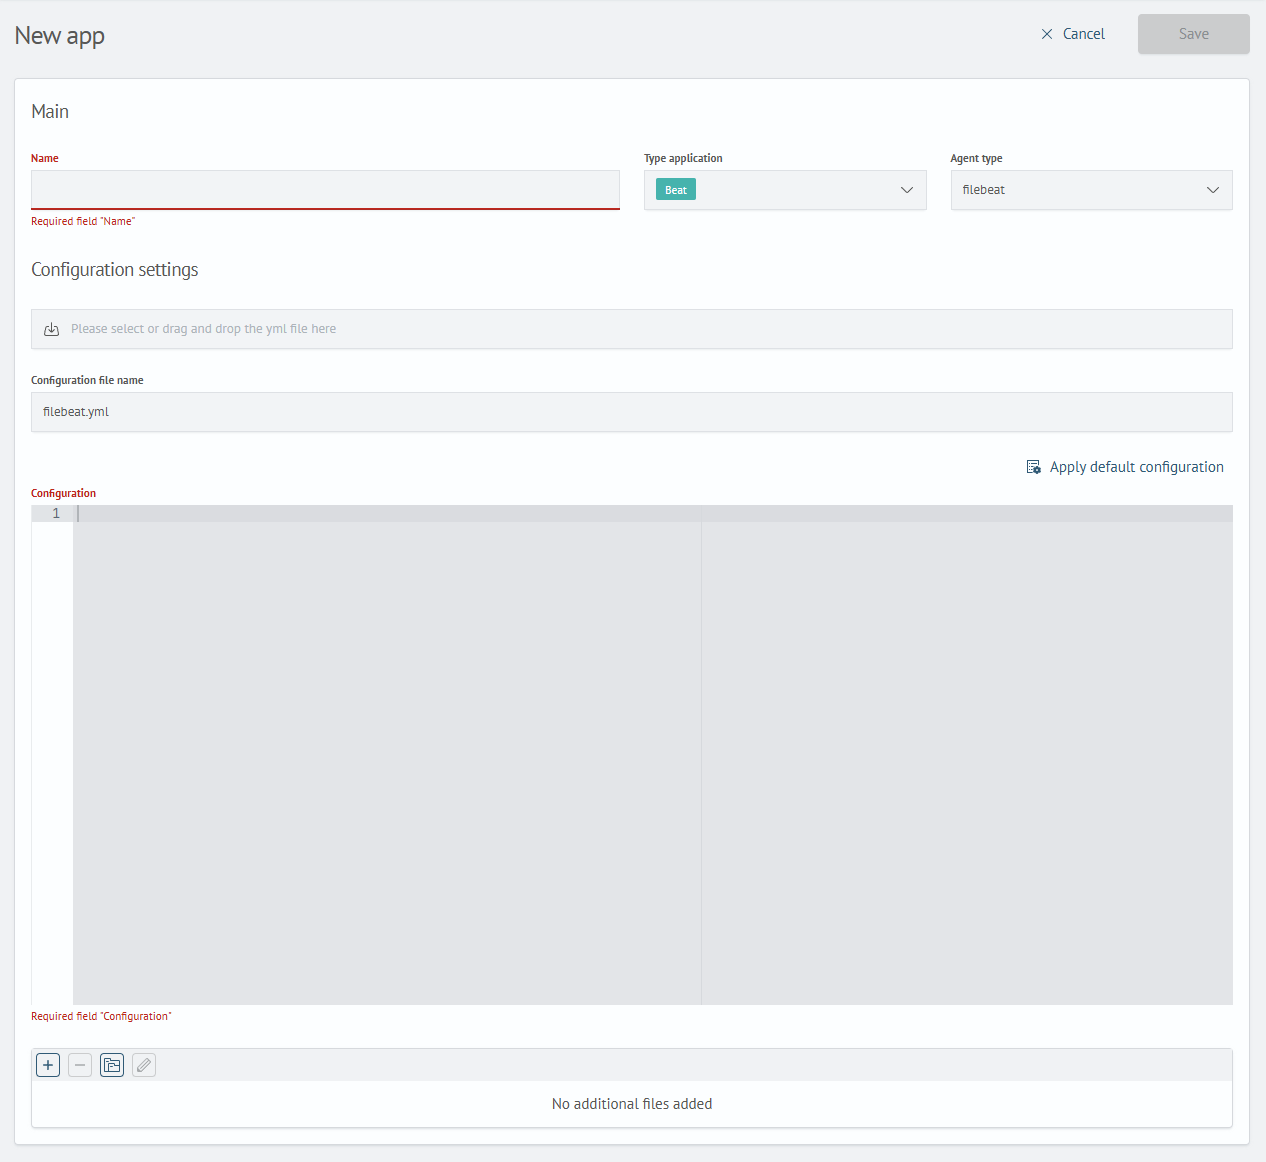
- Fill in the required fields; others can be filled if necessary depending on the application type:
- Beat
- Vector
- Logstash
Required fields:
NameAgent TypeConfiguration File NameConfiguration
Optional:
Additional Files
Required fields:
NameConfiguration File NameConfiguration
Optional:
Additional Files
Required fields:
Name- Logstash Settings
BasicJVMLogging
Optional:
- Logstash Settings
Plugins
Pipeline SettingsAdditional Files
Selecting an agent type from the dropdown enables the Apply default configuration button, which fills in the default config. This button is also available for the Basic, JVM, and Logging tabs within the Logstash settings.
Within configuration contents, you can use the ${SB_APP_CONFIG_PATH} token to specify relative paths to files in the SAF Beat application.
When the Vector application type is selected, the agent type field is automatically populated with the value vector. Similarly, for the Logstash application type, the agent type is set to logstash.
During edits, the Discard Changes button becomes available, which reverts the application card to its initial state.
- Click
Saveto add the new application to the system
Editing an Application
To edit an existing application in the SAF Beat Management interface:
-
Select the desired row and click on the application name:
-
Modify one or more of the following fields:
- Beat
- Vector
- Logstash
Agent TypeConfiguration File NameConfigurationAdditional Files
Configuration File NameConfigurationAdditional Files
- Logstash Settings
BasicJVMLoggingPlugins
Pipeline SettingsAdditional Files
When selecting an agent type from the dropdown list, the Apply Default Configuration button becomes enabled. This button populates the configuration field with default settings. This button is also available for the Basic, JVM, and Logging tabs within the Logstash settings.
Within configuration contents, you can use the ${SB_APP_CONFIG_PATH} token to specify relative paths to files in the SAF Beat application.
If the application type Vector is selected, the agent type field is automatically set to vector. Similarly, for the Logstash application type, the agent type is set to logstash.
While editing, the Discard Changes button appears - clicking it resets the application card to its original state.
Starting from SAF Beat Management version 4.3.0, for applications created through the SAF Beat management interface, a file containing information about the application properties, including the ElasticBeat agent type, will be stored.
For legacy applications created before v4.3.0 without a properties file, backward compatibility is maintained, but changing the agent type is not possible since it's inferred from the application name.
- Click
Saveto apply the changes
Deleting an Application
To delete an application via the SAF Beat Management interface:
-
Click the
Trashicon at the end of the application row -
Confirm deletion by clicking the
Deletebutton
